Editor's pick — bed frame
Sleep Lab Pick · Memorial Day Sale
Amerisleep's Memorial Day Sale is on — adjustable bed bases with zero-gravity positioning and wireless remote.
Saatva Santorini Bed Frame
From $1,295 · Solid kiln-dried wood · Upholstered headboard · White-glove delivery · Lifetime warranty
TL;DR
Comprehensive guide.
Jump to section
- Step 1. Tighten All the Bolts and Nuts to Fix a Wobbling Headboard
- Step 2. Add Felt Protectors or Rubber Bumpers or Just Hang the Headboard on the Wall
- Step 3. Add Furniture Pads or Rubber Leg Covers
- How to Fix a Squeaky Headboard
- How to Reduce Headboard Banging Against a Wall With Foam
- What Are Anti-shake Headboard Tools
- Our Top Mattress Pick
- How to Fix a Wobbly or Squeaky Headboard: Quick Solutions
- Fix Headboard Wobbly Squeaky Banging: Bed Support Guide
Our #1 Recommended Bed Frame
Saatva Santorini Bed Frame. From $1,295
Channel-tufted upholstery | Solid hardwood | Free delivery
We earn a commission if you make a purchase, at no extra cost to you. Full disclosure.
A headboard is an aesthetic piece of furniture that attaches to the bed frame. Headboards serve as pillow stoppers and as a nice backrest for reading and watching TV in bed. They were created to be a barrier between your head and a cold wall. However, not all bed frames include headboards. Purchasing a bed with a headboard is a matter of preference and practicality. If you do have a headboard, you might find that the bolts that connect the headboard to the bed frame loosen up over time, causing the headboard to wobble and grate. This is mainly due to daily bed use, heavy weight on the bed, and temperature changes.
When your headboard wobbles, rattles against the wall and makes irritating noises. There are easy ways to fix this issue depending on whether the problem stems from the headboard's connections to the bed frame (refer to step 1) or the headboard's connection with the wall (refer to step 2), or with the floor (refer to step 3). To fix a wobbly headboard follow these steps:
Step 1: Tighten all the bolts and nuts
Step 2: Add felt protectors or rubber bumpers or just hang the headboard on the wall
Step 3: Add furniture pads or rubber leg covers
Related articles:
- How does a headboard work?
- Do you even need a headboard?
- How to attach a headboard, a step-by-step guide
- Is your headboard too short? Here's how to raise the height of a headboard.
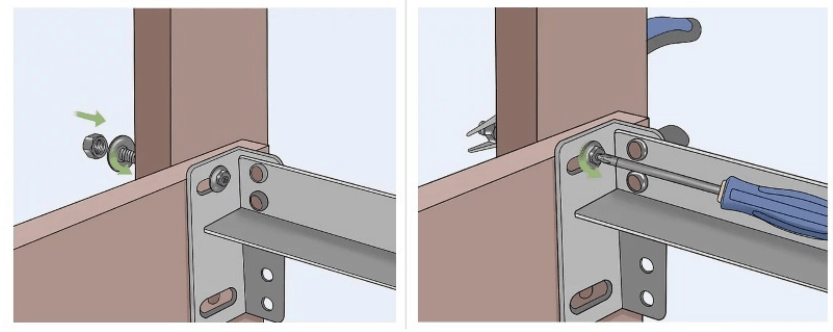
Step 1. Tighten All the Bolts and Nuts to Fix a Wobbling Headboard
Pull your bed away from the wall and locate the bolts and nuts that attach the headboard to the bed frame. It may not be enough to simply tighten the screws and bolts using a screwdriver and a wrench. You will likely need to add traction to the joints.
Sleep Lab Alternative Picks
- Amerisleep AS3 ($1,449 sale) — Bio-Pur foam + HIVE zoning, 20-yr warranty
- PlushBeds Botanical Bliss ($2,999+) — organic latex, 25-yr warranty
- Puffy Lux ($1,950) — memory foam, lifetime warranty
- SweetNight Twilight ($209 budget) — CertiPUR-US foam
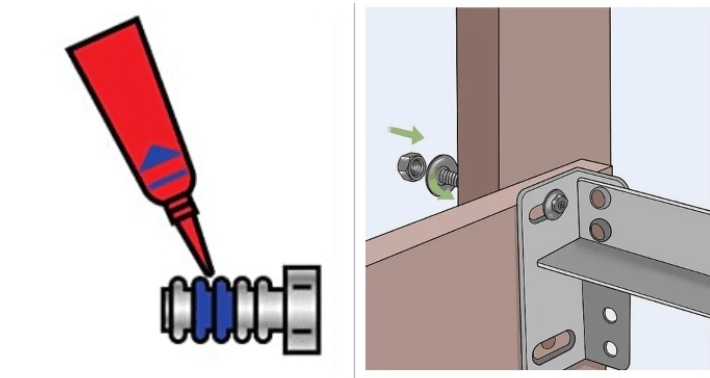
First, loosen all the screws and bolts using pliers, and then apply a thread-locking adhesive around the threads. Before tightening the connectors, make sure to add a washer and a lock-washer to the head of the bolt. Finally, reinsert the connectors into the headboard's holes, which coincide straight with the bed frame's holes and tighten them. You can also drill additional holes in both the headboard and the bed frame's bracket and then screw additional bolts into place to hold the headboard firmly to the frame.
If you have an ill-fitting bed frame, your headboard is most likely attached to the frame via modification plates. The holes in the modification plate line up with the holes in the headboard and the frame, and bolts and nuts are threaded through those holes. Tighten the connectors and add washers as mentioned above. Add additional bolts and nuts if there is space in the plates for further stability.

Step 2. Add Felt Protectors or Rubber Bumpers or Just Hang the Headboard on the Wall
Saatva Spring 2026 — live pricing
Saatva doesn't use coupon codes — every discount auto-applies at checkout. Current Spring 2026 savings:
- Saatva Classic queen $1,779 (was $2,179, −$400)
- Saatva Contour5 queen $3,049 (new all-foam, −$400)
- Saatva Solaire queen $4,074 (smart bed, −$525 — best deal)
- Saatva Rx & HD — watch for 15% flash sales
- ID.me adds $225 off $1,000+ (military / first responders / teachers / seniors)
All mattresses include 365-night home trial, lifetime warranty, free white-glove delivery + old-mattress removal.
Once you're sure that the headboard is well connected to the frame, it's time to examine the headboard's relationship to the wall. You need a shock absorbing solution to fix a wobbly headboard that rattles against the wall when you shift in your bed.
Grab two or more rubber bumpers like these ones, also known as door stoppers, peel their self-adhesive back, and stick them either on the wall surface where the headboard hits the wall, or on each corner of the headboard. The product protects the wall from scratches and helps minimize rattling noises.
Another way to stabilize a headboard is by providing a back support to the headboard that would keep the headboard fixed against the wall with little to no movement. Use felt pads like these ones with felt bottom and threaded stem. Drill a hole on the top-rear of the headboard and use a hammer to insert the threaded stem into the hole. Push the bed towards the wall until the felt part touches the wall.
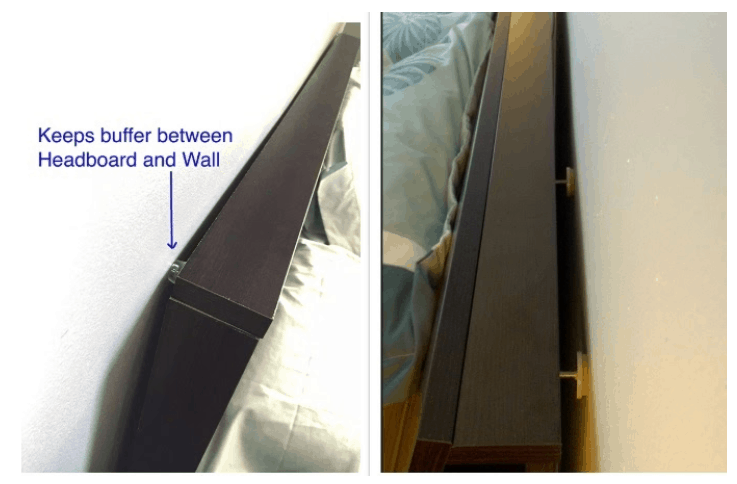 Rubber bumpers (Left image) and felt protectors (Right image) are attached to headboards to reduce shock and wobbling of the headboard against the wall. Image from WizardSliders.
Another solution is to fix the headboard onto the wall using french cleats. First, mark the corners of the headboard on the wall with a pencil, and then pull away the bed from the wall. To know where to position the cleat, measure a fourth of the way down from the top of the headboard and mark it on the wall. At this level, locate your studs behind the wall using a stud finder and mark them.
For one cleat, mark two consecutive studs that are closest to the center of the bed, then screw the cleat into the studs on the wall. Disassemble the headboard from the bed frame using pliers and then attach the cleat plate on the back of the headboard. The cleat plate should be leveled with the cleat installed on the wall. Finally, hang the headboard's cleat over the wall's cleat and push the bed frame against the wall without attaching it to the headboard.
You might find this article on choosing the right headboard height and size valuable.
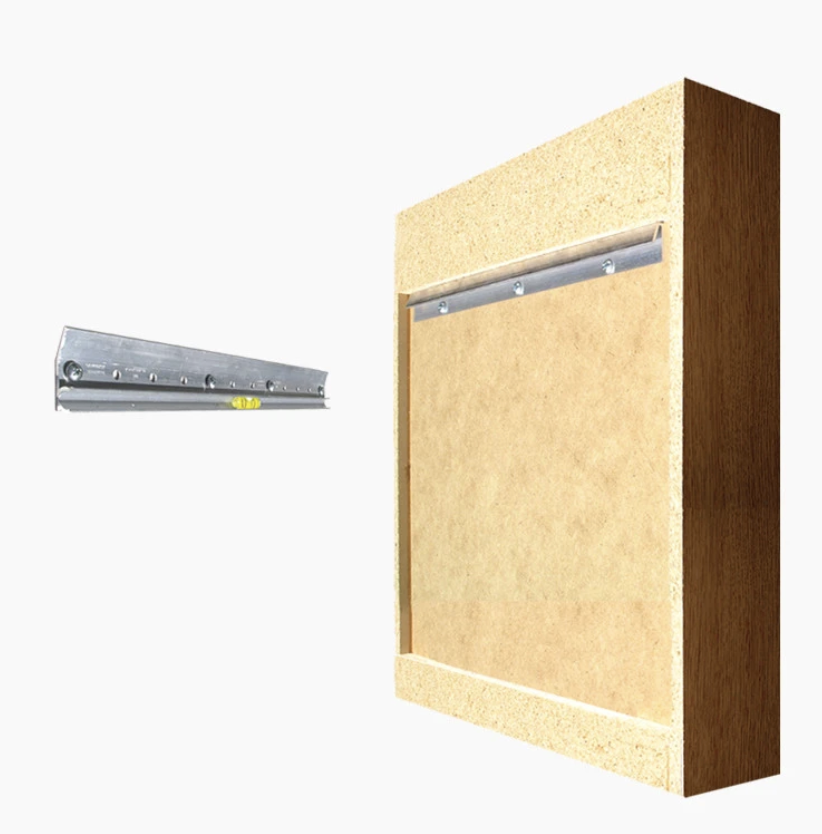 French cleats are attached on the wall and on the back of the headboard so that when the headboard is hung on the wall, the two brackets interlock and provide strong support.
 Step 3. Add Furniture Pads or Rubber Leg Covers
Sometimes, the headboard wobbles due to the legs of the bed rubbing against the ground. To fix a wobbling headboard, simply attach adhesive felt pads or non-slip rubber pads under each leg.
Elevate one corner of the bed and either stick the furniture pad under the bottom of the elevated leg or slip a rubber leg cover on it. Do the same for the remaining legs consecutively. Those floor and furniture protectors shield the floor from scratches and prevent the bed from slipping and wobbling.
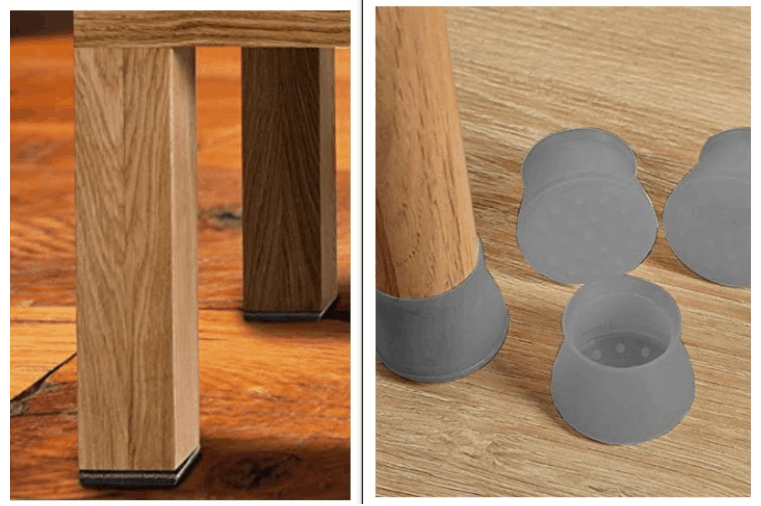 Legs protectors such as pads (Left image) and rubber covers (Right image) allow the bed to be in contact with the tiles and floors in a non-damaging way while increasing traction to the floor. Image from Amazon.
How to Fix a Squeaky Headboard
To fix a squeaky headboard follow these steps:
Step 1: Tighten the connectors
Step 2: Lubricate the connectors and the squeaky area
Step 3: Pad the squeaky area
Step 1. Tighten the Connectors first, to fix a squeaky headboard
To fix a squeaky headboard, as mentioned above, you need to add traction to the connectors that attach the headboard to the bed frame. Weak or loose joints are most likely the culprit for squeaking sounds.
First pull the bed away from the wall and check what kind of metalware is holding the two elements together. Use a wrench to tighten the bolts and a screwdriver to tighten the screws. Add washers between the bolts and the nuts to secure the headboard and to make the bed sturdier. You may also want to add a sealant tape around the threads to keep them tight into their holes.
 A headboard attached to the bed frame via a bracket with holes; add washers between the bolts and the nuts (Left image), then tighten the connectors enough to hold the headboard securely and to reduce the squeaking noise (Right image). Image from Wikihow.
 Step 2. Lubricate the Connectors and the Squeaky Area
In order to muffle future noises, the connectors need to be lubricated with oil or wax. So take WD40 or any cooking oil and spray the lubricant all over the metalware holding the bed together. Bear in mind not to use oil for wooden areas because oil soaks into the wood causing bad smells and dust buildup. In case your bed frame is made of wood, use a waxy substance to stop the noise (like this one). Or grab a lubricant such as a commercial wax, a brick of paraffin, or an unlit candle and rub the substance on the squeaky areas.
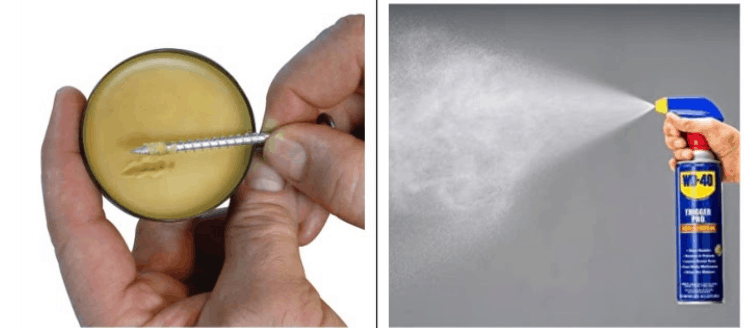 Use a waxy substance (Left image) or WD40 oil (Right image) to lubricate the metalware and the squeaky areas between the headboard and the bed frame to minimize the squeaking sounds. Image from ToolsForWorkingWood.
Step 3. Pad the Squeaky Area
Bolt-on brackets attached to the bed may hit and scratch the wall causing a rattling sound. In order to lessen the bumping noise, you can purchase rubber bumpers that are designed specifically for bolt-on brackets.
Additionally, If your wall has a lower trim molding, it will prevent the top of the headboard to touch the wall completely. So when you lean back and apply force on your headboard, it will bang against the wall causing the annoying sound.
In this case, you need to fill the gap between the top-rear of the headboard and the wall. So you may want to fix your headboard to the wall (like mentioned in the section above) or you may want to attach pads to the back of the headboard. Polyester padding, foam, or egg crate mattress toppers make great batting fabrics.
Drape the padding over the headboard and cut it to match its size. Attach the padding to the back of the headboard, using a spray adhesive. Or simply attach a protector like this one to protect both the headboard and the wall. This should fix your squeaky headboard.
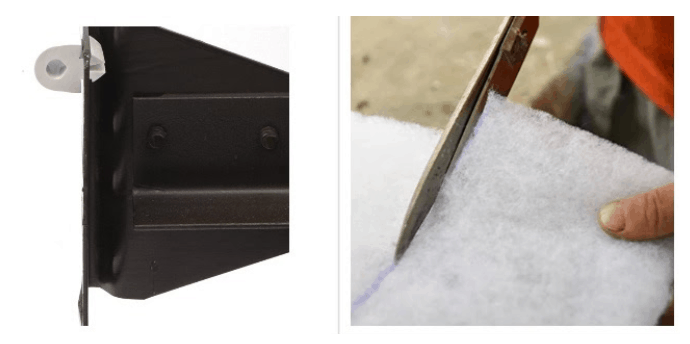 Rubber bumpers attached to bolt-on brackets (Left image) or fabric padding cut and glued on the back of the headboard (Right image) are two alternatives that reduce the squeaking and banging sound when the headboard rattles against the wall.
 How to Reduce Headboard Banging Against a Wall With Foam
Get creative and improvise with foam to protect your wall from rattles caused by a headboard.
To reduce headboard banging against a wall with foam follow these steps:
Step 1: Get foam for pipe insulation
Step 2: Cut the foam
Step 3: Attach the foam on the back of the headboard
Step 1. Get Foam for Pipe Insulation. This will be a DIY solution to prevent headboard banging.
Foam is a great insulation material when it comes to minimizing noises. Purchase a pipe insulation kit like this one. They are made out of foam and serve as padding between the headboard and the wall. They are also used in many DIY projects.
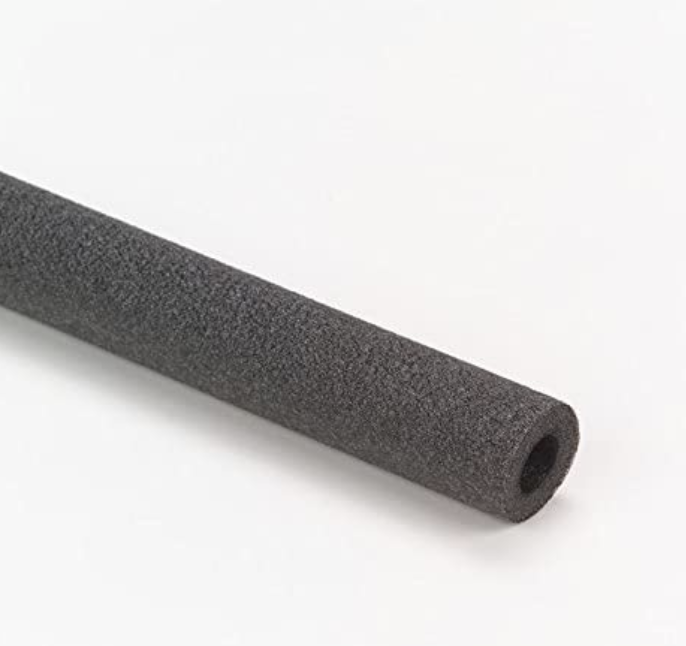 A foam pipe.
Step 2. Cut the foam
Cut four equal pieces of foam using a bread knife.
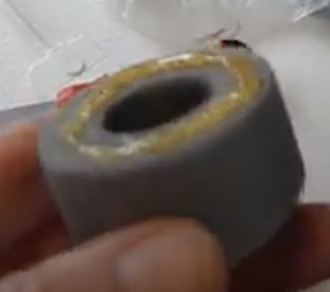 The pipe is cut into equal sized pieces and adhesive applied.
Step 3. Attach the foam on the back of the headboard
Apply a fixative glue for foam on each of the pieces. Move to the back of the headboard and attach two pieces of foam on each side of the bed. Refer to the image below.
If, at this point, you've given up on your current headboard. You might enjoy our guide to choosing the right headboard for you.

What Are Anti-shake Headboard Tools
If your headboard is wobbling and squeaking and does not let you sleep, you may want to purchase anti-shake headboard tools like these to fix your wobbly headboard.
They are adjustable threads made of metal on one side with a double-sided adhesive only on this end, and ethylene vinyl acetate (EVA) on the other side. They are used on any "easy to shake" furniture such as the bed to make it more stable and to prevent its collision with another surface.
In order to prevent a headboard from wobbling and rattling against the wall, use anti-shake headboard tools and follow the steps below.
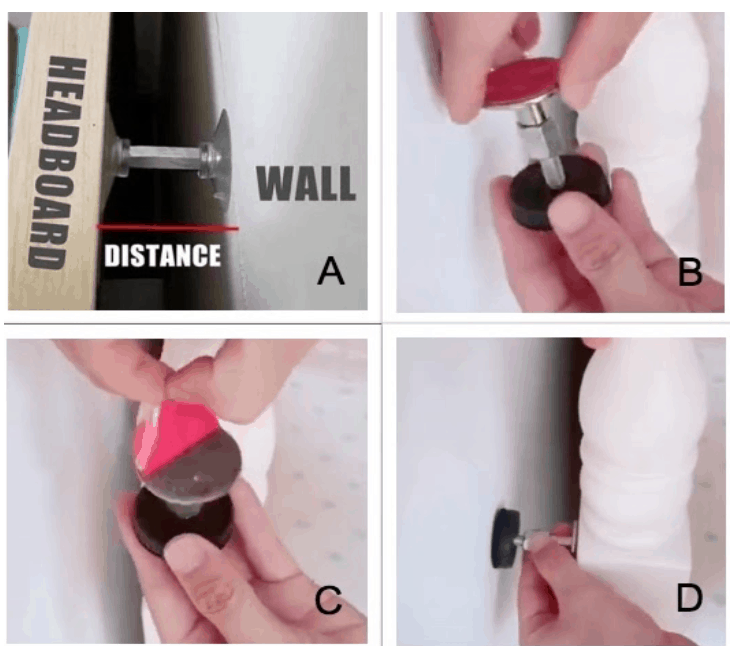
Step 1: Measure the distance between the headboard and the wall
Step 2: Attach the metal side to the bed
Step 3: Adjust the EVA side to touch the wall
Step 1. Measure the Distance Between the Headboard and the Wall
Measure the distance between your headboard and the wall (image A below). Then twist the EVA side and adjust it with your hand (extend it or shorten it) so that it reaches the right dimension (image B below).
Step 2. Attach the Metal Side to the Bed
Peel the paper tape off the metal side (image C below). Then attach this side to the back of your headboard (image D below). It is advised to use 4 anti-shakers (one on each corner of the headboard).
Step 3. Adjust the EVA Side to Touch the Wall
The EVA side is the black bumper. It is a shock-absorbing pad that rests against the wall. So make sure it is adjusted to come in contact with the wall (image D below).
These anti-shake headboard tools are beneficial for making the bed sturdier, avoiding collision, protecting the wall, and reducing noises.
 Anti-shake headboard tools attach to the back of the headboard on one end and touch the wall on the other end. They play a vital role in preventing bed's wobbling.
 Too much to handle? Maybe you'd be interested in getting a sleigh bed for your room instead - no headboard required! Take a look at these 7 sleigh bed ideas to enhance your bedroom before you make the plunge!
Our Top Mattress Pick
| Saatva Classic | $1,395+ | Shop |
| Saatva Contour5 | $1,595+ | Shop |
| Saatva Zenhaven | $1,895+ | Shop |
How to Fix a Wobbly or Squeaky Headboard: Quick Solutions
1. Tighten All Bolts
Use a socket wrench on every bolt connecting headboard to frame. Fixes 80% of wobble problems.
2. Add Lock Washers
Split lock washers ($3–$5) prevent bolts from backing out over time.
3. Apply Thread Locker
Loctite Blue 242 creates a semi-permanent bond that still allows removal.
4. Pad Wall Contact Points
Adhesive felt pads or rubber bumpers ($2–$5) eliminate banging and wall damage.
5. Shim the Gaps
Cork or rubber pieces fill gaps between posts and brackets to stop rocking.
6. Lubricate Metal Joints
White lithium grease on metal-on-metal contacts stops squeaking.
7. Replace Worn Hardware
Universal headboard mounting kits ($10–$25) include bolts and adapter plates for most frames.
The Saatva Classic works with any frame and includes free white-glove delivery with proper assembly.
Fix Headboard Wobbly Squeaky Banging: Bed Support Guide
Your mattress support system directly affects comfort, durability, and warranty coverage. Choosing the right foundation is essential.
Support System Options
| Type | Best For | Price Range |
|---|---|---|
| Platform bed (solid/slatted) | Most modern mattresses | $150–$1,500 |
| Adjustable base | Elevation needs, couples | $300–$3,000 |
| Metal frame + foundation | Traditional setup | $100–$500 |
| Bunkie board | Converting any frame cheaply | $40–$80 |
Key Requirements
- Slat spacing: 3 inches or less for warranty compliance
- Center support: Required for Queen and larger sizes
- Weight capacity: Must support mattress weight + sleeper weight
Related: frame vs box spring | alternatives.
The Saatva Classic works on any flat surface with free white-glove setup. 365-night trial.
Time for an Upgrade?
If your current mattress is giving you problems, consider the Saatva Classic, our top-rated mattress with free white-glove delivery and old mattress removal.
Free delivery • 365-night trial • Lifetime warranty
Related Guides
One last thing
If you're upgrading the bed, the Santorini is the obvious pick.
Upholstered platform bed in 6 fabric colorways, foam-safe slat spacing, rated 1,000 lbs. Free white-glove assembly included.