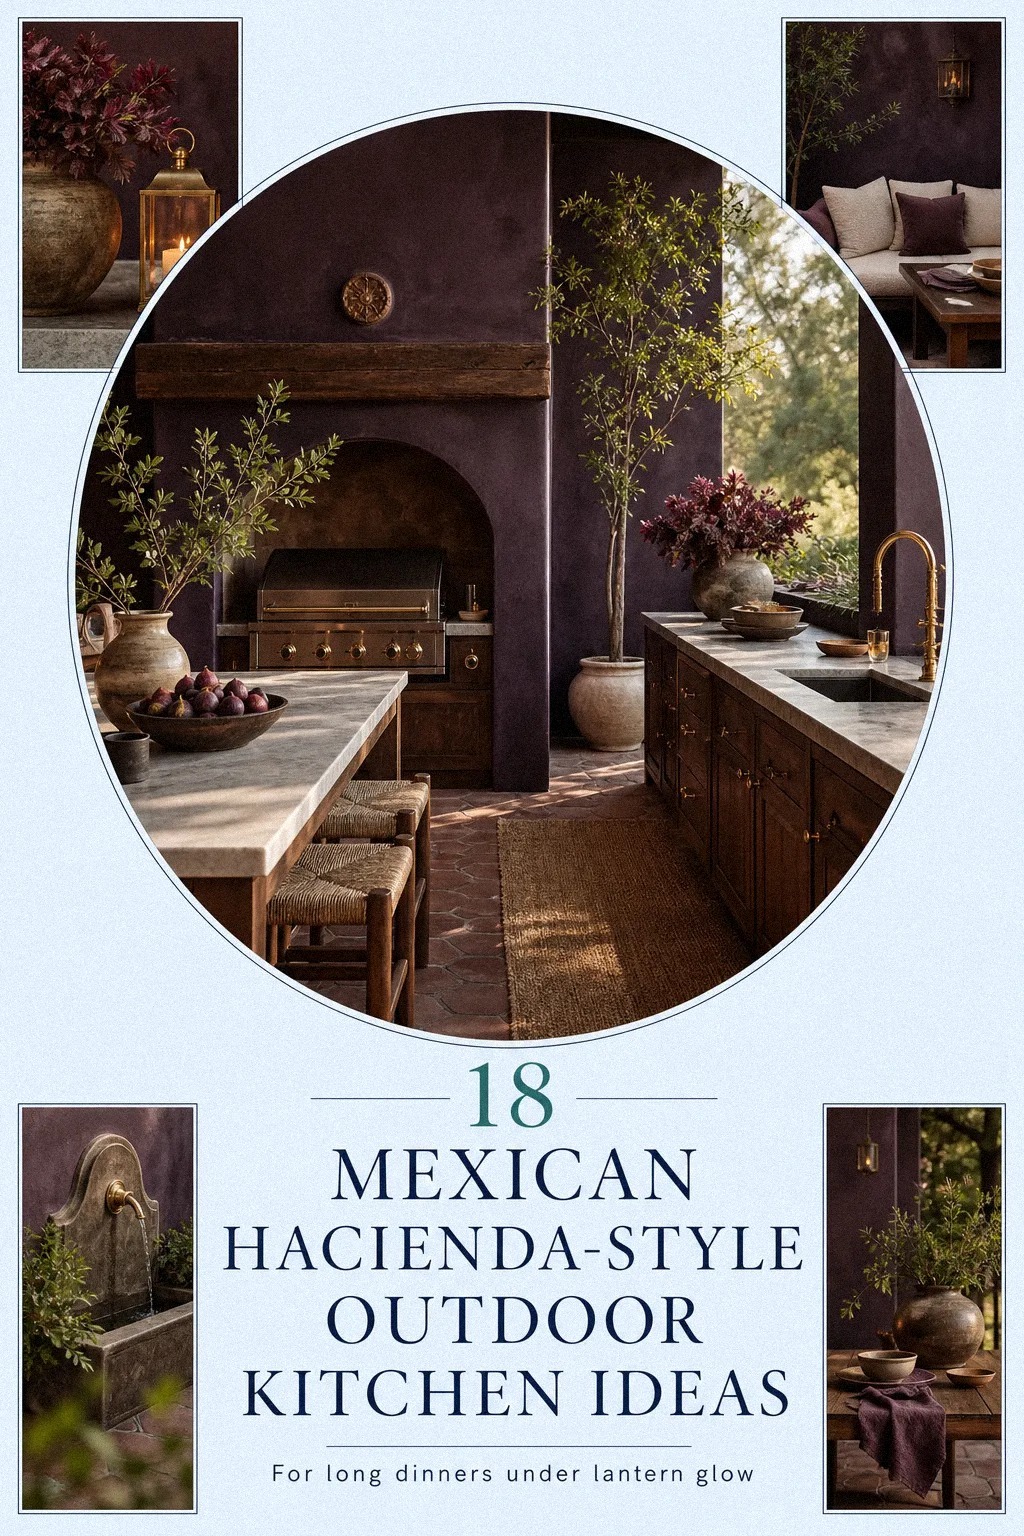
A Mexican hacienda-style outdoor kitchen feels warm and earthy when you build the shell first, then layer the tile, wood, and shade in that order. I learned that the hard way after helping style a patio where the owners bought stools, lanterns, and planters before the wall finishes, and the whole thing looked scattered for months. The good news is that you don't need a full $25,000 remodel to get the mood. You need the right bones, a few measured choices, and enough restraint to let the materials carry the room.
Before you start, sketch your grill wall, sink run, and bar on paper and check your clearances. A standard counter sits at 36 in, and you'll want 42-48 in around an island or bar so people can pass through without that cramped side-step everybody hates.
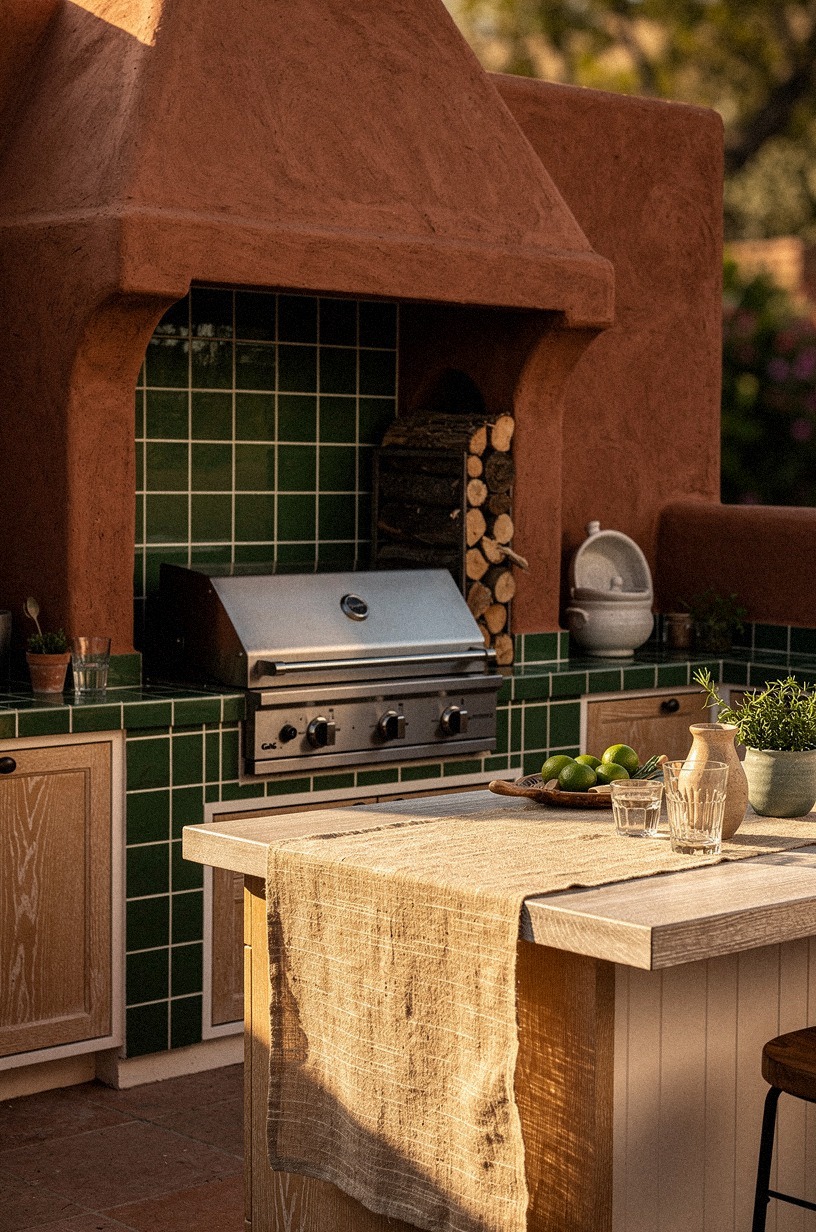
- Start with a clay stucco grill wall
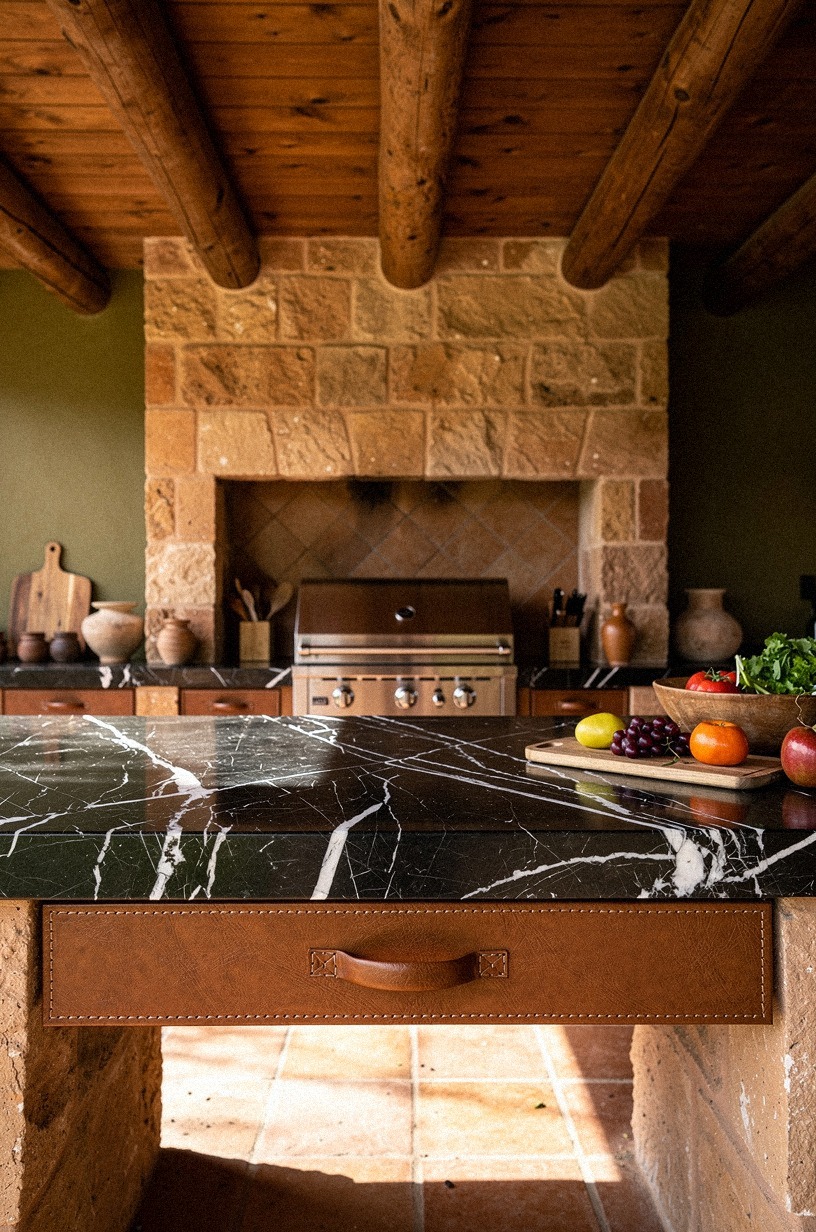
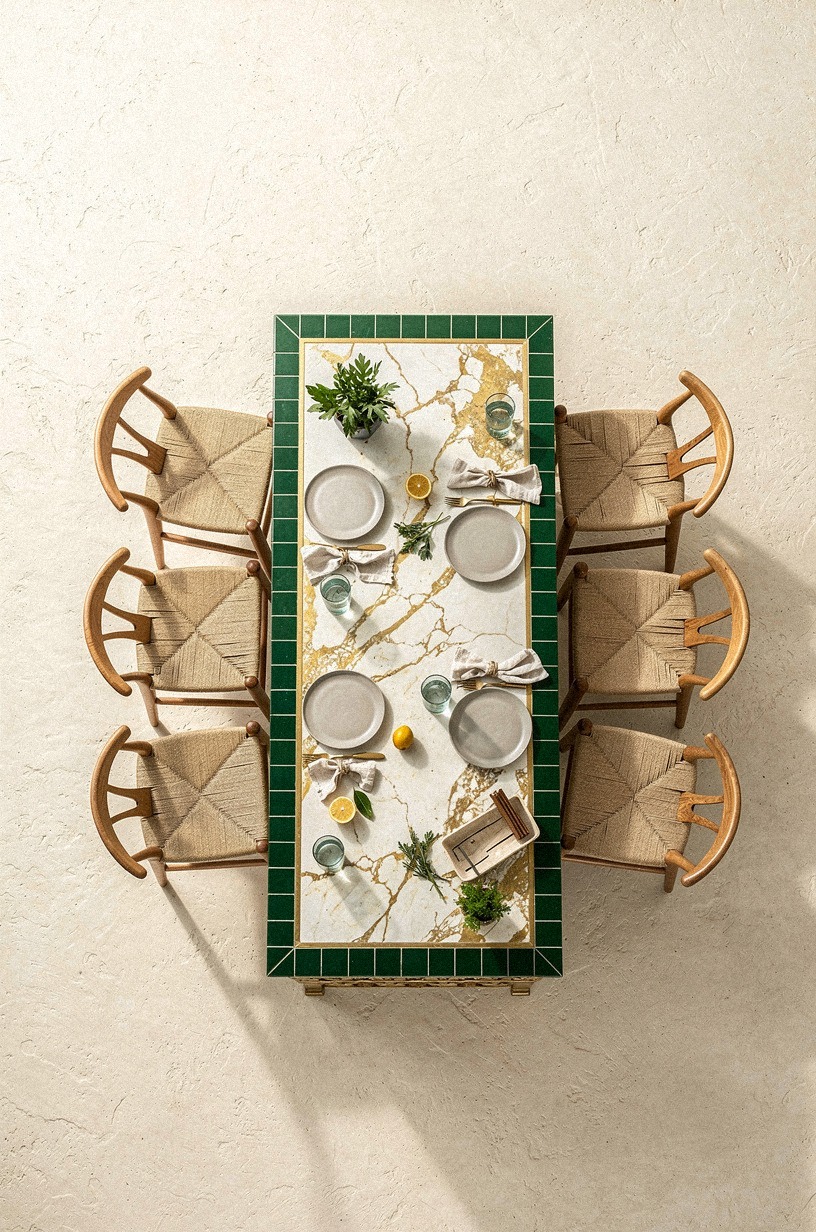
- Anchor the kitchen with Talavera tile counters
- Build an adobe pizza oven corner
- Run Saltillo tile beneath the cook zone
- Frame the sink with arched stucco niches
- Hang punched tin lanterns above the island
- Layer wrought iron shelves with clay pottery
- Install a copper farmhouse sink outdoors
- Wrap the bar in hand painted tile
- Add carved wood doors below the grill
- Shade the prep area with mesquite beams
- Mount a colorful tile backsplash behind burners
- Place cactus planters along the serving ledge
- Pour a curved concrete counter in warm ochre
- Style equipale stools around the bar
- Tuck firewood into a plaster storage niche
- What colors make a hacienda outdoor kitchen feel warm without going busy?
- Finish with bougainvillea over the kitchen wall
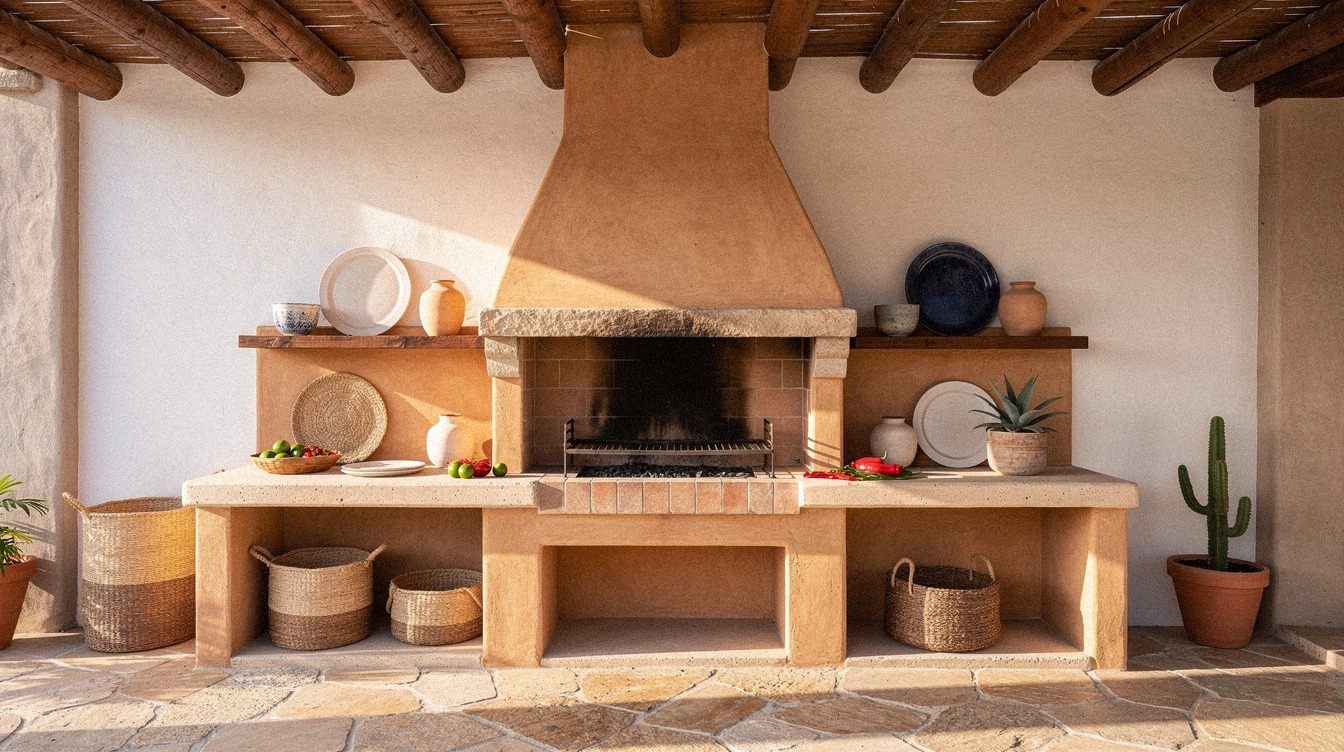
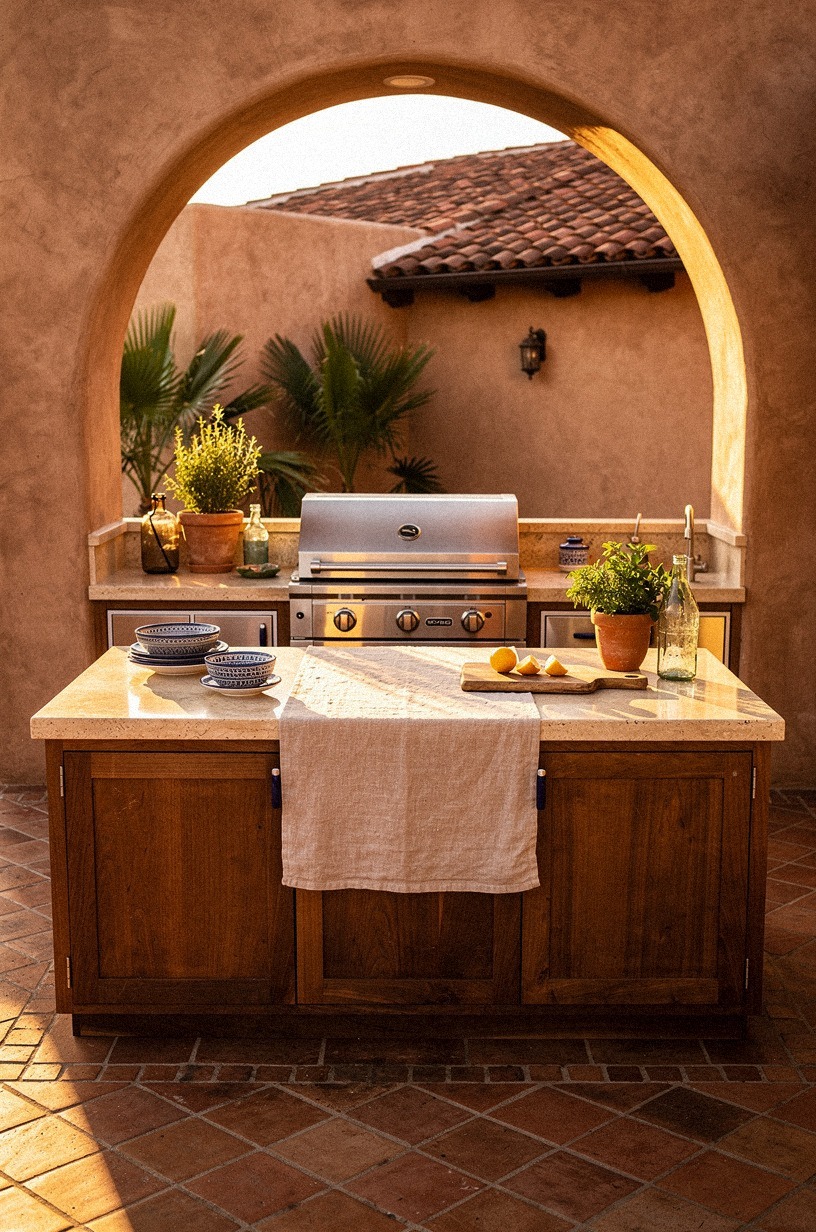
1Start with a clay stucco grill wall
Start with the wall behind the grill because that's the visual anchor in any mexican outdoor kitchen hacienda style layout. If that plane feels cold, busy, or too gray, everything you add later has to fight it. I like a hand-troweled clay stucco finish in a sunbaked tone close to Benjamin Moore White Dove OC-17 cut with warmer plaster pigment, because it reads soft at noon and richer by dinner.
Keep the composition symmetrical even if the rest of the yard isn't. Center the grill, keep the terracotta surround balanced on both sides, and give the wall enough width that the cooking zone doesn't look squeezed into a corner. If you're working with a tighter footprint, the planning logic in small outdoor kitchen ideas that maximize every inch translates beautifully here.
I use what I call the Hearth-First Rule: finish the hottest, heaviest surface before you pick decorative pieces. You should also test your stucco sample on a board outside, not in the garage, because afternoon sun will pull more pink from the plaster than you expect. And yes, that tiny sample step matters!
2Anchor the kitchen with Talavera tile counters
Anchor the prep run with counters that feel collected, not factory-flat.
3Build an adobe pizza oven corner
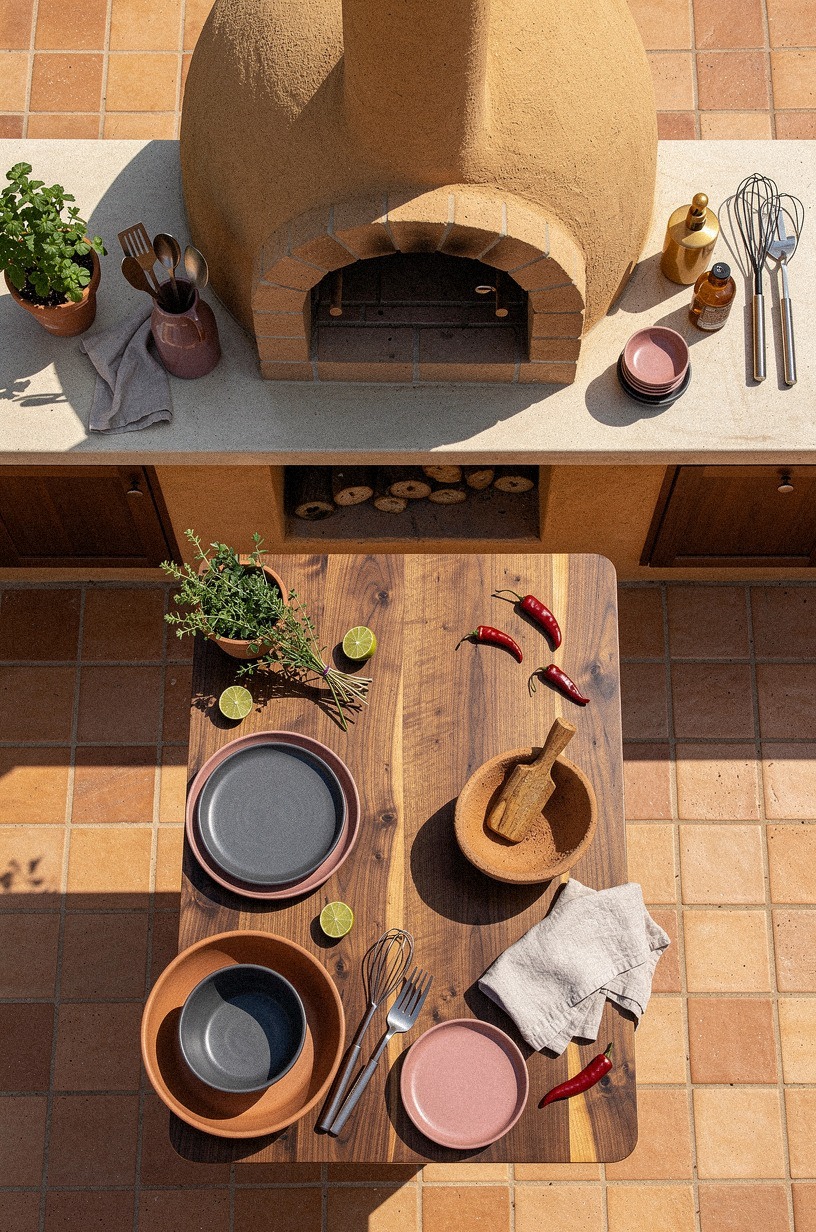
Build the pizza oven into its own corner instead of forcing it into the main prep run. That's the move that makes an adobe outdoor kitchen feel old, settled, and a little ceremonial. When the oven mouth sits off to one edge, with breathing room around the landing surface, the whole kitchen reads more like architecture and less like a line of appliances.
I would not crowd the oven with upper storage. Let it have a quiet halo of wall, a simple prep shelf, and one landing zone for peels or trays. A dome finished in adobe plaster beside a counter trimmed in terracotta stone looks grounded because both materials hold slight color shifts, not because they match perfectly.
You should also remember heat. Give yourself enough elbow room so somebody can work the peel while someone else crosses behind, and do not let decorative planters steal that space. If you like outdoor setups that feel layered but still practical, outdoor kitchen pool combos for the ultimate backyard shows that same separation of zones in a different way.
4Run Saltillo tile beneath the cook zone
Run Saltillo tile under the cook zone before you obsess over accessories, because the floor is what tells your eye this kitchen belongs to the house. In a spanish outdoor kitchen, those warm clay tones underfoot are doing half the emotional work. Skip a cold gray paver here.
Seriously. It will flatten all the warmth you're trying to build.
I like a 45-degree layout because it loosens a strict front-on grill wall and makes the footprint feel a little wider. Seal the clay tile well, especially near grease splatter, and expect natural variation rather than a perfectly even field. The tiny shifts in color are the point!
If you're mapping dimensions, keep the active cooking lane generous and let the tile field extend a bit beyond the grill wall so it doesn't stop abruptly. The same inch-by-inch discipline in outdoor kitchen ideas for small backyards big function littl can save you from that boxed-in look.
5Frame the sink with arched stucco niches
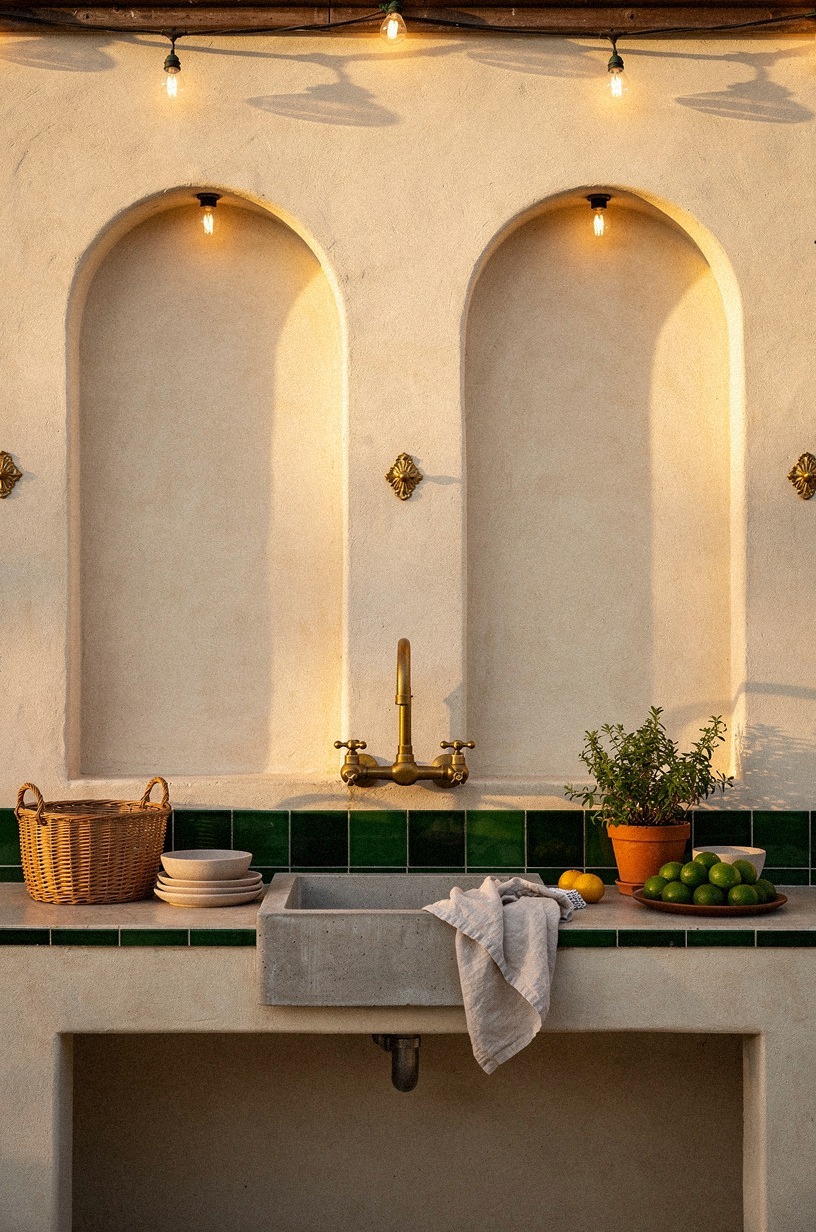
Frame the sink area with arches so the wash station feels built in, not tacked on. A pair of stucco niches around a smaller sink gives you that airy, balanced look the best hacienda kitchens have, especially when the plaster stays a warm cream instead of turning bright white. You want the sink to feel useful, yes, but also tucked into the architecture.
This is where the Two-Niche Balance Rule earns its keep. Put dish soap, brushes, or a stack of striped towels in one side, and keep the other side looser with a clay vase or a small cutting board. I made the mistake once of filling both niches to the brim, and the whole wall looked like a souvenir shop.
If you need inspiration for making utility corners feel intentional, rustic outdoor kitchen ideas for a charming cookout space leans into the same built-in logic. And keep your faucet reach practical, because pretty doesn't help if your rinse zone is awkward.
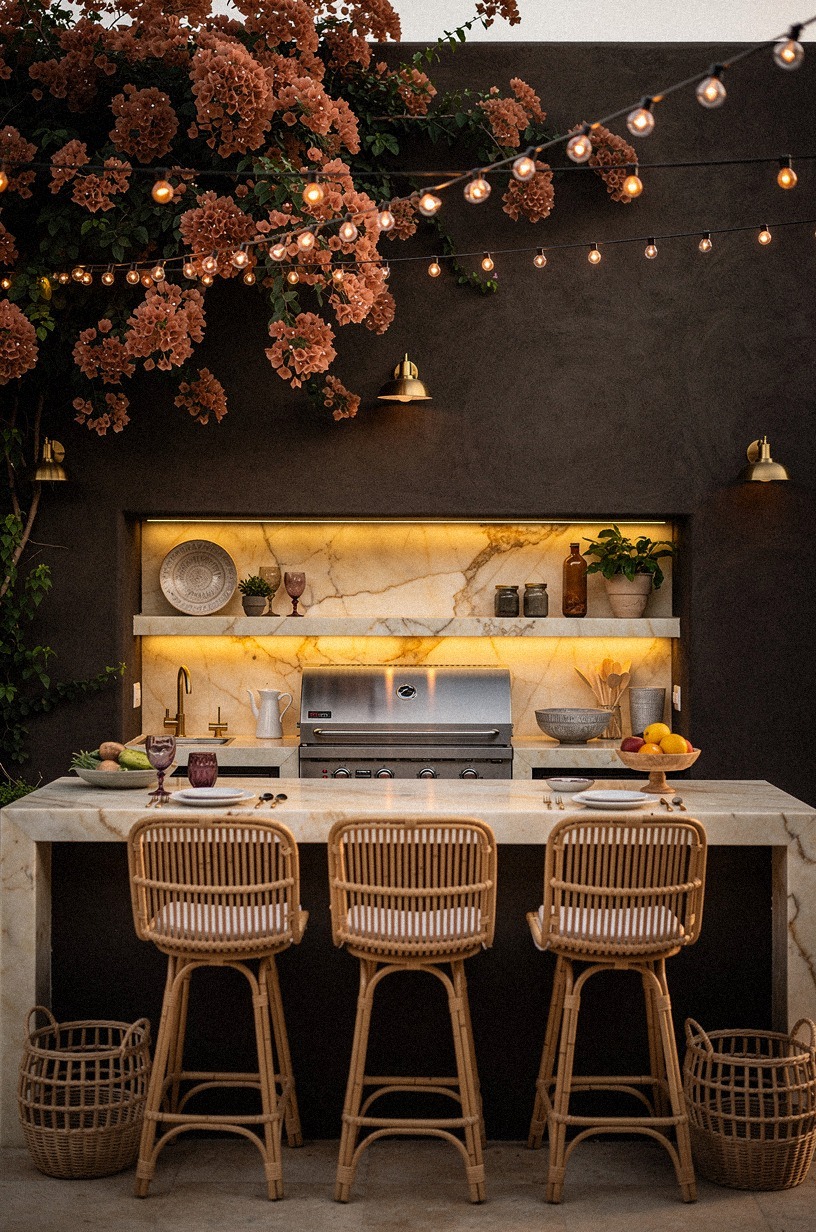
6Hang punched tin lanterns above the island
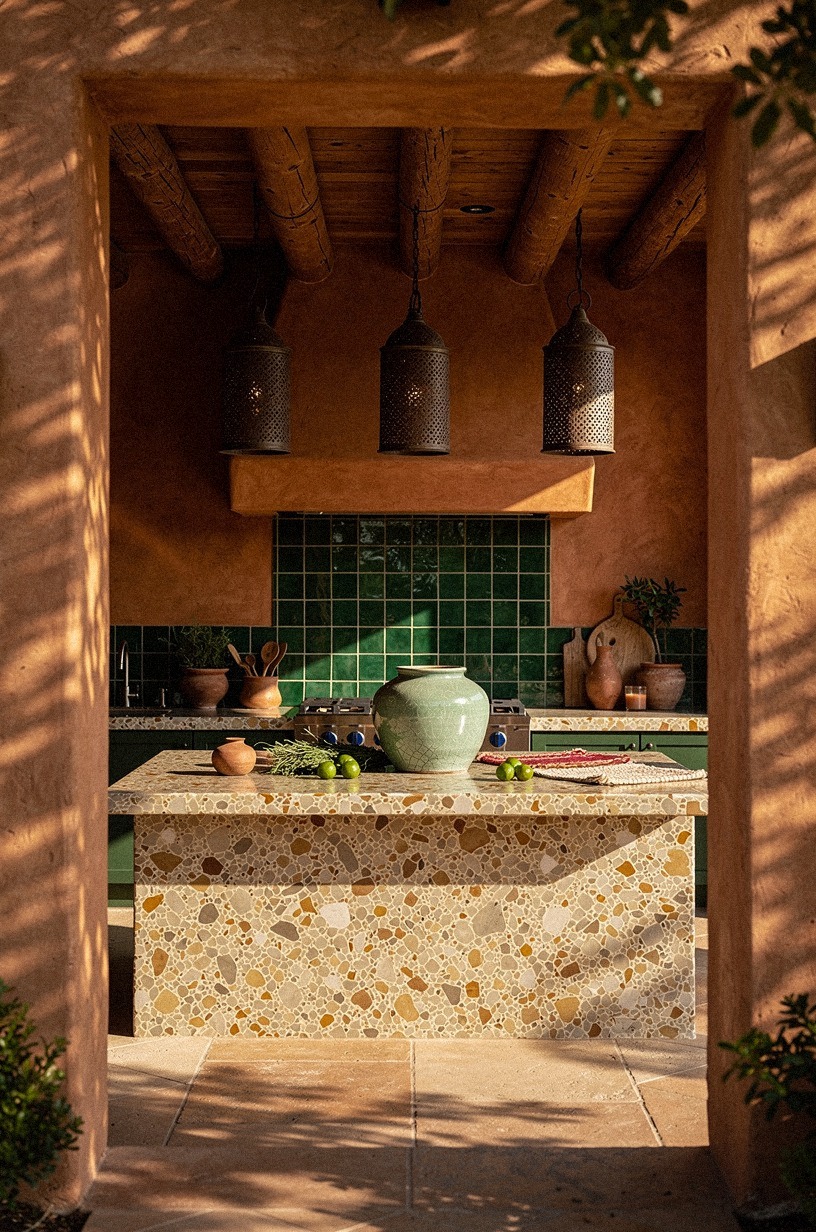
Hang the lighting before you shop for stools, because overhead glow decides whether your island feels like dinner or cleanup. Punched tin lanterns are perfect here since they throw patterned light and bring that slightly timeworn note you want in an outdoor kitchen mexican style scheme. Seen through a stucco doorway, they also create layers, which is why the whole room suddenly feels deeper.
Use warm bulbs only, and keep them dimmable if possible. The light should skim the counter and faces, not blast the stone counter like a parking lot.
But do not overdo the drop length. If the lanterns hang too low, the island starts feeling theatrical in the wrong way.
I follow the Three-Height Glow Stack: overhead lanterns, one lower task light near the grill, and candle or low accent light farther out. That's the mix that keeps the kitchen usable after sunset. If entertaining is part of the plan, outdoor kitchen with tv ideas for the ultimate game day setu has smart lessons on sight lines and nighttime comfort.
7Layer wrought iron shelves with clay pottery
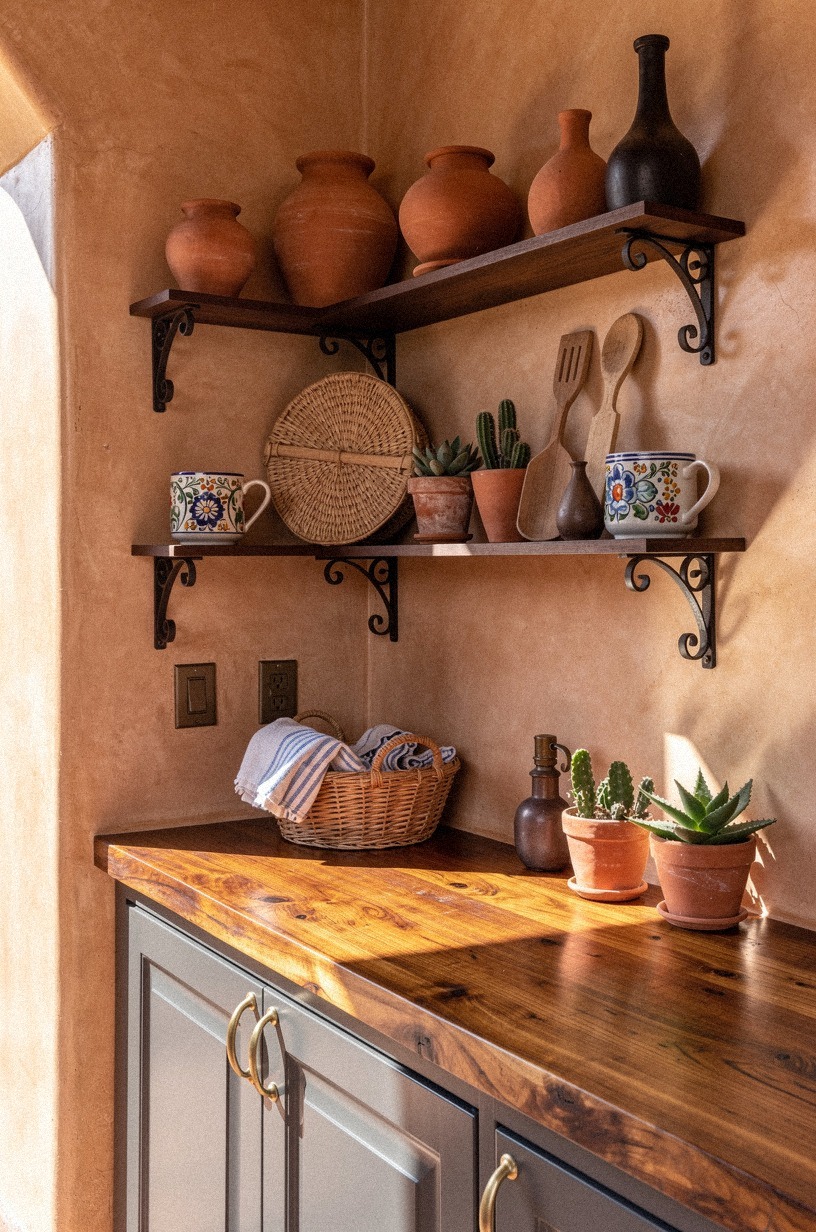
Layer open shelving only after the hard finishes are settled, because shelves can either add soul or create instant clutter.
8Install a copper farmhouse sink outdoors
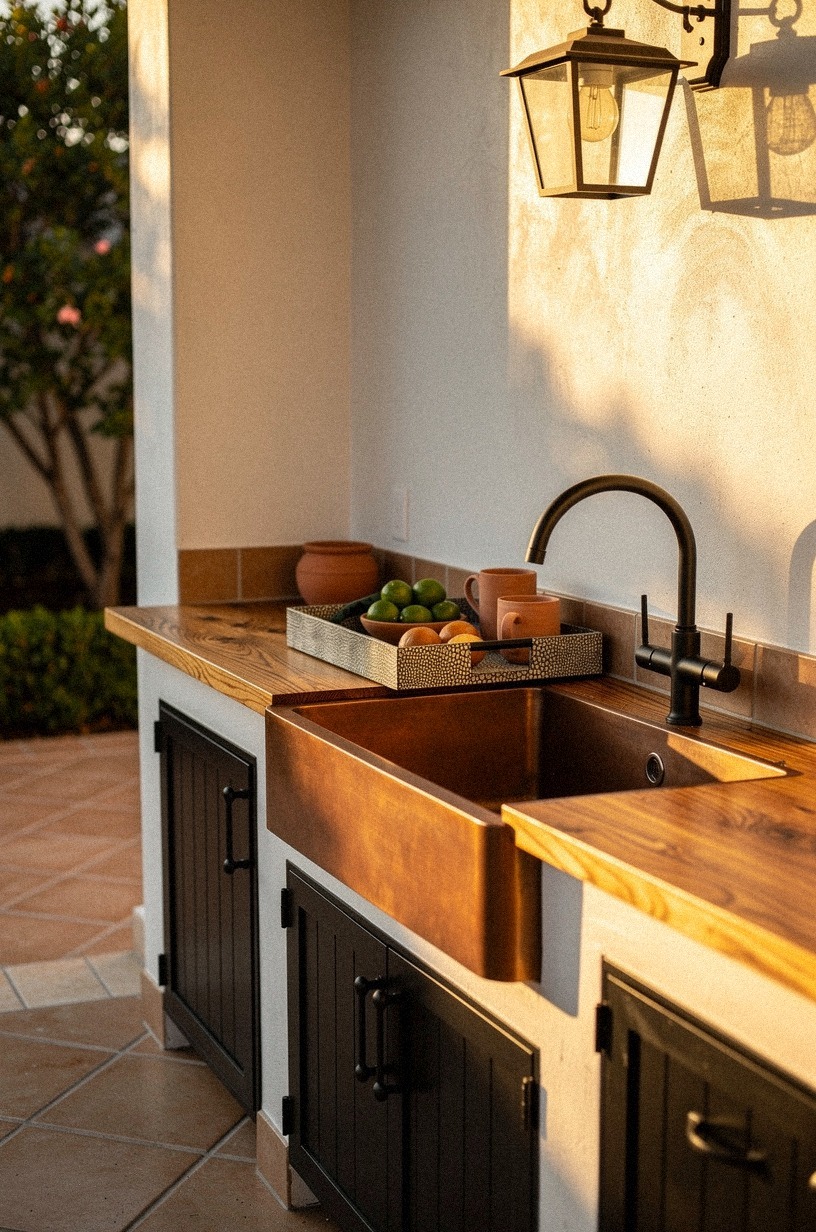
Install a sink that gets better when it ages. That's why I keep coming back to a copper farmhouse sink outdoors instead of stainless. The patina, the hammered surface, the way water marks soften rather than scream at you, all of it suits an adobe outdoor kitchen better than a sleek modern basin ever could.
You should set the sink into a prep run that still gives you working space on both sides. A cramped prep run corner is maddening. If you're choosing finishes, pair the copper with aged bronze or a weathered unlacquered faucet rather than bright chrome, which can look a little disconnected against warm plaster.
Material pricing helps here too:
And if the rest of your yard also needs softening, outdoor kitchen hot tub ideas for a resort style yard shows how warm materials can connect adjacent zones without turning everything matchy.
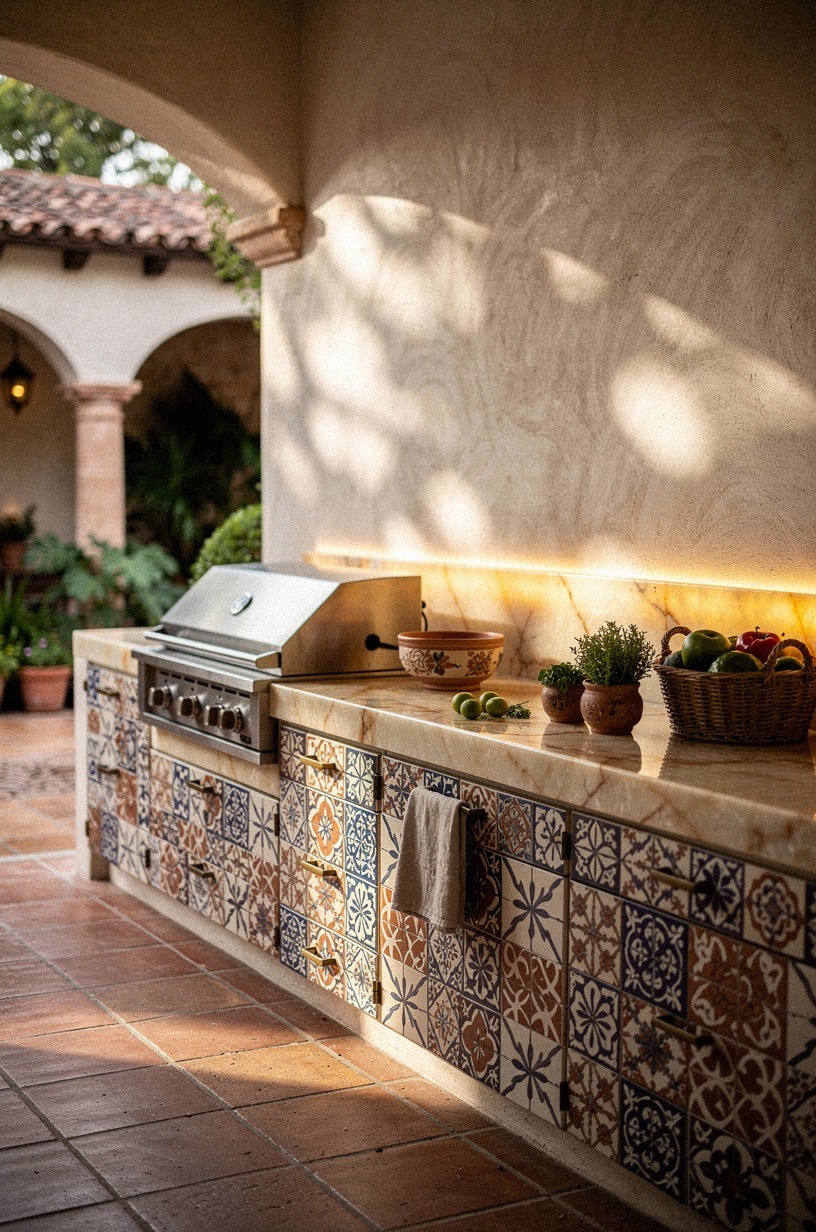
9Wrap the bar in hand painted tile
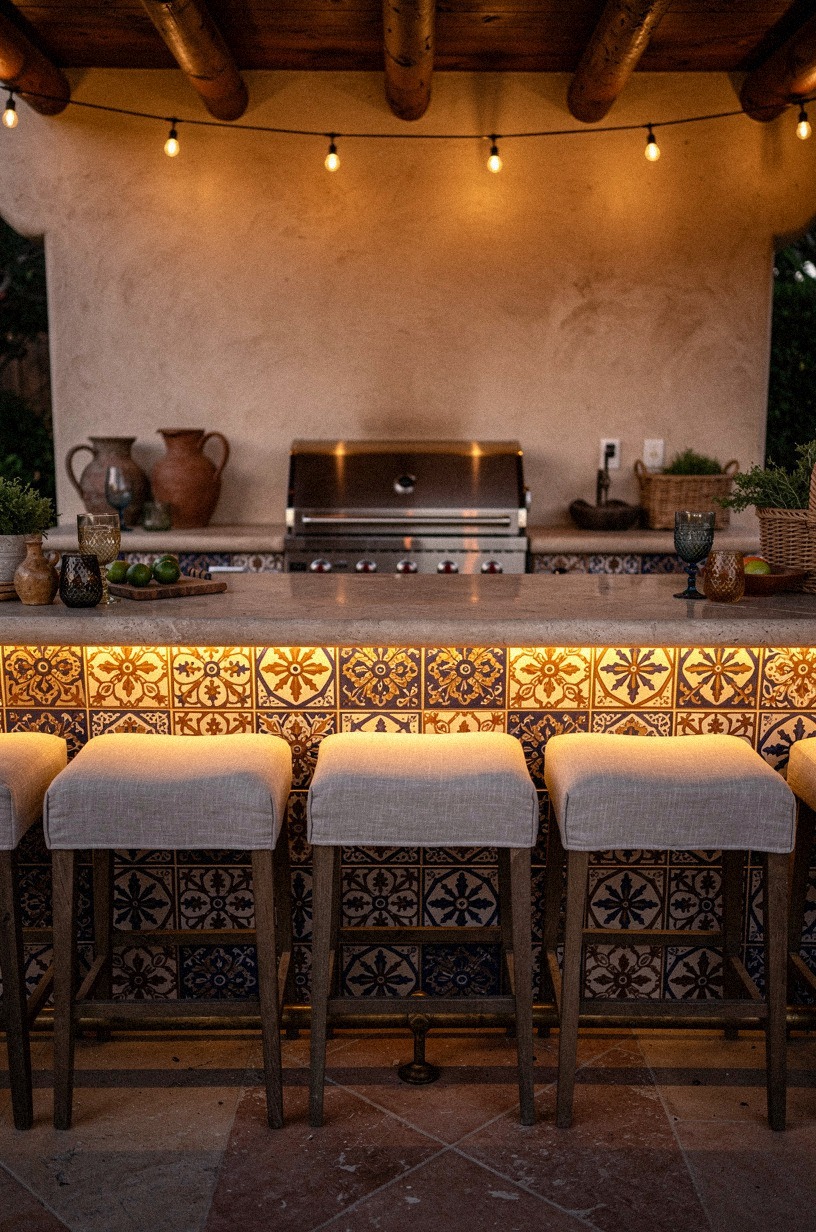
Wrap the face of the bar in hand-painted tile so the room has one surface that reads decorative from a distance. When you see the bar head-on from a low angle, that pattern becomes the jewelry of the whole kitchen. It should feel confident, not busy, which is why I like repeating one or two colors from the floor or plaster instead of throwing every hue in the box at it.
Keep the countertop slab above it quieter if the tile is lively. This is where restraint saves you.
Too many people mix patterned bar tile, bold counters, and ornate lanterns all at once, then wonder why nothing lands. The better move is contrast over clutter.
If your yard is compact, use the tile only on the bar front and let the side returns stay plain. That move stretches your budget and keeps the hero moment facing the seating area. Small outdoor kitchen ideas that maximize every inch is useful again here because decorative surfaces need editing in small spaces.
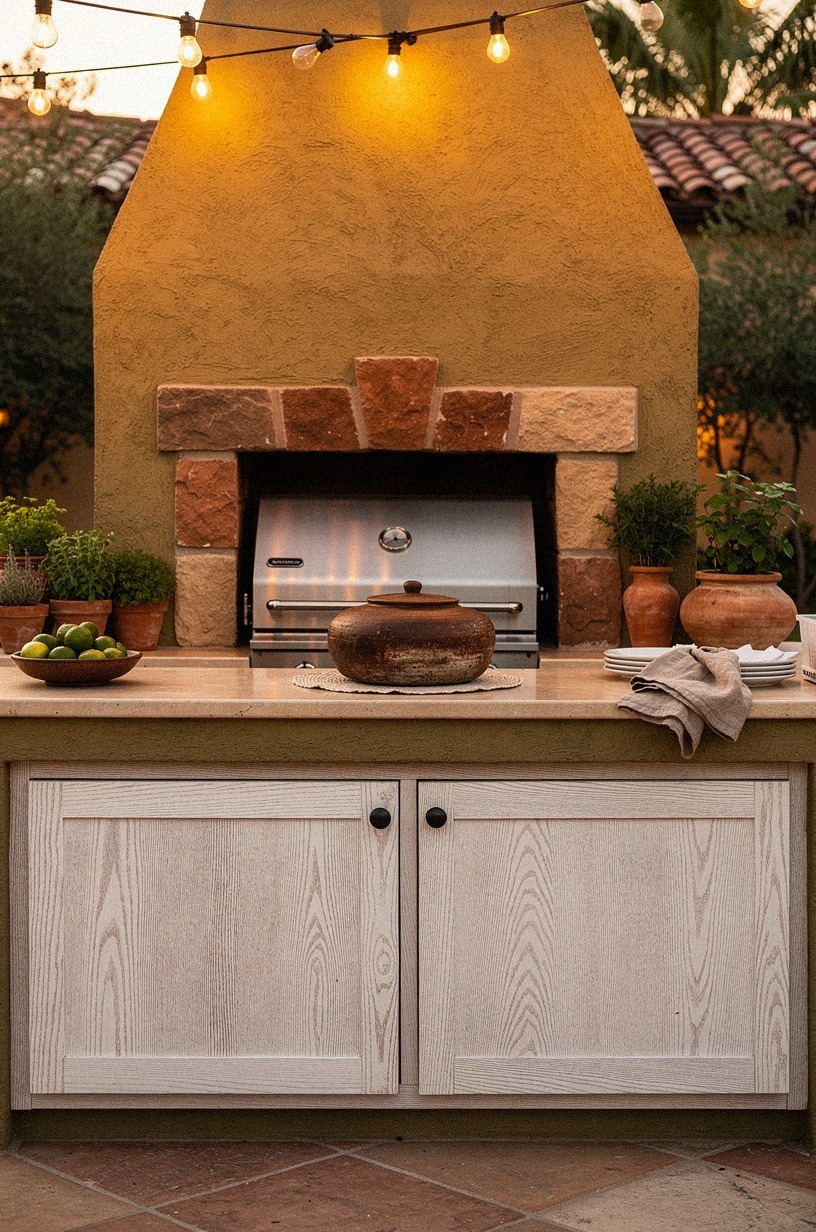
10Add carved wood doors below the grill
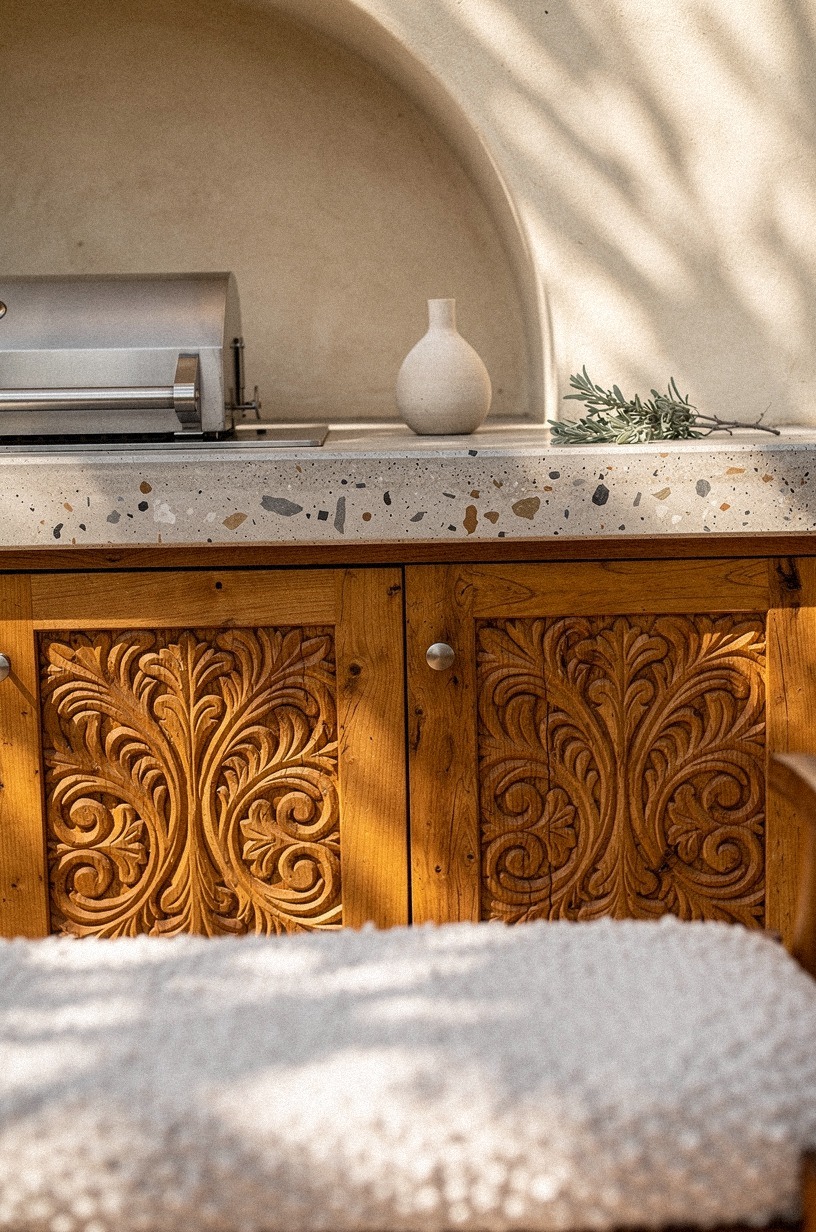
Add doors below the grill that look like furniture panels, not utility blanks. A set of carved wood doors in a sage cast instantly warms the lower half of the kitchen, especially when the carving stays shallow and the grain still shows through. Macro details matter here because this is one of the few spots people will see up close while they're waiting near the fire.
I like a muted green close to Sherwin-Williams Evergreen Fog SW 9130 for painted carvings, or a sealed natural wood if the kitchen already has enough color elsewhere. But seal the wood properly. Outdoor sun is ruthless, and a pretty door that starts curling by August is no bargain.
This is also a smart place to hide propane, grill tools, or serving trays so the counters stay calm. If you love the idea of hard-working storage that still looks styled, outdoor kitchen ideas on a budget diy friendly has more low-drama ways to tuck clutter out of sight.
11Shade the prep area with mesquite beams
Shade the prep area before you buy another decorative piece, because comfort changes how often you'll use the kitchen. Mesquite beams bring weight overhead, but they also filter the light in a way that makes stone, plaster, and copper look richer. Look across the counter toward the grill and you'll see it right away: the room feels cooler, steadier, and more finished.
I would not stain the beams too dark. Let the mesquite wood stay honest and dry-looking, with enough variation to keep the ceiling alive. And if you can, repeat that same tone on a shelf, door, or stool frame so the overhead structure doesn't feel unrelated.
You should also think about span and clearance. Keep the visual rhythm regular, but don't let beams crowd sight lines or trap smoke over the grill.
Want a backyard that holds together across multiple use zones? Outdoor kitchen pool combos for the ultimate backyard is a good companion read.
12Mount a colorful tile backsplash behind burners
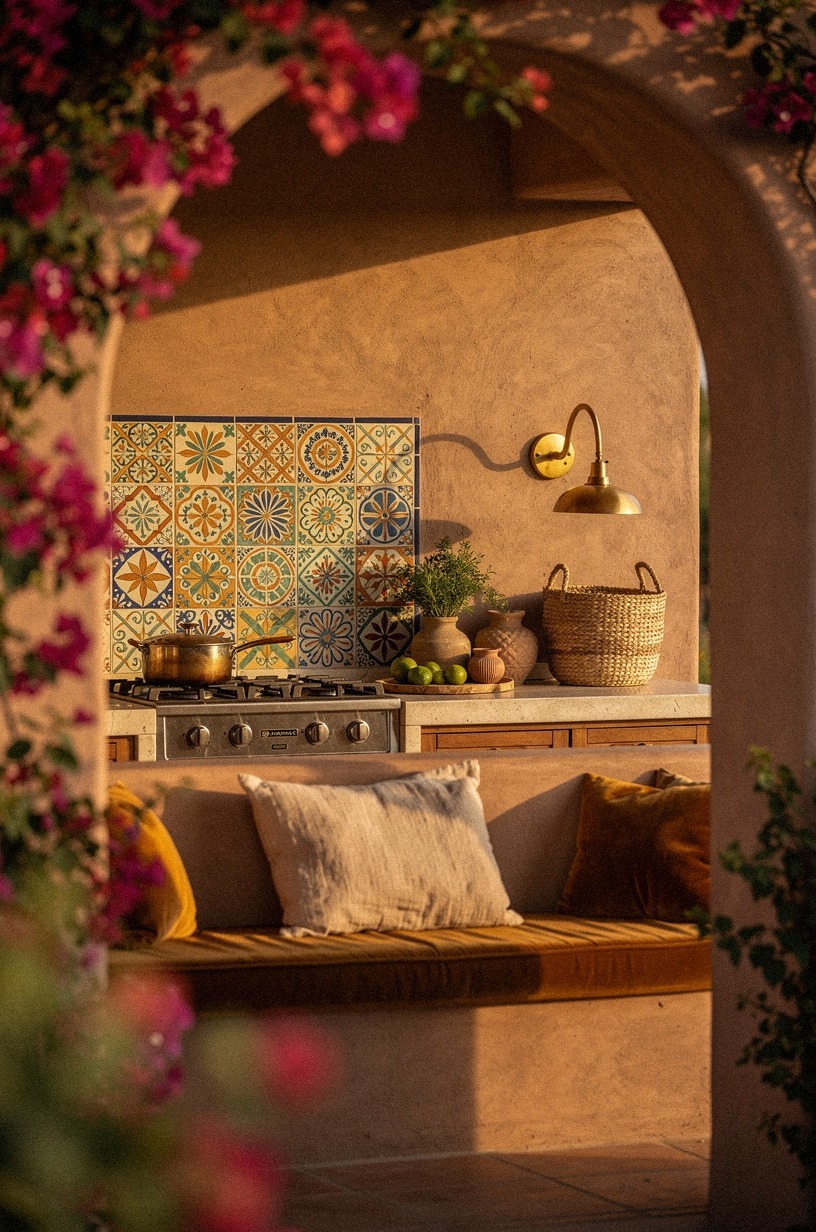
Mount the backsplash where heat and splatter happen, then let it carry the color story. In a spanish outdoor kitchen, a colorful tile backsplash behind the burners can do more than a painted wall ever will because it reads crisp through foliage, smoke, and shifting daylight. Framing it through bougainvillea or a stucco opening only makes the payoff stronger.
Keep the scale of the pattern appropriate to the distance. Tiny motifs can blur from across the yard, while a medium repeat stays legible without shouting. I also like to leave a clear 18 in backsplash gap between the counter and any upper element, because that proportion looks relaxed and works well visually.
If you want a richer green note in the palette, this is a beautiful place to echo Farrow & Ball Studio Green No.93 in tile trim or painted metal. For more ideas on balancing bold surfaces with usable cooking space, rustic outdoor kitchen ideas for a charming cookout space gets the ratio right.
13Place cactus planters along the serving ledge
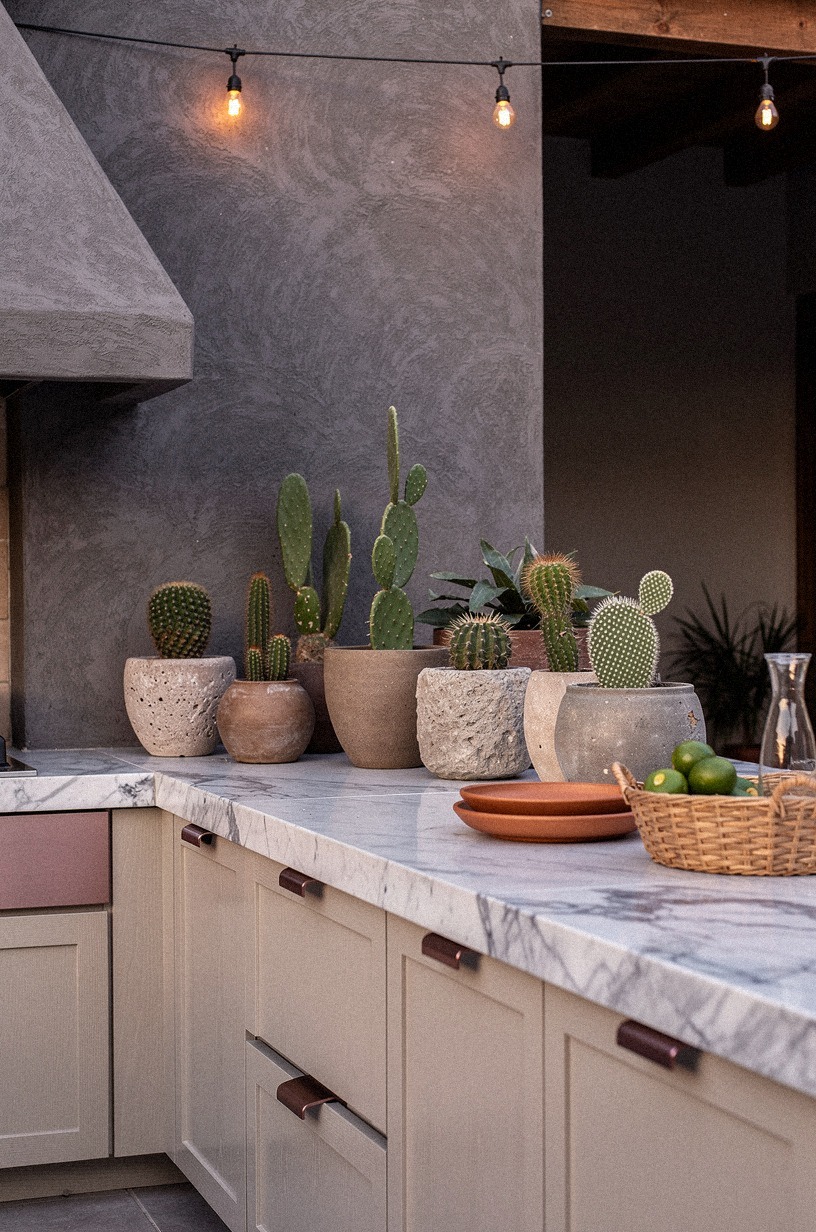
Place planters where they frame the serving edge, not where they block it.
14Pour a curved concrete counter in warm ochre
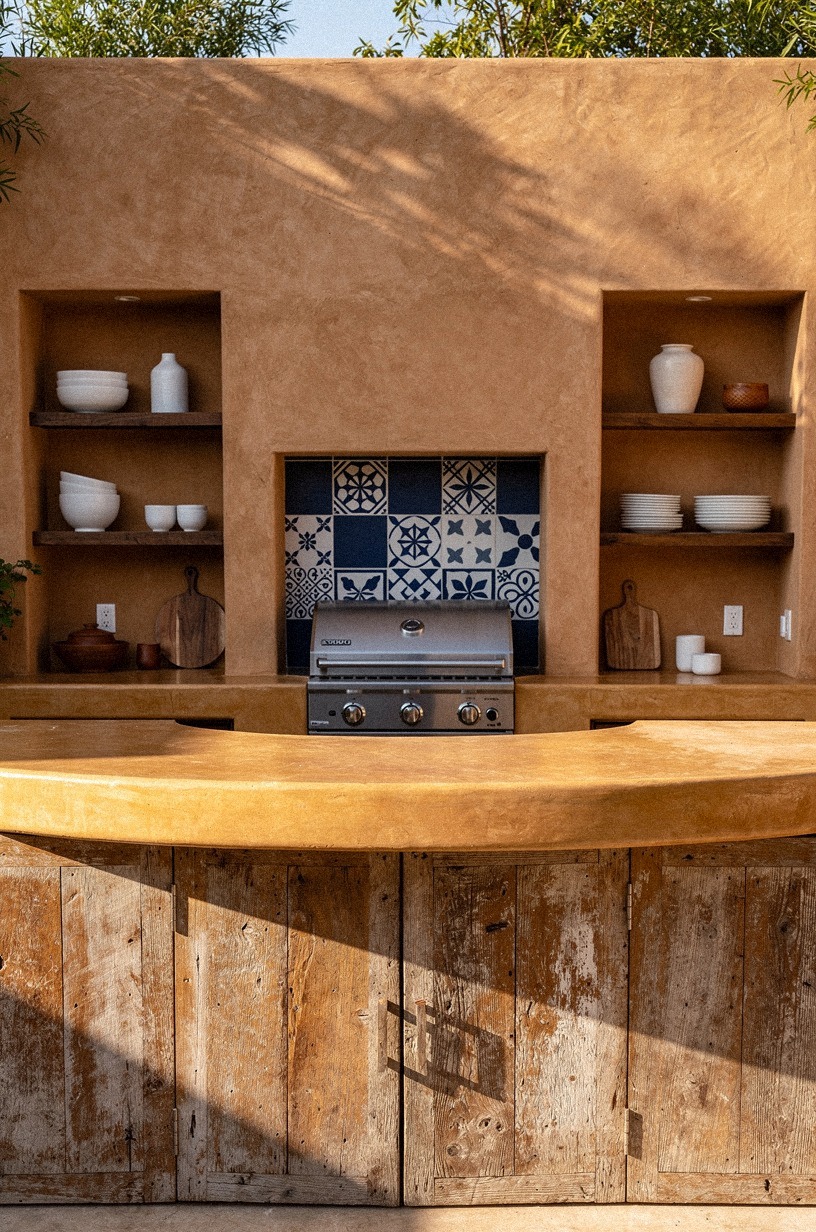
Pour the counter in a soft curve if you want the kitchen to feel custom without adding fuss. A warm ochre concrete counter has that heavy, earthy presence hacienda spaces need, but the curve keeps it from reading blocky. From a first-person view, walking toward it, the gesture feels welcoming in a way a hard right angle never quite does.
This is also where you should check your dimensions carefully. Standard height is 36 in, and if this counter faces stools or circulation you still want 42-48 in of clearance around the main standing zone. A pretty curve that pinches traffic is still a mistake.
I prefer a tinted concrete mix over paint here because the color wears more honestly. If you need to save, keep the curved section short and use a simpler finish on the back run. For other real-world layout tradeoffs, rv outdoor kitchen ideas for cooking on the road sounds niche, but the compact planning lessons are surprisingly useful.
15Style equipale stools around the bar
Style the seating after the bar front is finished so you can judge scale properly. Equipale stools are one of those pieces that can make an outdoor kitchen mexican style look soulful in ten seconds, but only if the leather and wood tones stay warm and a little dusty.
Too dark, and they start reading lodge. Too slick, and the mood disappears.
In an overhead view, the seating group should feel small within the larger kitchen, not like a crowded cafe. Give each stool enough breathing room and keep the count honest to the width of the bar. I usually stop before the bar is technically full because a little negative space makes the whole thing look more expensive.
You can mix one vintage stool with newer pieces if the shapes line up. In fact, I prefer that slight mismatch. If your entertaining area needs more inspiration beyond stools, outdoor kitchen with tv ideas for the ultimate game day setu has useful ideas for seating flow and conversation zones.
16Tuck firewood into a plaster storage niche
Tuck the wood where it becomes part of the architecture. A plaster storage niche beside the grill gives you texture, warmth, and one of those details that makes people assume the kitchen was designed years ago by someone who really knew what they were doing. That's the charm of an adobe outdoor kitchen when it works.
Stack the logs tightly enough to look intentional, but not so tightly that the niche turns stiff. Bark, cut ends, shadow, a little irregularity.
That's what you want to see. I also like keeping the niche slightly off the hottest zone so the firewood stays dry and the composition still reads balanced in a 45-degree view.
And yes, even if you do not burn wood every week, the niche still earns its place because it softens all the hard surfaces around the grill. If you're building a layered backyard story, outdoor kitchen hot tub ideas for a resort style yard shows how these tactile details help separate a good setup from a forgettable one.
17What colors make a hacienda outdoor kitchen feel warm without going busy?
Plaster, tile, and planting all pull from the same earthy family, and that's what keeps the room calm.
18Finish with bougainvillea over the kitchen wall
Finish with planting last so the hardscape can stay in charge. Bougainvillea trained over a wall, an arbor, or a stretched wire turns the architecture soft without softening it, and the magenta or coral flowers against warm plaster is the kind of color story nobody gets tired of. Pick the wall that gets the most morning sun and let one vigorous plant do the work.
Anchor it in a deep planter with a real trellis behind the wall, not a flimsy hook. The first year you water more than you think, the second year you barely water at all.
And if your climate won't support bougainvillea, climbing roses in a similar coral give you nearly the same payoff with a little less drama. Either way, finish the room with one living moment that climbs. That's the move that makes the kitchen feel like it's been there for years.
Trust me on this one!
Why This Style Feels Better Than the All-White Version
I've seen a lot of outdoor kitchens chase a resort look with white quartz, black hardware, and one lonely strip of greenery, and I almost always think the same thing: they photograph cleaner than they live. Outdoors, you need materials that absorb weather, shadow, and dust without looking defeated by them. That's why this hacienda direction works so hard.
Saltillo tile doesn't panic when it gets a little dirty. Copper improves when water hits it.
Mesquite looks better once the sun has had a month with it.
What I wouldn't do is start with decor. People love to shop the fun parts first, and I get it.
Lanterns are fun. Stools are fun.
A glazed planter is fun. But if the grill wall is cold gray cement board and the floor is generic paver, every pretty thing you add feels borrowed from another house.
The room never settles. The difference was always the shell.
I also think this style gets misunderstood as busy, when the good version is anything but. The best hacienda kitchens edit hard.
One handmade tile field, not four. One carved door detail, not carvings on every surface.
One real plant moment climbing the wall instead of ten scattered pots. You should feel warmth first, pattern second.
Isn't that what makes an outdoor room worth lingering in?
And here's the honest money piece: I'd spend on plaster, tile in the focal zone, and shade overhead before I spent on upgraded appliances. Most people use their grill, sink, and prep counter in pretty ordinary ways.
But the surfaces around those basics decide whether you want to stand there for ten minutes or two hours. That's not fluff.
That's use. Once you get the bones right, even a modest kitchen starts giving you that slow, grounded, late-summer feeling every single time.
What People Always Want to Know
What is the best Mexican Hacienda-Style Outdoor Kitchen Ideas (Warm & Earthy) for a small kitchen?
The best move for a small space is a stucco grill wall plus one tiled prep run, because clear structure makes the footprint feel bigger. I'd skip a second decorative zone.
One narrow shelf, one sink, and maybe an IKEA TORNVIKEN cart nearby are usually enough. Small outdoor kitchen ideas that maximize every inch has more compact layout cues.
Where can I buy Mexican Hacienda-Style Outdoor Kitchen Ideas (Warm & Earthy) pieces on a budget?
Target, Wayfair, and Facebook Marketplace are the first places I'd check, because mixing old and new looks more believable than buying a full matching set. Look for clay pots, iron shelving, and bar stools secondhand, then fill gaps with Threshold or IKEA basics.
How much does a Mexican Hacienda-Style Outdoor Kitchen Ideas (Warm & Earthy) makeover cost?
A cosmetic version usually lands around $300 to $1,500, while a bigger refresh can hit $3,000 to $12,000, and that's before full appliance changes. The money saver is keeping your layout and upgrading surfaces first. Paint, hardware, and tile placement do a lot.
Can I create a Mexican Hacienda-Style Outdoor Kitchen Ideas (Warm & Earthy) on a budget?
Yes, and you do not need to fake the whole thing to get the mood. The cheap wins are warmer paint, a few terracotta planters, and better lighting.
Clay-colored plaster tint, one tiled bar face, and secondhand wood stools will carry more weight than trendy gadgets. Outdoor kitchen ideas on a budget diy friendly can help you price those swaps.
Is a Mexican Hacienda-Style Outdoor Kitchen Ideas (Warm & Earthy) worth it in a small space?
Yes, maybe even more in a smaller yard, because tight footprints make material choices matter faster. When your bar, wall, and floor all speak the same language, the kitchen feels intentional instead of crowded. Keep the walkway open and let the focal wall do the heavy lifting.
Is Mexican Hacienda-Style Outdoor Kitchen Ideas (Warm & Earthy) a good idea for a rental?
Yes, if you focus on removable layers and skip permanent masonry. The rental-safe version is peel-and-stick tile on a bar front, portable planters, lanterns on hooks, and a rolling prep cart. You can still get the palette and texture without tearing into the property.
Where I'd Start First
If I had to pick one step, I'd start with the clay stucco grill wall. A cold wall kills every warm material around it, and you can't decorate your way out of that.
Get the shell right first. Everything else suddenly makes sense.