
Our #1 Recommended Mattress
Make the look happen: Saatva beds & furniture
Saatva's furniture catalog matches the look of the bedrooms featured above with handcrafted, solid-wood construction rather than MDF veneer. The collection covers upholstered bed frames (linen, velvet, leather), four-poster & canopy beds, platform beds, storage beds with hydraulic lift, and matching nightstands, dressers, benches, and headboards.
All furniture ships via free White Glove delivery with in-room setup, removal of packaging, and assembly included. Current promotion: up to $625 off sitewide, plus the $225 off orders $1,000+ professional discount via ID.me (military, veterans, first responders, nurses, teachers).
Ownership terms: 45-day return on furniture, 1-year warranty on frames. Pairs naturally with the Saatva Classic mattress.
Saatva Classic. From $1,095
365-night trial · Lifetime warranty · Free white-glove delivery
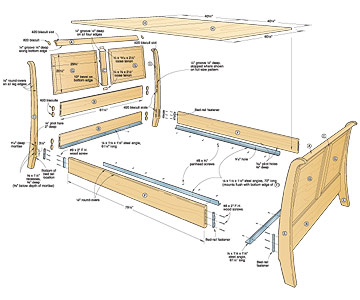
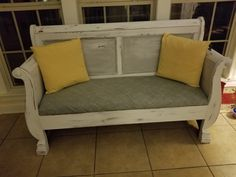
Transforming a sleigh bed into a couch offers a comfortable place to sit while also creating a unique piece of furniture that can complement other furnishings in the room. If you’re about to get rid of an old sleigh bed, we have come up with a step-by-step guide to turning a sleigh bed into a couch, which can add an elegant touch to your home while saving the money you would have paid to buy a new couch.
To turn a sleigh bed into a couch clear everything off the sleigh bed, dismantle all its parts, decide on the dimensions of the couch, modify the headboard to make the back of the couch, cut the footboard in two, then use the split footboard as the arms of the couch, make a base for the cushion boxing, cut the sleigh bed legs to the desired height of the couch, attach all the parts together, sand everything down, paint or stain the couch, and finally add cushions.
What Is a Sleigh Bed?
Although sleigh beds go back to the 1800s, they are still so popular today due to their unique and sturdy silhouette. Sleigh beds can create an opulent look in both traditional and contemporary bedrooms. Since Sleigh Beds have unique shapes and can be made from all sorts of materials ranging from solid wood to upholstered cloth, they’re well suited for repurposing. Read our sleigh bed styles article to discover the many sleigh bed designs that are available.
A sleigh bed is a style of bed that has a scrolled head and footboard. This gives the bed the shape of a sleigh or sled, and creates a charming focal point in a bedroom.
 This lavish sleigh bed with tufted upholstery headboard creates a refined atmosphere in any bedroom. Image Source: Amazon.
Before you repurpose your bed, you might be interested in learning how to maximize your storage space. Make sure to take a look at our guide to sleigh bed lift kits to learn more about easy storage solutions. Similarly, we've put together an article explaining how to lift up a sleigh bed and raise it that offers more ideas. You might also find interest in these 5 ways to modernize a sleigh bed and give it a makeover too. And our article that answers the question, "how do you close a sleigh bed mattress gap" will certainly be helpful as well.
Why Turn a Sleigh Bed Into A Couch?
Saatva Spring 2026 — live pricing
Saatva doesn't use coupon codes — every discount auto-applies at checkout. Current Spring 2026 savings:
- Saatva Classic queen $1,779 (was $2,179, −$400)
- Saatva Contour5 queen $3,049 (new all-foam, −$400)
- Saatva Solaire queen $4,074 (smart bed, −$525 — best deal)
- Saatva Rx & HD — watch for 15% flash sales
- ID.me adds $225 off $1,000+ (military / first responders / teachers / seniors)
All mattresses include 365-night home trial, lifetime warranty, free white-glove delivery + old-mattress removal.
There is more than one idea for upcycling a sleigh bed into something fresh and useful. You could consider repurposing a sleigh bed into a bench or a banquette if your sleigh bed is old and damaged, or if you are looking for new furniture. You can also turn a sleigh bed into a porch swing. Read our article on simple repurposing ideas to learn about easy and useful ways to upcycle a sleigh bed into a bench.
Repurposed sleigh beds make excellent couches because of their sturdy structure and their ornate headboards, footboards, and foot designs. Turn a sleigh bed into a couch for a one-of-a-kind item of furniture.
Before starting your sleigh bed couch conversion examine the bed frame to determine the tools needed for disassembly. Then get another person to help because disassembling a bulky bed frame such as a sleigh bed is definitely a two-person job, and you don’t want to get hurt. Read our article on how to disassemble a sleigh bed so that you can keep track of the various pieces and hardware that make up the sleigh bed.
 Understanding the various components of a sleigh bed will ensure that you correctly disassemble the bed without damaging it. Image Source: AZWoodman.com.
Materials Needed to Turn a Sleigh Bed into a Couch
| Materials | Purpose | Amazon Product Example | Price Range |
| Tape Measurer | To take measurements before cutting any parts of the sleigh bed. | Amazon Basics Self-Locking Tape Measure | ~$10 |
| Jig Saw | To cut and modify the footboard. | Black+Decker Jig Saw, 5.0-Amp | ~$30 |
| Miter Saw | To make angle cuts. | Dewalt Miter Saw, Double-Bevel | ~$350 |
| Screwdriver | To unscrew and disassemble the components of the bed and to screw new parts together. | 8 in 1 Screwdriver, Portable multi-purpose screwdriver | ~$10 |
| Screws | To attach different components together. | Qraftworks Stainless Steel Self Tapping Screws Assortment Set 660 PCS | ~$30 |
| Nails | To add more support to parts that are attached together. | Mr. Pen- Nail Assortment Kit | ~$10 |
| Sand Paper | To make all the surfaces of the couch smooth enough without sharp edges before painting it. | Fandeli Assorted Grits (80,120,220), sandpaper sheets | ~$15 |
| Wood Stain | To add protection to the wood against weather and other factors that might damage it. | General Finishes Water Based Wood Stain, 1 Pint, Antique Brown | ~$25 |
| Paint | To add a coat of colorful paint to the couch. | Wolman 360350 Outdoor Furniture Paint, 2 Pack, Colonial Red | ~$25 |
| Cushions | To decorate the couch and make the back more comfortable. | FoamRush 6" x 24" x 27" Upholstery Foam | ~$60 |
How to Turn a Sleigh Bed Into a Couch?
When a sleigh bed has run its course, after a few years, it is easy to upcycle its headboard and footboard into a couch. The process is similar to that of repurposing it into a bench. Below we describe general steps on how to turn a sleigh bed into a couch. For more specific steps refer to the DIY couch posted by Becca Robbins on Love our crazy life.
To turn a sleigh bed into a couch, first clear everything off the bed so that you can access the frame. Next, dismantle all the parts, and measure the sleigh bed so that you can determine the dimensions of the final repurposed coach. Modify the headboard so that it can be installed as the backrest for the couch, cut the footboard in half to be used as the armrests, make the base section for the seat, and trim down the legs to the desired height of the couch. Attached all these modified pieces together to form the couch, sand the entire couch down, and stain or paint the couch frame. Finally, add an upholstered box cushion onto the seat and place cushions or throw-pillows against the backrest.
Step 1. Clear Everything Off the Sleigh Bed
You first need to remove all pillows and bedding from the sleigh bed. Strip off all the bed linen, then lift and remove the mattress. Store everything away until they are needed.
Step 2. Dismantle All Parts of the Sleigh Bed
Now that you see only the slats and the frame, it is time to remove the slats from the rails. If your slats are joined together, you may be able to roll them up. If not, then you will need to unscrew each slat individually. Use a drill and a screwdriver to unscrew the slats from the holes in the side rails.
 Bed slats are one of the most common types of mattress foundations found on many sleigh beds, and can be easily rolled up and stored. Image Source: Amazon.
The head and footboards might be attached to the side rails in three possible ways. If they are screwed to the side rails, simply use your drill or screwdriver to remove the screws, nuts, or bolts.
If the rails are connected with brackets that hook into the bottom inside of the headboard and the footboard, then you’ll need to pull them up out of the post slots.
The third possible way which the headboard and footboard may be attached is with both screws and glue. In this case, you need to carefully heat the glue with a hair dryer or heat gun without damaging the finish, then you can remove the screws and detach the head and the footboard.
Step 3. Decide on the Dimensions of the Couch
Before assembling the detached parts, you need to decide on the dimensions of the couch.
Sleigh bed length and width dimensions are about the same as other beds. The length of the couch will be the same as the size of your sleigh bed. The base of the cushion box will also be the same width as the rails of the sleigh bed.
Use the headboard to make the back of the couch, and the footboard to make the arms of the couch. Sleigh bed headboards are larger and can range from 20” to 72” tall. Use a jigsaw to cut the bedposts off the headboard to modify the height of the couch. To decide on the dimensions of the couch, you will also need to consider the dimensions of the room where you plan to place the couch. Our sleigh bed height guide offers available information about the overall height of various sleigh beds which will be helpful when determining the dimensions of your completed sleigh bed couch.
Step 4. Modify the Headboard to Make the Back of the Couch
Now that you have the headboard detached from the bed frame, you can modify its dimensions to your liking. You can cut off parts of the headboard to reduce the height of the couch since the height of the couch will be the same as that of the headboard. Our detailed guide to sleigh bed dimensions lists the most common sleigh bed sizes and will assist you with your sleigh bed couch remodelling project.
Step 5. Cut the Footboard in Two
Use a tape measure to measure the dimension of the footboard. Then use a jigsaw to cut the footboard in half. The two halves will be used to make the arms of the couch, so make sure that you use a straight edge guide like this one from Amazon to ensure a smooth and precise cut.
Step 5. Use the Split Footboard as the Couch Arms
If your bed is a king or queen size, you should cut a few more inches from the split footboard so that the couch isn’t too deep. If your bed is a twin size, then cutting the footboard in two parts will be perfect for the couch arms.
 The sleigh bed’s footboard is repurposed so that it becomes the armrests on either side of the new sleigh bed couch. Image Source: Pinterest.
Step 6. Make a Base for the Cushion Boxing
For this step, take the two side rails of the bed and modify their size to coincide with the length of the headboard which will be installed as the back of the couch. Then cut the slats of your bed, so that their sizes match the width of the couch seat.
Step 7. Cut the Sleigh Bed Legs to the Desired Height of the Couch
Before attaching all the parts together, make sure you have determined the correct height for the couch. Cut the sleigh bed legs carefully to the desired height, taking precise measurements to make sure all legs are the same level.
Step 8. Attach All Parts Together
Now it's time to attach all the parts together. First, attach both arms to the headboard so that the couch is standing on four legs. Then, screw one side rail to the two armrests and the back of the couch. Then, attach the other side rail to form the front brace so that you have a box-shaped base. Finally, screw the slats to both side rails to serve as a supporting seat.
Step 9. Sand Everything Down
Use sandpaper to sand everything down. This step helps even out all the surfaces of the couch to make them feel smooth, without any bumps or rough edges, for a final polished look.
Step 10. Optional: Stain or Paint the Couch Frame
Staining or painting the frame is optional. However, it can add a lot to the final result in case your sleigh bed was not in a good condition before upcycling it. You can use either wood stain or paint. While the stain preserves the beauty of the wood, paint masks the natural color of the wood and gives it a different color.
Acrylic oil-based paints work best for everyday wooden beds. These paints harden over time and are resistant to scuff marks. You can also use chalk paint and a foam paint roller, to eliminate brush-strokes.
Apply wax to protect the couch against scuff-marks, and water. You can also add different types of finishes after painting your sleigh bed like glossy or satin paint to give the couch a finished look. This video explains how to paint furniture with chalk paint if you have never done it before.
Step 11. Add Cushions to the Couch
Now it is time to add cushions to the couch. Place a bench cushion on the couch seat, or sew your own custom bench cushion by following this video tutorial. You can add different cushions to create more than one seat, or use one long cushion that is of the same size as the base. To dress up the couch, choose throw pillows of different shapes and colors and stack them against the back of the couch.
 Choose a variety of cushion sizes, textures and colors to accent your repurposed sleigh bed couch. Image Source: Amazon.
Make sure to also read our related article to find more ways to repurpose a sleigh bed. You might find a completely different project to inspire you!
Summary of Sleigh Bed Couch Parts
| Part of Sleigh Bed | What Part Of The Couch It Turns Into | What Dimension of the Couch it Determines |
| Headboard | Back of the Couch | The height of the couch will be the same as the height of the headboard |
| Footboard | Arms of the couch | The size of each arm will be half the size of the footboard |
| Rails | The front brace of the couch and the base for the cushion box | The height of the seat will depend on how high the front brace is |
| Slats | Support for the cushion above the base | The slats will affect how high the seat of the couch is. |
Can You Convert a Mattress Into a Sofa Cushion?
A very practical way for making seat cushions for your couch is to convert a mattress into a cushion. If your mattress is old and worn then converting it into a couch cushion could save you some money, all you need to do is to follow these steps and the results will be amazing.
Key Takeaways
- Dismantle the sleigh bed into its basic components: headboard, footboard, side rails, and slats.
- Modify the headboard to serve as the back of the couch, and cut the footboard in two to create the arms of the couch.
- Adjust the length of the side rails and slats to form the base for the cushion boxing, ensuring it matches the dimensions of the back and arms.
- Cut the sleigh bed legs to achieve the desired height of the couch, ensuring all legs are cut to the same length for stability.
- Assemble the parts together, attaching the arms to the back, and then attaching the side rails and slats to form the base of the couch.
- Sand down all surfaces to smooth out any rough edges or uneven areas, preparing the couch frame for painting or staining if desired.
- Optional: Apply paint or wood stain to enhance the appearance of the couch, ensuring to choose a durable paint that can withstand daily use.
- Add cushions to the seat and back of the couch for comfort, choosing cushions that complement the style of the couch and the room decor.
- Explore further customization by adding throw pillows, reupholstering, or applying additional finishes to achieve a unique look.