Small kitchen cabinet ideas that maximize storage paid off faster than I expected: I spent a cosmetic-budget amount, kept my footprint at standard 36 in counter height, and got the room working in one long weekend plus paint dry time. I did this after one too many nights cooking in a kitchen where the counter corner had become the family drop zone. And yes, you can feel the difference the minute your prep space clears.
Here's what it looked like before: filler over function, The Overflow Triangle
Before I touched a single door, my kitchen had the full cramped-package problem you probably know too well. One dead counter corner. Bulky uppers that hung low enough to crowd your eye.
A fridge wall with a useless sliver beside it, the kind of gap builders leave and then pretend isn't stealing storage. I kept buying baskets, which was my first mistake, because baskets don't fix a layout that wastes inches.
The room itself had every classic galley-kitchen pitfall and none of the easy wins. A single counter audit was the first step before I bought anything.
The palette wasn't awful, just muddy. Cream fronts that had yellowed, shiny hardware that caught every fingerprint, and one dark side panel that did nothing for you except collect chair scuffs.
The worst part was how I cooked around the room instead of in it. My spices were near the window, bowls were across the galley, and the microwave sat out on the counter like it owned the place.
If your small kitchen feels busy before you even start dinner, that's usually the clue: you do not need more stuff, you need the cabinets to stop fighting you. I learned that before I bought anything from IKEA. The first trip to the IKEA Brooklyn showroom is where the whole redesign took shape, in the middle of a long Saturday with a flat cart and a tape measure.
- I cleared the counter corner first
- I swapped uppers for shallow white cupboards
- I ran skinny cabinets beside the fridge
- I stacked glass doors to the ceiling
- I added toe kick drawers under everything
- I hid the microwave behind pocket doors
- I painted lower cabinets warm mushroom gray
- I used rail pulls on every narrow door
- I turned one blank side into shelves
- I tucked spice drawers beside the stove
- I left one cabinet open for bowls
- I built a slim rollout tray for cutting boards
- What about a pantry wall when you have no pantry?
- I added a magnetic knife strip inside a door
- I swapped bulky bins for CB2 Primitivo bouclé baskets
- I went for IKEA SEKTION over custom build-outs
- Why does a small kitchen punish you more than a big one?
- I lined the inside of every drawer with cork
- How do I know which dead zone to fix first?
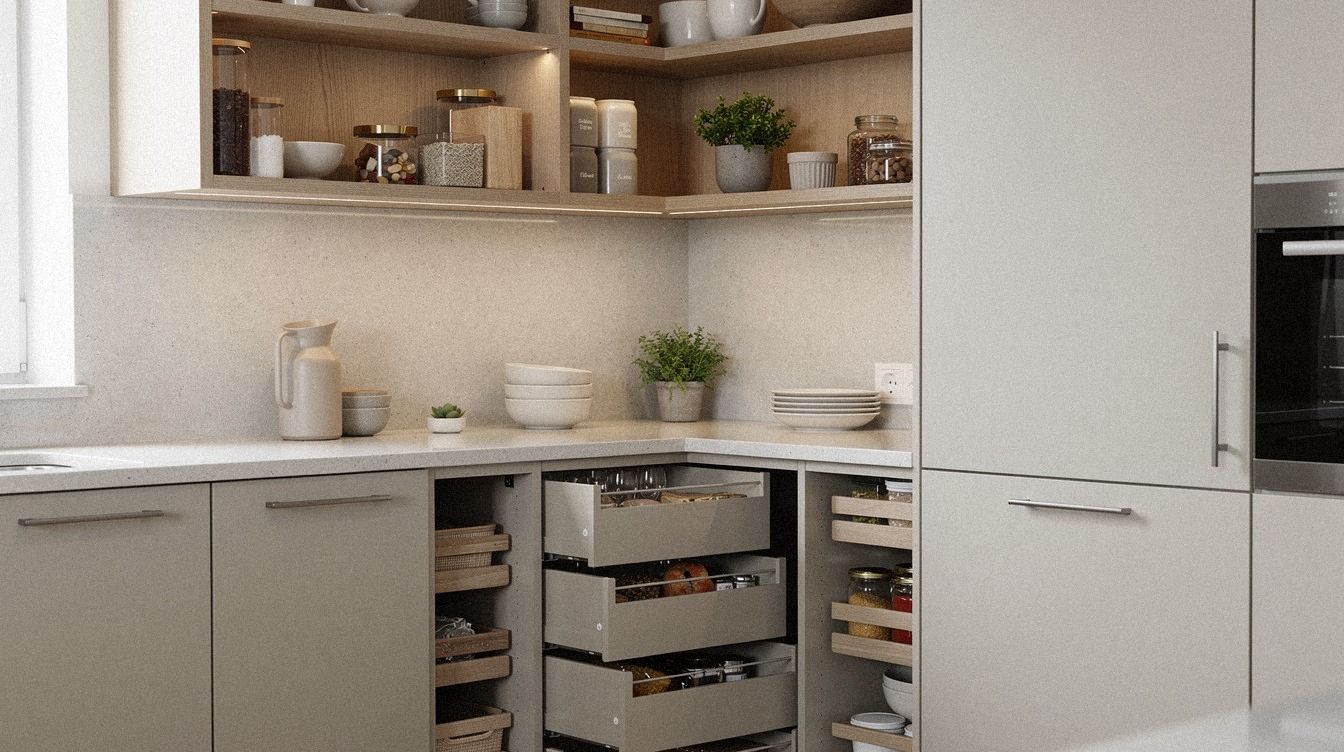
1I cleared the counter corner first
I started with the counter corner because it was the place I resented most, and you may have one just like it. In the photo, you can see why this worked: the prep zone sits centered between cerused white oak cabinets, the corner is clean, and the oak feels light instead of fussy.
Once I pulled the toaster, oils, and random mail basket off that stretch, I got a real landing spot back. Not huge.
Enough. The whole counter reads as a single prep square instead of three cramped zones fighting each other. A small wooden tray keeps the morning items contained without adding clutter.
Then I gave the corner a job. A slim board, a crock, and one bowl only. I kept the exposed white oak dowel rail below visual clutter level so your eye reads open space first, not storage first.
If you're working in a tiny footprint, that order matters more than people admit. I used the same discipline I talk about in under bed storage ideas and under bed storage tips: start by making the empty zone earn its keep before you add organizers.
You do not need ten containers here. You need one clear prep square you can hit the second dinner gets messy.
A single walnut cutting board at the back of the counter keeps the zone useful without crowding it.
2I swapped uppers for shallow white cupboards
This was the move that changed how the room felt when you walked in. My old upper cabinets were too deep for what I kept in them, so they turned every mug into a cave project.
I replaced them with shallow white cupboards that sit lighter on the wall, and if you look at the image, you can see the backlit translucent fronts doing part of the heavy lifting. The room feels taller because the cupboards stop looming over you.
The whole upper band reads as a quiet horizontal plane instead of a heavy wall of doors. The new band also lets the cerused white oak counter get a moment to breathe.
I kept the finish close to Benjamin Moore White Dove OC-17, because bright white would have gone clinical in my light. The important number here is the upper depth and height relationship: with an 18 in backsplash gap and uppers that read more like 30 to 42 in tall storage, you get capacity without that boxed-in feeling.
Would I do frosted glass everywhere? No. I like it only when you can keep the silhouettes quiet behind it.
If you're trying to make a tight room breathe, shallow storage beats bulky storage every single time. I linked the same idea mentally to small outdoor kitchen ideas that maximize every inch and outdoor kitchen ideas for small backyards big function littl because both layouts win by shaving bulk, not by adding drama.
The 12 in cabinet depth is the number I keep coming back to when friends ask.
3I ran skinny cabinets beside the fridge
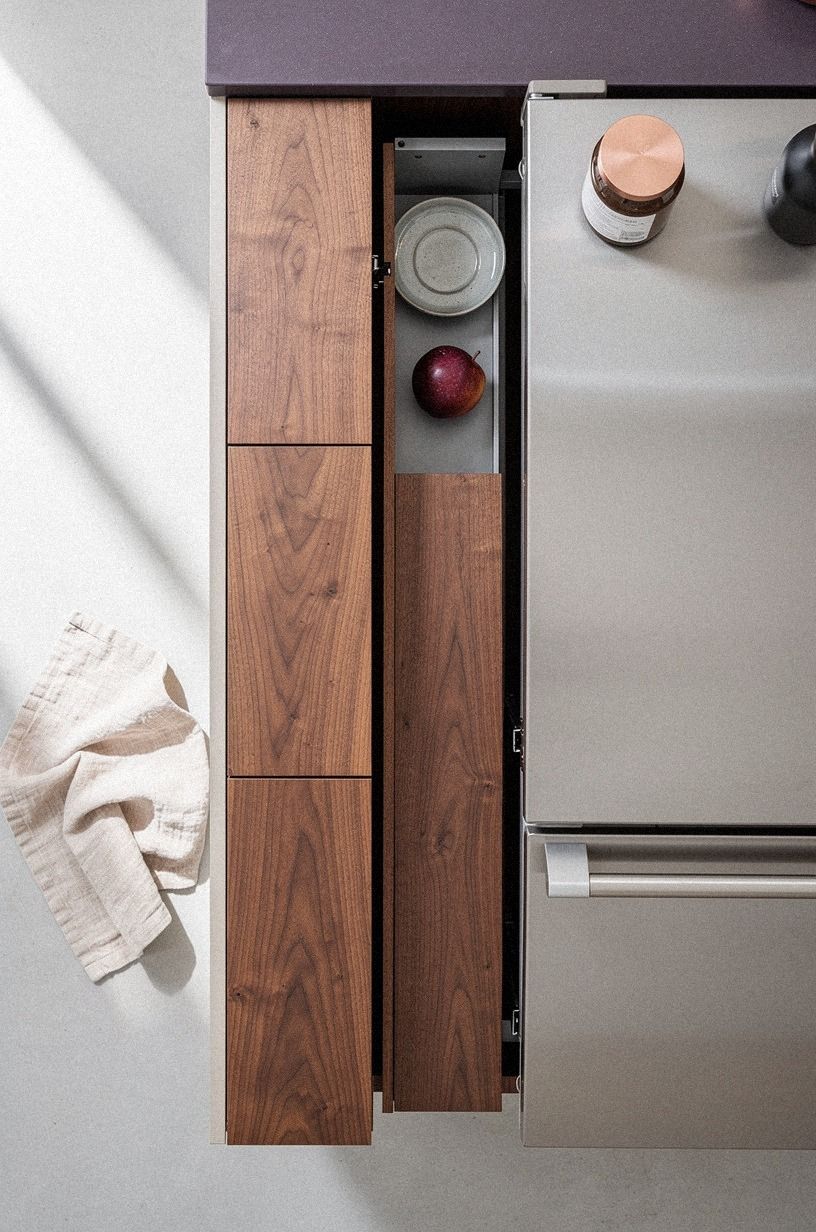
The strip beside my fridge looked too small to matter until I measured it. That's the trap. Even a narrow vertical run can hold oils, wraps, trays, or your baking sheets if you stop treating it like filler.
In the overhead view from the photo, the book-matched walnut pullouts tucked against one refrigerator edge tell the whole story: a sliver became working storage, and the counter stayed cleaner because the overflow finally had a home. A 6 in vertical gap is not a gap.
It's a pantry waiting to be built, and a single slim pullout turns it into the most useful zone in the room.
I built mine around a pullout rhythm instead of shelves, because shelves in skinny zones waste your reach. My version has walnut fronts, black channels, and storage widths that respect what you really keep there, not what a catalog thinks you should keep there.
And if you're worried it will look too custom for a modest kitchen, do not be. One narrow cabinet in a rich book-matched walnut reads considered, not precious. I made this call after staring at that gap for months and thinking it was too awkward to fix. It was not.
If your kitchen has one impossible strip, claim it first and let the fridge wall work harder for you. For another tiny-space mindset reset, I still send people to your small bedroom actually works for two and your small bedroom finally feels like a couple lives there because the principle is the same: skinny space can still be prime real estate.
A full-extension Blum tandem runner keeps the back of the pullout reachable too. The skinny cabinet rule is simple: if it is at least 6 in wide, it earns a door.
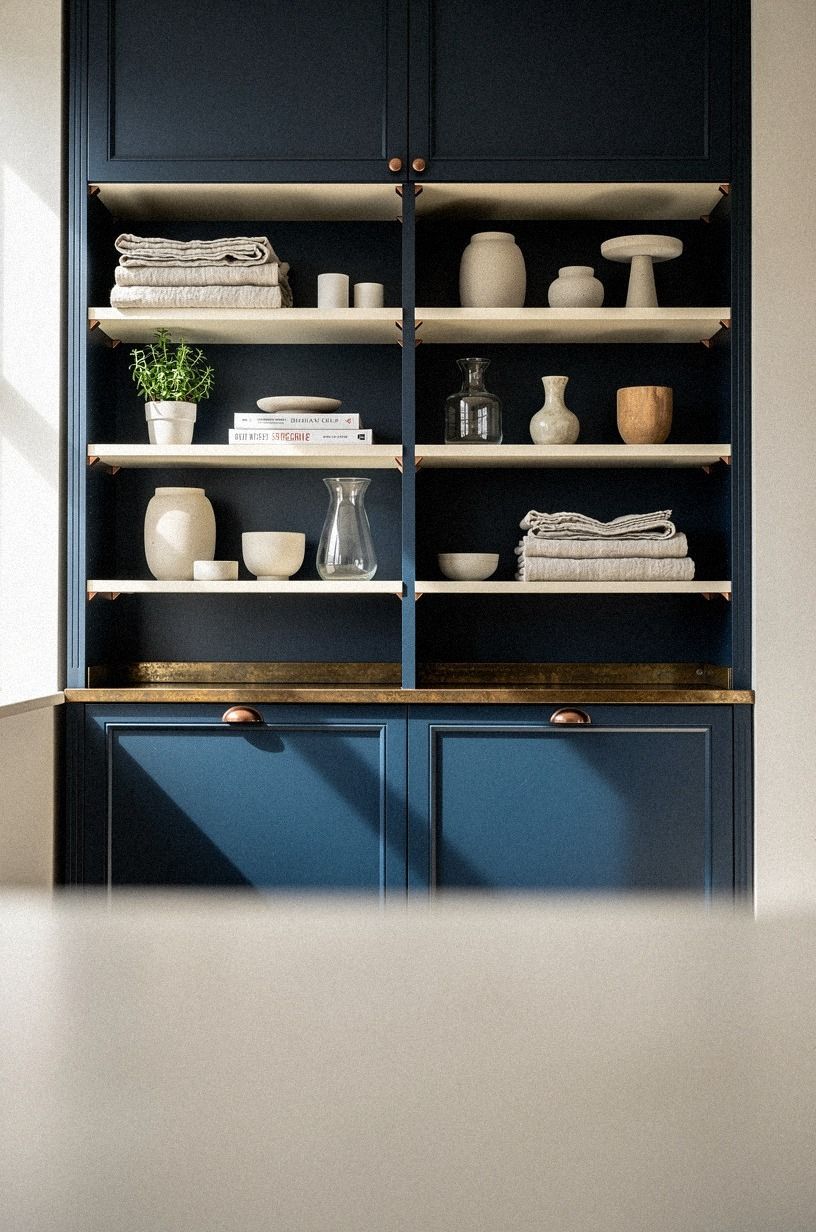
4I stacked glass doors to the ceiling

This one felt risky because you may hear "glass doors" and picture dust, fingerprints, and stress. I get it.
But in a compact kitchen, stacked glass to the ceiling can pull your eye up and make the room feel finished, especially when the lower half of the composition stays solid. The photo gets it right: navy and white on the outside, warm walnut interiors inside the glass, and tall storage that feels intentional instead of top-heavy.
The ceiling line ties the whole composition together. A single frosted glass insert on the middle door is the easiest version of this look.
I skipped wide mullions and kept the frames lean so the cabinets still felt clean. The uppermost section is where you hide seasonal serveware, spare vases, and the pieces you do not need on a Tuesday. Under that, I edited hard. White bowls, one stack of plates, amber glasses.
That's it! You want the glass to create rhythm for your eye, not inventory for your brain. And because the display has to earn its place, I borrowed the same editing rule I use in under bed storage tips and under bed storage ideas: fewer categories, deeper usefulness.
If you love color, warm walnut cabinet interiors keep the glass from feeling cold. A single low-iron glass shelf inside each cabinet adds another layer without blocking the view, and a glass shelf insert is one of the cheapest upgrades in this whole list.
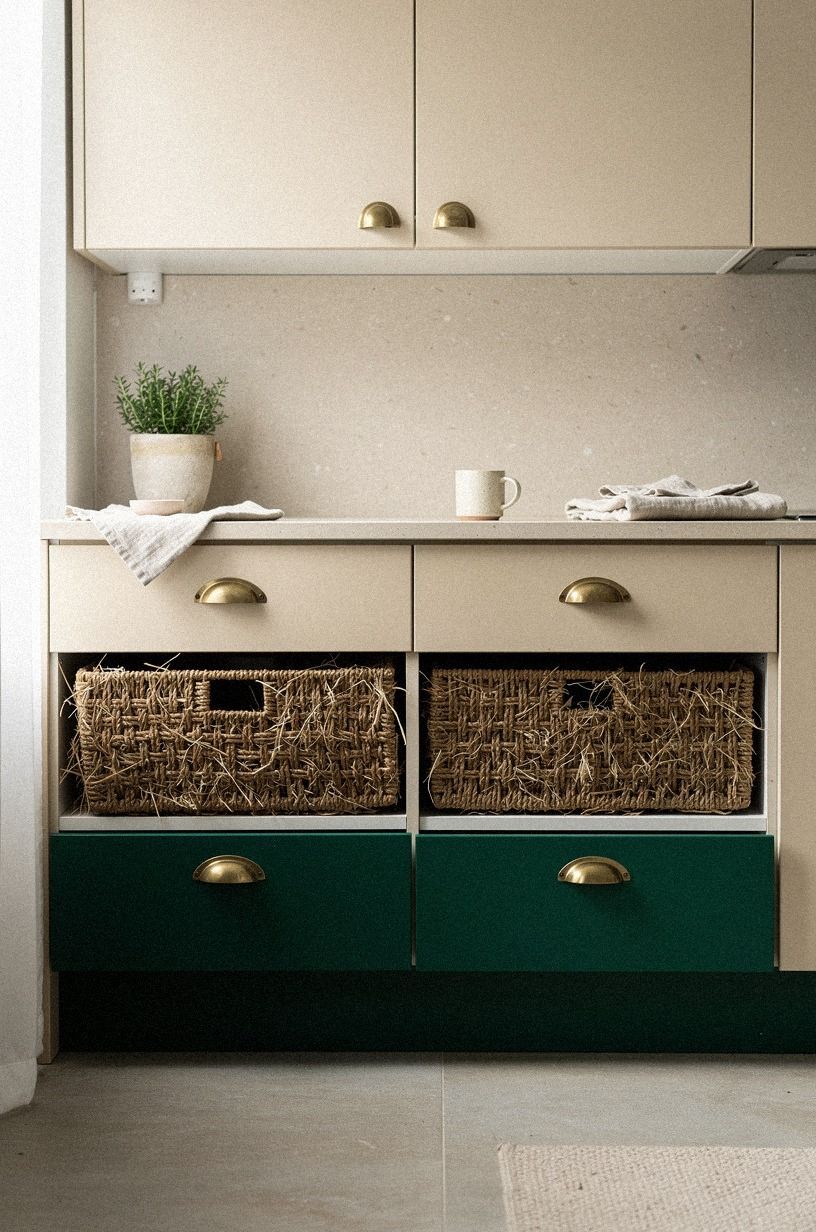
5I added toe kick drawers under everything
Toe kick drawers sound fussy until you live with them. Then you wonder why base cabinets ever wasted that band of space.
In my kitchen, the plinth line became the easiest place to stash flat things I hated storing upright: placemats, freezer packs, cutting mats, and the ugly backup trays I use more than I want to admit. The image shows the idea well, with those low emerald plinth drawers tucked under cream cabinetry like they were always supposed to be there.
The 4 in plinth zone is the storage you were never using, and a single toe kick drawer will surprise you with how much it carries.
This is where numbers help you decide. You already have standard 36 in base cabinetry, so adding storage at the kick line gives you volume without eating aisle width. That matters if your clearances are already flirting with the minimum and you can't spare even a few inches. I painted the drawer fronts in a deeper green than the wall so the line read deliberate, not accidental, and the result feels custom.
But don't use these for heavy pots. I tried that for a week and hated the drag. Flat, light, annoying items only. If your kitchen has no room left above, go below and let the hidden layer do the work.
A push-to-open latch on the drawer face keeps the front clean of knobs.
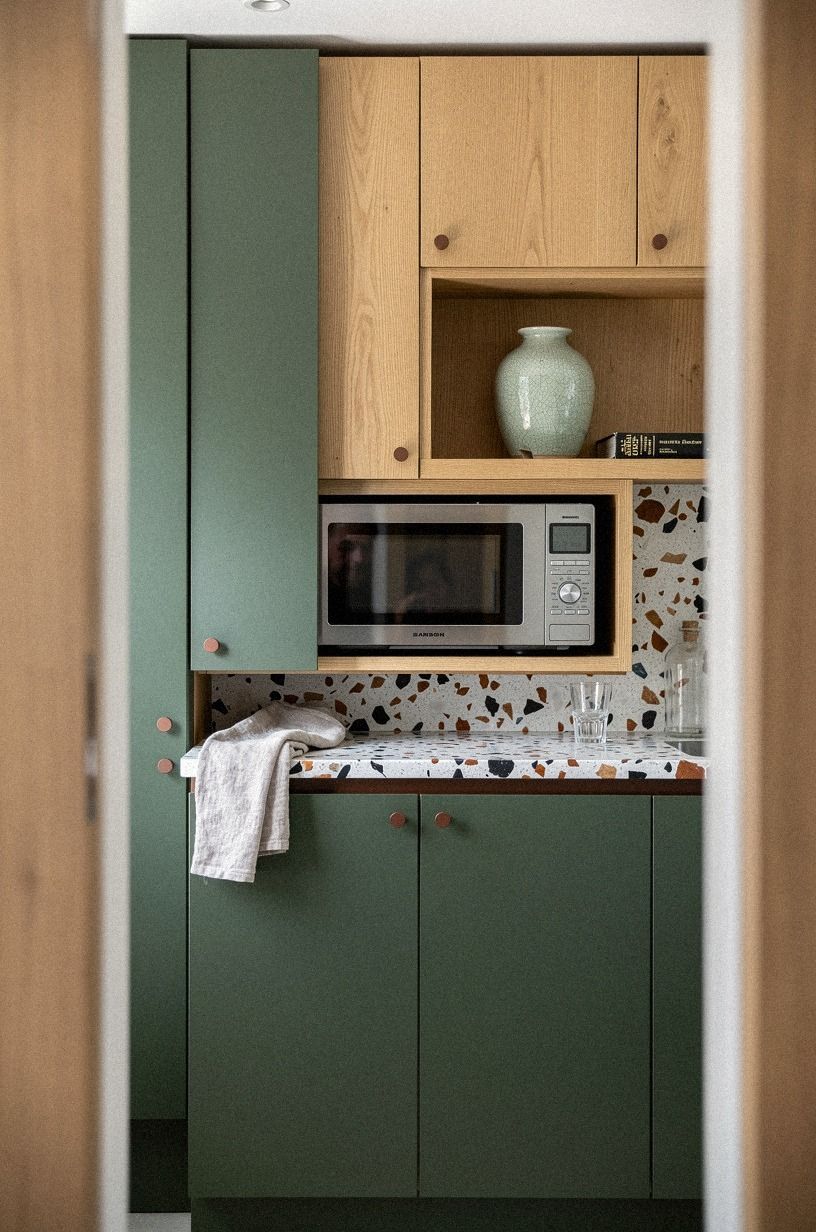
6I hid the microwave behind pocket doors
I resisted this because I thought hiding the microwave was too precious for a small kitchen. I was wrong.
When the appliance disappears behind pocket doors, the whole wall calms down and you get a cabinet face back instead of a black rectangle shouting at you. In the photo, that forest green and natural oak cabinet wall proves the point. You still know the machine is there, but the room no longer revolves around it.
A pair of solid oak pocket doors softened the whole wall, and a single microwave garage is one of the best small-kitchen moves of the last decade.
My doors slide back cleanly, and I kept the cavity vented so the fix felt practical, not cosmetic. I painted the cabinet face close to Farrow & Ball Studio Green No. 93, then added rust-toned pottery nearby so the wall held warmth instead of going flat.
If you're balancing a compact work triangle, small visual quiet matters as much as raw storage. The microwave used to claim counter depth I needed for prep, and now it does not.
Simple. For the same reason I like the best outdoor kitchen countertops ranked compared and summer outdoor kitchen ideas for the best backyard bbqs, I like appliances tucked behind doors: your work surface should read useful first, equipment second. And honestly, opening the pocket doors still feels satisfying!
A soft-close track kit from the hardware store keeps the slide quiet.
7I painted lower cabinets warm mushroom gray
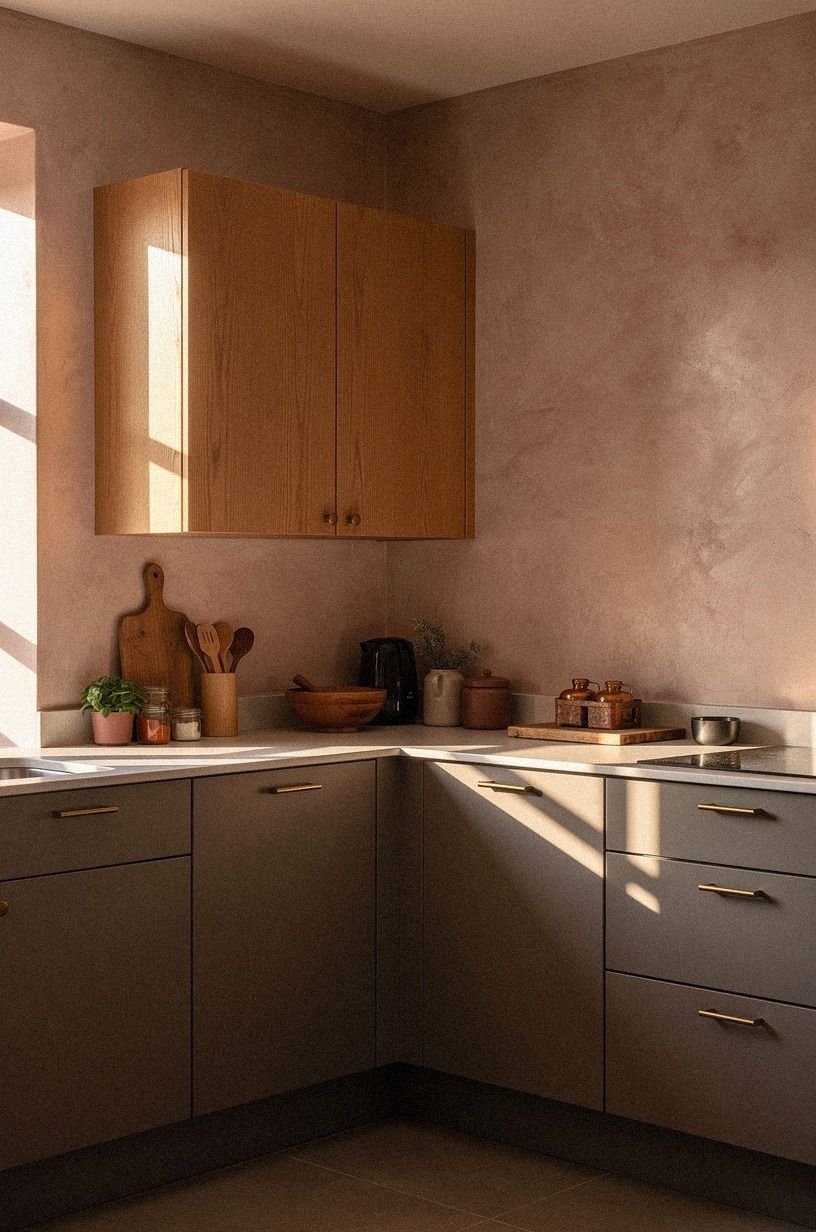
Paint was my cheapest big win, and it fixed the room faster than hardware alone ever could. I kept the uppers light, then pushed the lowers into a warm mushroom gray that sat somewhere between taupe, clay, and shadow.
You can see in the wide work-triangle image how that grounded the floor line while the dusty rose, charcoal, and oak notes around it stayed soft. The room finally looked anchored.
The mushroom gray is the friend you didn't know your kitchen needed. A single oak cutting board resting on the counter pulls the warm gray back into the foreground.
I tried a cooler gray first and hated it by 3 pm. North light turned it dead, and no amount of styling could rescue that.
The warmer version played better with oak, cream counters, and the kind of everyday mess you and I both know never fully disappears. If you want a close paint cousin, Sherwin-Williams Evergreen Fog SW 9130 is useful as a comparison point because it carries warmth without tipping mint.
I wouldn't use a stark greige here. Too flat.
If your small kitchen cabinets are doing too much visually, lower contrast down low can make storage read calmer even before you organize a single shelf. That same tone-on-tone restraint is why I like outdoor kitchen ideas for small backyards big function littl for layout thinking, even indoors.
A satin finish on the lowers wipes clean without looking shiny, and a single satin roller will save you an entire Saturday.
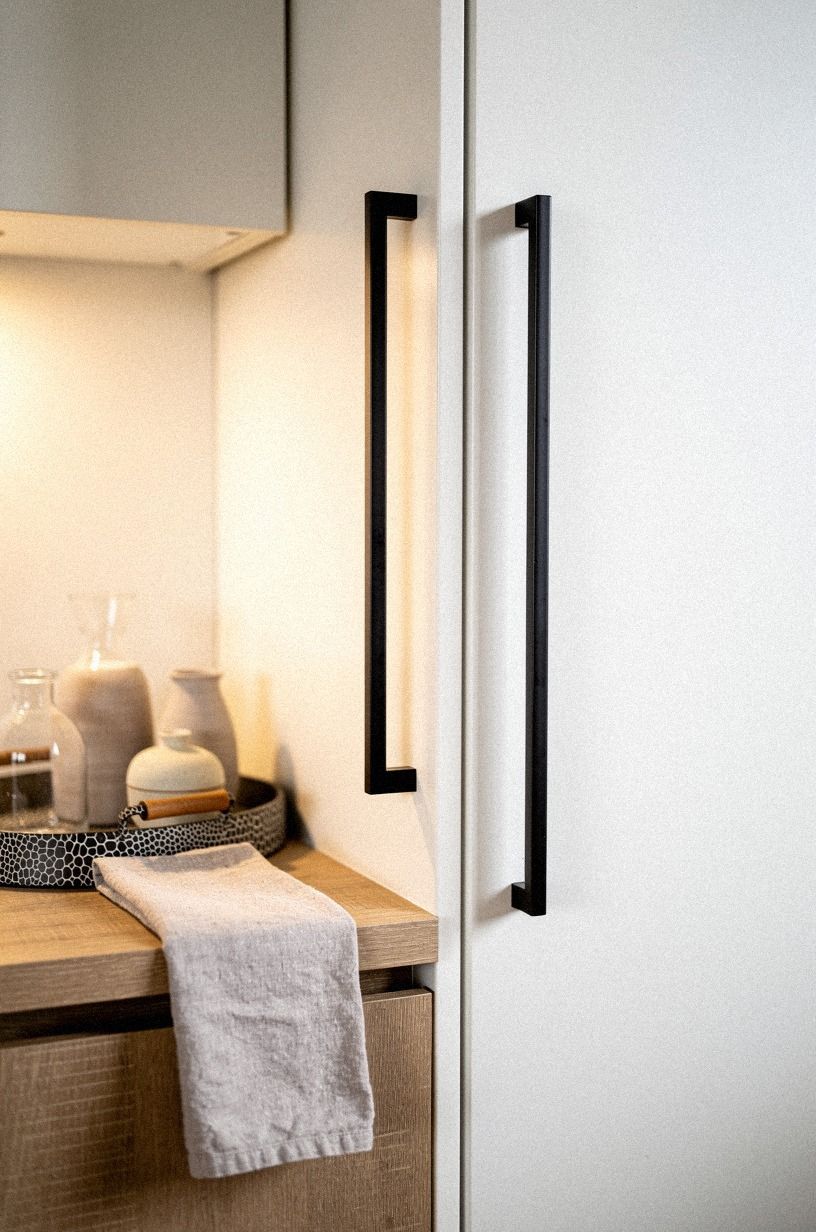
8I used rail pulls on every narrow door
Hardware is one of those details people dismiss until they touch the room every day. In a bank of narrow cabinet doors, little knobs can make the whole setup feel twitchy.
Rail pulls, especially simple black ones on warm-white doors, give you a cleaner grip and a steadier visual line. That's exactly what the photo shows: slim doors, black rails, and a storage wall that feels orderly instead of peppered with dots.
A single matte black pull at 4 in center-to-center is the version that flatters most doors.
I chose rail pulls long enough to visually stretch each door but not so long they looked commercial. That balance matters. Too short and you lose the point. Too long and your compact kitchen starts impersonating an office pantry.
I also spaced them consistently so your hand can move through the zone without thinking, which matters more than people say when you're reaching for snacks, foil, or lunch boxes in a rush. If you're fixing a narrow-door run on a budget, start with the pulls before you repaint. You may not need more than that.
And if you're organizing family overflow beyond the kitchen, your small bedroom finally feels like a couple lives there has the same lesson: repeated hardware can make a cramped wall feel calm. The right pull is one of those $8 to $20 swaps that nobody notices and everybody feels.
9I turned one blank side into shelves
The side of one cabinet run was just a blank end panel, and for months I let it stay blank because I thought open shelves would look cluttered. But a shallow end wall can hold a lot if you keep the depth tight and the palette disciplined. In the low, dramatic image, the midnight blue cabinet end wall now carries slim shelves that read architectural, not improvised, and that's why this works.
The shelves feel built in because they stay narrow, and a single 6 in deep end panel can carry a surprising amount when you stop treating it as wasted space.
I used them for the things you reach for without thinking: salt cellar, tea tins, a folded towel, one cookbook, two jars. Not a whole lifestyle display. If your shelf starts asking for styling help, you've already gone too far.
I painted the side close to midnight blue cabinetry and let the objects sit in ivory, glass, and warm metal so the contrast stayed clean. This is the same move I like in summer outdoor kitchen ideas for the best backyard bbqs: turn the forgotten edge into a working zone instead of pretending it isn't there.
And yes, you do have to dust it. Worth it!
10I tucked spice drawers beside the stove
This was the most obvious fix after I did it, which is always slightly annoying. My spices had been scattered in two uppers and one basket, so cooking meant opening three things before the pan was even hot.
A slim pullout beside the stove solved that in one shot. The close-up image nails the setup: sage green drawer front, warm cream cabinetry around it, and spices kept close enough to grab without turning dinner into a scavenger hunt.
A drawer insert at 12 by 18 in fits the standard base cabinet, and you can drop it in for under $25.
I kept the drawer narrow and shallow on purpose. You don't want duplicate jars sliding into a dark slot where you forget them for six months.
I want labels visible, reach short, and refills somewhere else. That's the whole One-Reach Spice Rule, and if I sound firm about it, it's because I tried the deep-drawer version first and hated how quickly it got chaotic. Beside-stove storage is best when it's brutally edited.
For me that meant oils up top, spices in the pullout, backup packets elsewhere. If you cook in a small kitchen, put the things you touch every night within one pivot of the cooktop and stop making yourself travel for cumin.
A small angled spice rack inside the drawer works too, especially if you decant into matching 4 oz jars.
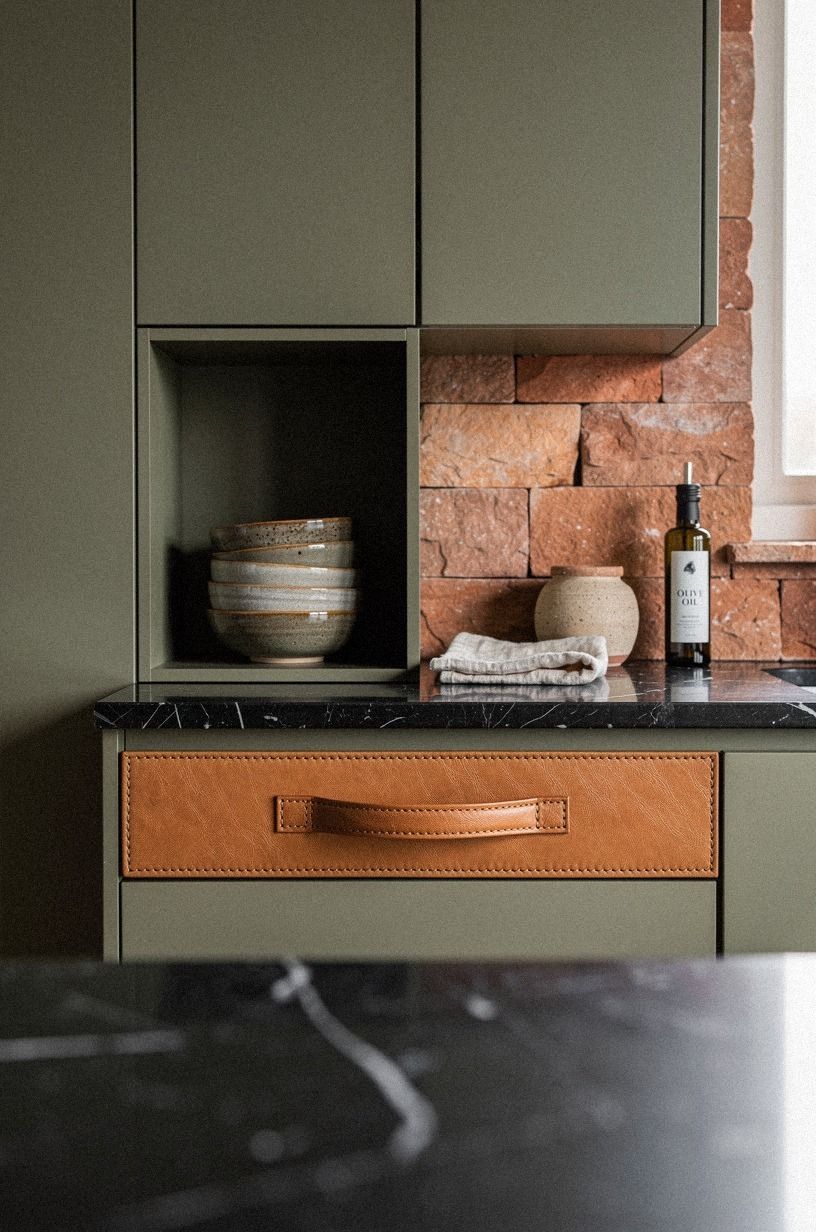
11I left one cabinet open for bowls
Leaving one cabinet open felt wrong at first because I was in full hide-everything mode by then. But one visible zone can make the whole kitchen easier to use if it holds the right thing.
In the image, the open cabinet sits against terracotta stone, olive cabinetry, and that dark Nero Marquina marble counter, and the bowls look grounded instead of exposed. That's the key.
Open storage should hold something soft in shape and steady in color.
I chose bowls because they're light, stack well, and come out constantly. Mugs would have made the composition too fussy. Pantry goods would have looked messy in a week.
Bowls give you ease without showing every part of your life. And if your kitchen is compact, one open niche can break up a solid wall of doors so the room doesn't feel like a cabinet showroom. I also like that guests know where to reach without asking.
Small thing. Big relief. If you're editing for warmth, keep the open stack in chalky stone, creamy ceramic, or matte clay and let the rest stay closed. A single stoneware bowl on the top shelf is the kind of piece that earns the open treatment, and a matte clay bowl is the most forgiving of the bunch.
12I built a slim rollout tray for cutting boards
Cutting boards were the second item I kept tripping over, and yes, I mean that literally. A 12 in rollout tray tucked between two base cabinets, narrow enough to disappear but tall enough to hold every board, sheet pan, and cooling rack I own. The cabinet in the photo shows the move: a single chrome rail, a low wooden lip, and zero wasted vertical space.
The board you want lands at waist height, so you stop leaning into the back of a deep cabinet with a wet hand. A 12 in rollout tray is one of the cheapest upgrades in this whole list.
I'd go with a soft-close on this one. I didn't, and I kicked the rail twice before I learned to push, not slam.
The soft-close drawer runners cost about $40 a pair at the hardware store, and the upgrade is worth every cent. If your base cabinets sit on a 4 in plinth, you've got room for this.
If not, try the toe kick drawer approach from earlier and use that for the boards instead. Two layers, no overlap.
And the rollout works best when you commit to one category per tray: boards on one side, sheet pans on the other, cooling racks up top. Mixing the categories is how you end up sorting the drawer every time you open it. A friend told me the same thing about her linen closet, and the rule is identical: one bin, one job. A single drawer bin is the entire toolkit you actually need.
13What about a pantry wall when you have no pantry?
This question came up three times in the first week I posted this, so it's worth answering here. If you don't have a real pantry, you can fake one with a 24 in slice of wall and a tension rod.
Slim canvas pouches on that rod hold pasta, rice, grains, and the bags of beans you keep forgetting you bought. The image shows the layout: a soft linen pocket wall, a chalk label per pouch, and a counter below that stays clear because the dry goods are up and out of the way.
A simple 24 in slice is enough to fake an entire pantry.
I tried clear plastic bins first, and they made the whole wall look like a warehouse. Canvas hides the mess and softens the look, which matters when the wall sits next to a window. The key is the rod: get a satin nickel tension rod rated to at least 30 lb, mount it between two studs if you can, and hang no more than eight pouches. Once you go above ten, the rod sags and so does the whole illusion.
The honest test is whether the pouches swing when you walk past. If they do, you've overloaded. Same logic applies to the inside of a deep pantry.
I borrow the same restraint from my small outdoor kitchen ideas that maximize every inch notes: every pouch earns a row, every row earns a label, and the wall stays quiet even at full capacity. The canvas pouch swap is what makes the whole wall feel calm.
14I added a magnetic knife strip inside a door
Sounds almost too simple, but hear me out. A 16 in magnetic strip mounted on the inside of a tall cabinet door holds a full set of knives, a steel, and a small pair of kitchen shears, and you free up an entire drawer. The photo shows the strip running along the upper interior of a deep pantry door, knives gripped in a clean line, no block taking up counter space.
The first time I closed the door after dinner, the room felt instantly calmer. The wall-mounted magnetic strip is the cleanest knife storage I have ever used, and a single 16 in strip holds a surprising number of blades.
A simple angled mount keeps the knives from sliding when the door swings.
You want neodymium magnets rated for 25 lb or more, because cheap strips let your blades slide down over time and that ruins the edge. Mount it high enough that the tip of your longest knife clears the door's lower edge, and angle it maybe 5 degrees off vertical so gravity keeps everything in place.
I keep the paring knife at the front, chef's knife in the middle, and the bread knife at the back, and the shears hang on a small hook to the right. It looks organized, and the wall stays blank from the outside. The door is the storage.
If you're working with kid-safe scissors, hang them low, behind a child lock, and you'll have the best of both worlds: hidden and quick.
15I swapped bulky bins for CB2 Primitivo bouclé baskets
Some bins shout storage. Others dissolve into the room.
The difference is texture, not color, and a set of soft, neutral baskets will always read as a styled shelf, not a cleanup project. I use CB2 Primitivo bouclé baskets in cream and warm camel for my open shelves, and the bouclé weave catches the light just enough to look intentional. They're about 12 by 10 in, which fits a standard cabinet run, and the soft handles mean I can pull one out one-handed.
The woven cream tones fade into a warm wall instead of fighting it, which is exactly the goal. A single woven tray underneath protects the shelf and adds a layer of texture.
The cheaper version works too. IKEA FLODDRAN baskets in jute blend run about $6 a piece, look 80% as good, and survive a wash. I mix the two on the same shelf: the CB2 ones up high where guests see them, the FLODDRAN ones down low where kids grab them.
Same rule I used for the spice drawer: visible zones earn the upgrade, hidden zones earn the budget pick. If you're trying to make a small kitchen cabinet feel less like a cabinet, soft baskets buy you more calm than any paint job.
The detail that makes soft baskets work is the label: small black chalk tags, two words each, on the front. Rice. Snacks. Linens.
Done. If your eye can read the row in three seconds, the shelf has done its job.
16I went for IKEA SEKTION over custom build-outs
Here's the part where I might ruffle a few feathers. Custom cabinetry in a small kitchen is usually a mistake. Not always, but more often than people want to admit.
The lead time alone kills momentum, and by the time the install crew shows up, you've lived around the problem for so long you've forgotten why you started. I went with IKEA SEKTION boxes, custom fronts, and a couple of clever inserts, and the entire kitchen came together in two weekends with one helper. That's the honest timeline, and a single IKEA Brooklyn trip is the best design research you will do all year.
You can spend more, sure. A full custom shop will charge three to four times the SEKTION cost, and you'll wait eight to twelve weeks for the build. For a small kitchen, where the room is the limit, the cabinet brand rarely is. The parts that matter: the box construction (SEKTION is solid), the hinges (soft-close BLUM hinges, included), and the fronts (which you can order from a third party if you want a specific profile).
That's the whole stack. The savings went into the book-matched walnut pullout, the Farrow & Ball Studio Green paint, and a real quartz remnant for the corner shelf. Spend on the visible material. Save on the box nobody sees.
The math works.
17Why does a small kitchen punish you more than a big one?
Because every wasted inch becomes a daily obstacle. In a big kitchen, a clunky upper cabinet is an eyesore.
In a small kitchen, it's a daily annoyance that costs you time, energy, and patience. A 3 in sliver beside the fridge might not matter in a 200 sq ft kitchen.
In a 70 sq ft galley, that same sliver can be the difference between cooking at home and ordering out. A small kitchen is less forgiving in every way, and that is exactly why the fixes hit harder.
The 3 in sliver is the simplest example of why this scale punishes you more.
There's also a perception problem. Small kitchens feel smaller when the storage is loud.
Tall uppers, fat hardware, and chunky bins all signal "this room is stuffed," and your brain accepts that as fact. The fix is mostly visual quiet: lighter doors, slimmer pulls, hidden appliances, and one open niche that lets the room breathe. The moment the eye stops scanning for stress, the kitchen starts feeling larger.
It's not magic. It's how contrast works.
Farrow & Ball Down Pipe on the lowers against Benjamin Moore White Dove on the uppers is a textbook move, and the room will look twice the size without adding a single square foot. If you're working in a tight footprint, your paint choice is doing as much work as your cabinet plan.
Don't skip it.
18I lined the inside of every drawer with cork
This one's cheap, reversible, and the kind of detail that quietly changes how a kitchen feels.
19How do I know which dead zone to fix first?
The honest answer: the one that costs you the most steps per week. Stand in your kitchen for two minutes and count how many times you cross the room for the same thing. Spices?
Bowls? Cutting board?
That tally is your priority list. In my kitchen, spices cost me four extra steps a night, the microwave cost me ten, and the cutting board cost me five.
I fixed them in that order. The fridge sliver was a different problem (storage, not steps), so I left it for last. A simple paper tally sheet on the fridge is the cheapest design tool you will ever own.
The next level of the question is harder: which fix gives you the most visual calm for the least money? For most small kitchens, that's paint.
Benjamin Moore White Dove OC-17 on the uppers, Farrow & Ball Studio Green No. 93 on the lowers, a satin nickel pull, and your kitchen looks remade for under $400. The deeper builds (toe kick drawers, pocket doors, walnut pullouts) come after, and only if the room still feels off once the paint dries.
The mistake I see in almost every kitchen account online is starting with the cabinets and ending with the styling. Reverse it.
Style first, build second, and let the work tell you what's still missing. A simple paint plan is the highest leverage of any first move, and a single paint swatch is cheaper than any storage bin you will buy.
Why did the room calm down so fast? The One-Reach Rule
What surprised me most was that the kitchen didn't improve because I added more places to put things. It improved because I finally chose what deserved immediate reach, what could go high, and what needed to disappear. I used to think small kitchen storage was a shopping problem.
Buy the right insert, buy the right bin, buy the right label maker, and somehow your cabinets would start behaving. They don't.
Not if the layout itself keeps asking you to cross the room for a bowl, bend for the microwave, or stack useful things behind decorative ones. The storage paradox is the part most remodel shows never name, and it is the most expensive lesson in this whole list.
My mistake was treating every cabinet like it should do equal work. That's not how small kitchens succeed.
One zone has to become your daily landing spot. One run should carry the visual quiet. One skinny slot should absorb the awkward items.
Once I accepted that, the room got easier to use and easier to look at, and a single daily landing spot is worth more than ten new bins you will never fill.
If you're deciding where to spend, spend on access before finishes. A pullout beside the fridge, a toe kick drawer under the sink run, or a pocket door for the microwave changes your day more than one more pretty front ever will.
And I'd say that even though I love paint. Paint helped.
Hardware helped. But the real shift was functional honesty. I stopped pretending I needed more display space and admitted I needed smoother movement.
That is the part no Instagram kitchen reveal is ever going to teach you, and it is the part that matters most.
There's also a reason this matters emotionally. In a small kitchen, visual friction becomes mental friction fast.
When you start dinner already irritated by the counter corner, the room feels mean. When the bowls are where your hand expects them, the microwave disappears, and the spice drawer opens next to the stove, the room starts helping you back. That sounds dramatic, but you know it when you feel it.
I did. The right layout grammar is what makes the room feel like it is on your side, and that is the part no glossy magazine will teach you.
So if your cabinets are full and the kitchen still doesn't work, do not start by buying a prettier organizer. Start by asking a ruder question: what in here makes me move twice for no reason?
That's the thing to fix first. The part that worked for me was not more storage.
It was storage with a pecking order. I landed on the same logic I use in small outdoor kitchen ideas that maximize every inch: every step you remove gives the room a little more grace. The kitchen workflow audit is the cheapest design exercise you will ever run, and it will tell you what your kitchen actually needs.
How much it cost: The two-tier spend
I kept my makeover in the cosmetic lane on purpose, because full cabinet replacement wasn't happening in this house. My spend landed between a weekend refresh and a more layered mini-upgrade: paint, new rail pulls, one pullout run, toe kick drawers, and the pocket-door microwave fix.
If you're budgeting your own version, these are the ranges worth knowing. The $300 to $1,500 cosmetic band is where most small kitchens should land, and it will surprise you how much it does.
My own numbers sat closer to the first tier plus one or two custom touches. That was enough. I didn't touch the footprint, kept clearances intact, respected the 42 to 48 in rule where movement matters, and left the expensive countertops for another year.
If you're wondering what I'd skip to save money, it would be full front replacement. Paint the lowers, change the pulls, and solve one dead zone first. That's where you feel the win.
The cosmetic lane is where most of us live, and it is far more capable than the magazines admit. A single dead zone is the highest-leverage fix in any budget.
The Questions I Get Asked Most
What is the best 11 Small Kitchen Cabinet Ideas That Maximize Storage for a small kitchen?
The best move is the one that cuts a repeat annoyance first, and for me that was the skinny pullout plus the cleared counter corner. Fast access beats pretty overflow in a tiny kitchen. One narrow cabinet, one edited prep zone, and the room starts pulling its weight.
Where can I buy 11 Small Kitchen Cabinet Ideas That Maximize Storage pieces on a budget?
Start with IKEA, Target, and Wayfair for shallow cupboards, rails, and simple shelf parts. Facebook Marketplace is still the best place to find one-off cabinet pulls or paintable extras. I also reuse ideas from small outdoor kitchen ideas that maximize every inch when I need compact planning.
How much does a 11 Small Kitchen Cabinet Ideas That Maximize Storage makeover cost?
Most cosmetic makeovers land around $300 to $1,500, and that's enough for paint, hardware, and one smart storage fix. Mid refreshes run much higher once you add lighting or tops. Free helps count too: clearing the counter corner costs nothing and changes the room immediately.
Can I create a 11 Small Kitchen Cabinet Ideas That Maximize Storage on a budget?
Yes, and you should start with the cheap wins. Paint, hardware, and editing beat overbuying organizers.
Cleared counter zone. One rail-pull swap. A thrifted crock for utensils.
You can make your cabinets feel calmer before you spend on custom work.
Is a 11 Small Kitchen Cabinet Ideas That Maximize Storage worth it in a small space?
Yes, more than in a big kitchen, because every wasted inch shows up faster. Small spaces reward precision. Keep your daily items within one turn of the stove, protect your prep area, and let one cabinet run hold the visual calm for the whole room.
Is 11 Small Kitchen Cabinet Ideas That Maximize Storage a good idea for a rental?
Yes, if you stick to reversible moves. No-drill, low-risk upgrades still buy you function.
Removable rail hooks. Freestanding shelf risers.
Peel-and-stick backsplash. Better bins inside the doors.
I use the same renter logic I like in under bed storage tips.
Where I'd Start First: The Fridge-Side Rule
If I had to pick one, I'd start with the fridge-side skinny pullout. Dead slivers waste more daily storage than people think, and fixing that gap changes how the whole wall behaves.
The 6 in sliver is the highest-leverage fix in this whole room. Pin this idea for later and clear your counter corner the same day. A single pullout changes more than a dozen pretty fronts, and that is the part the magazines never print.