How to build a cheap, sturdy DIY cinder block outdoor kitchen comes down to three things: a level pad, filled block cores, and a counter that doesn't pretend to be fancy. I learned that after pricing prefab carts that looked good online and wobbled in person. You do not need a mason's budget for this. You need a simple plan, the right clearances, and a little patience.
The Cheap Weight-First Rule
If you are wondering what this kind of project usually costs, the short answer is that a basic outdoor build can stay far below a full kitchen remodel because you are using block, gravel, and simple finishes instead of custom cabinetry. I like starting with the numbers because you can make better calls when you know where the money usually goes.
For this block build, your cheapest wins are the ones with real mass: gravel, block, rebar, and paver caps. Save your money for the grill opening, counter surface, and any water hookup you can't fake twice.
If you want more layout ideas before you commit, look through free DIY outdoor kitchen plans to build this weekend and outdoor kitchen ideas on a budget that stay DIY friendly. You'll spot fast what belongs in a budget build and what only looks budget on day one.
- Start with a level gravel pad for drainage
- Map the grill wall around cinder block modules
- Mark utility clearances before stacking the first course
- Dry stack cinder blocks around the grill bay
- Anchor rebar through every corner block
- Fill block cores with concrete for weight
- Build a vented grill opening with fire brick
- Set paver caps as cheap counter slabs
- Run a simple prep counter beside the grill
- Add a hose sink with a bucket drain
- Mount a cedar tool rail above the backsplash
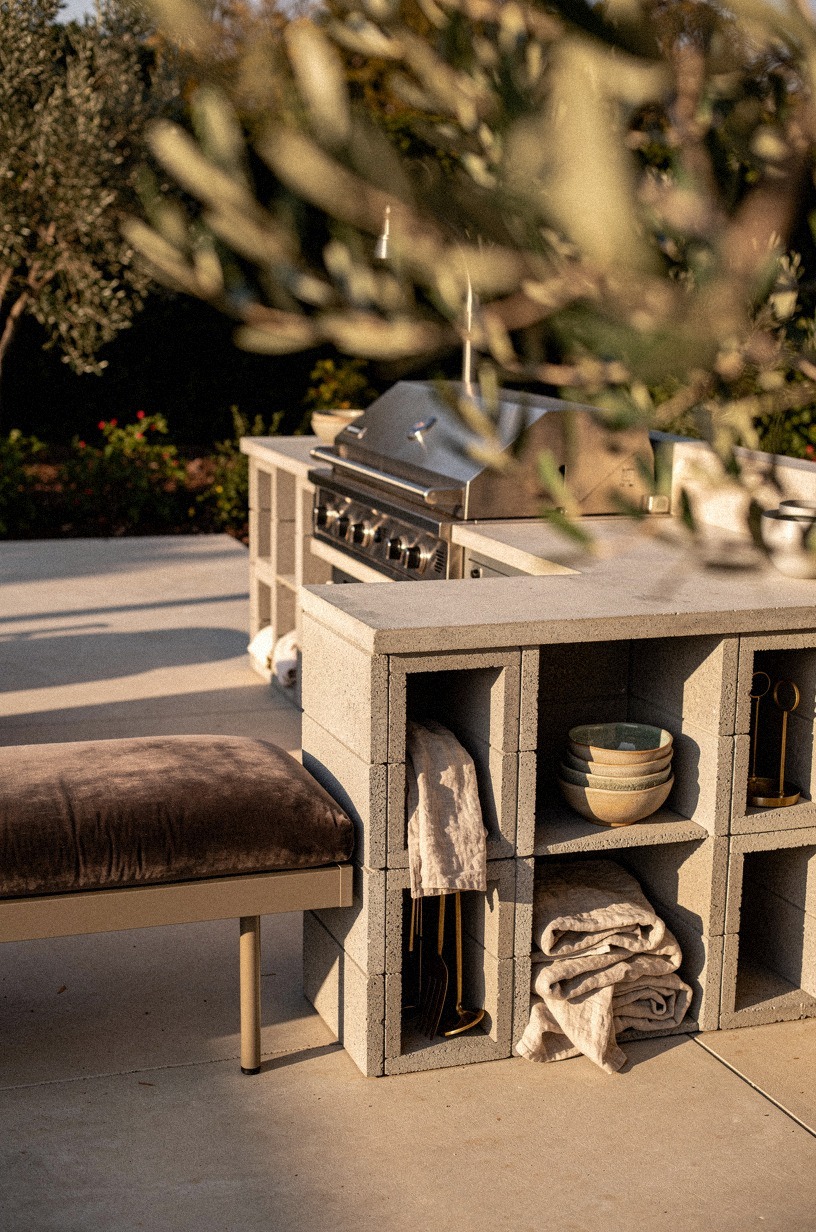
- Stack side blocks into open storage cubbies
- Layer concrete board under the hot zone
- Tile the grill wall with budget porcelain
- Hang battery sconces over the cook line
- Create a narrow serving ledge along the back
- Plant herb crates beside the prep station
- Seal the blocks with charcoal masonry paint
- Finish with gravel paths around the kitchen
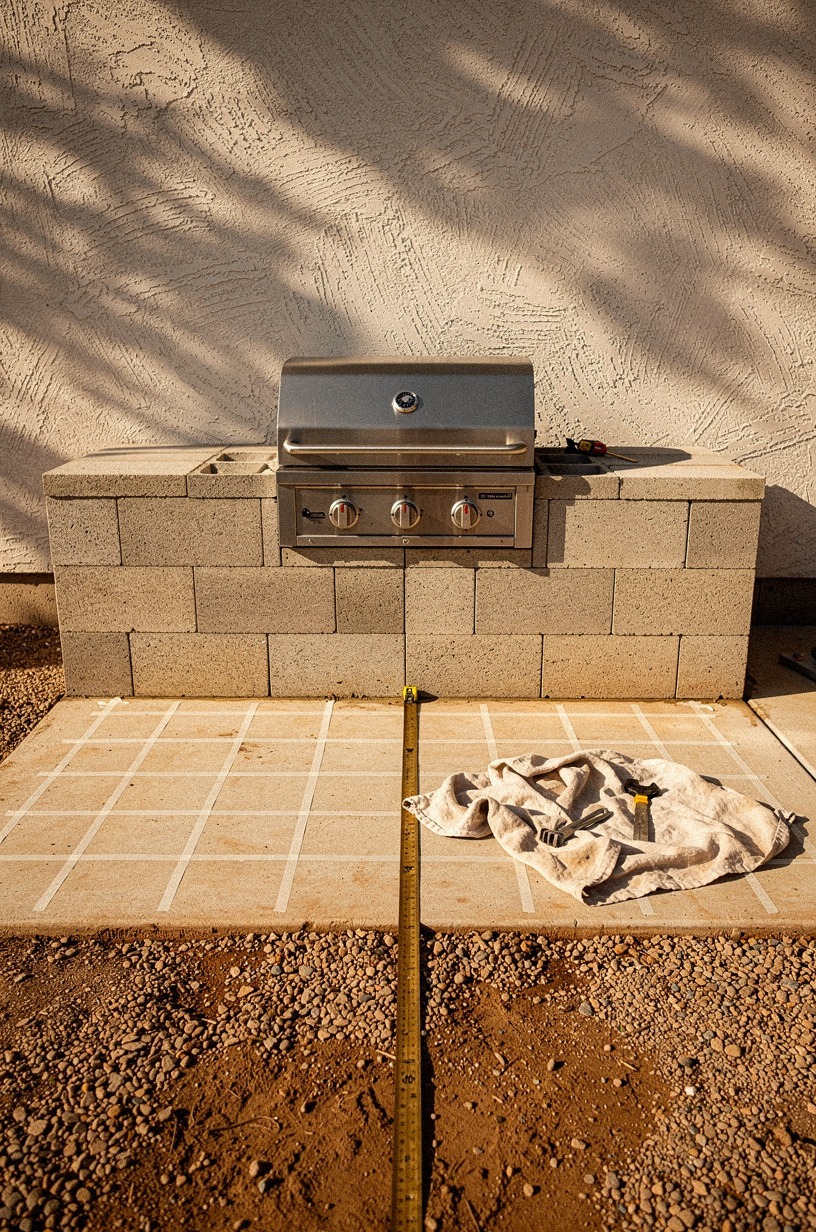
1Start with a level gravel pad for drainage
Start here, not with the block. Your gravel pad is what keeps the whole outdoor grill wall from sinking crooked after the first hard rain, and you want it level before you admire anything.
I like a compacted base of crushed gravel because it drains fast, locks together, and still feels forgiving under a beginner build. A cheap steel rake, a tamper, and a long level do more for this project than a fancy countertop ever will.
Give yourself enough footprint for the block base plus walking room, especially if your grill space sits near a wall or fence. A 42 to 48 in clearance around the working side is the number worth respecting if you do not want every cookout to feel cramped.
I made the mistake once of building to the block line only, and the path around it felt mean and tight. For more small-footprint planning, small outdoor kitchen ideas that maximize every inch is a smart sanity check.
2Map the grill wall around cinder block modules
Map the whole diy outdoor bbq area before you stack a single block, because the block dimensions decide everything after that. Painter's tape on the pad works well, and so do dry outlines with chalk if the surface is dusty. I like to set the stainless grill insert in place first, then step back and build the module lines around it.
That first-person walk-up view tells you fast if the layout feels centered or annoyingly off.
You want the grill bay to read as the anchor, not a hole you squeezed in later. Standard counter height lands at 36 in, so map your courses with the cap thickness included before you start guessing. But do not chase symmetry so hard that you ignore how you move.
If you want another beginner-friendly planning walkthrough, how to build an outdoor kitchen: a beginner's guide covers the sequencing you should settle before the first stack.
3Mark utility clearances before stacking the first course
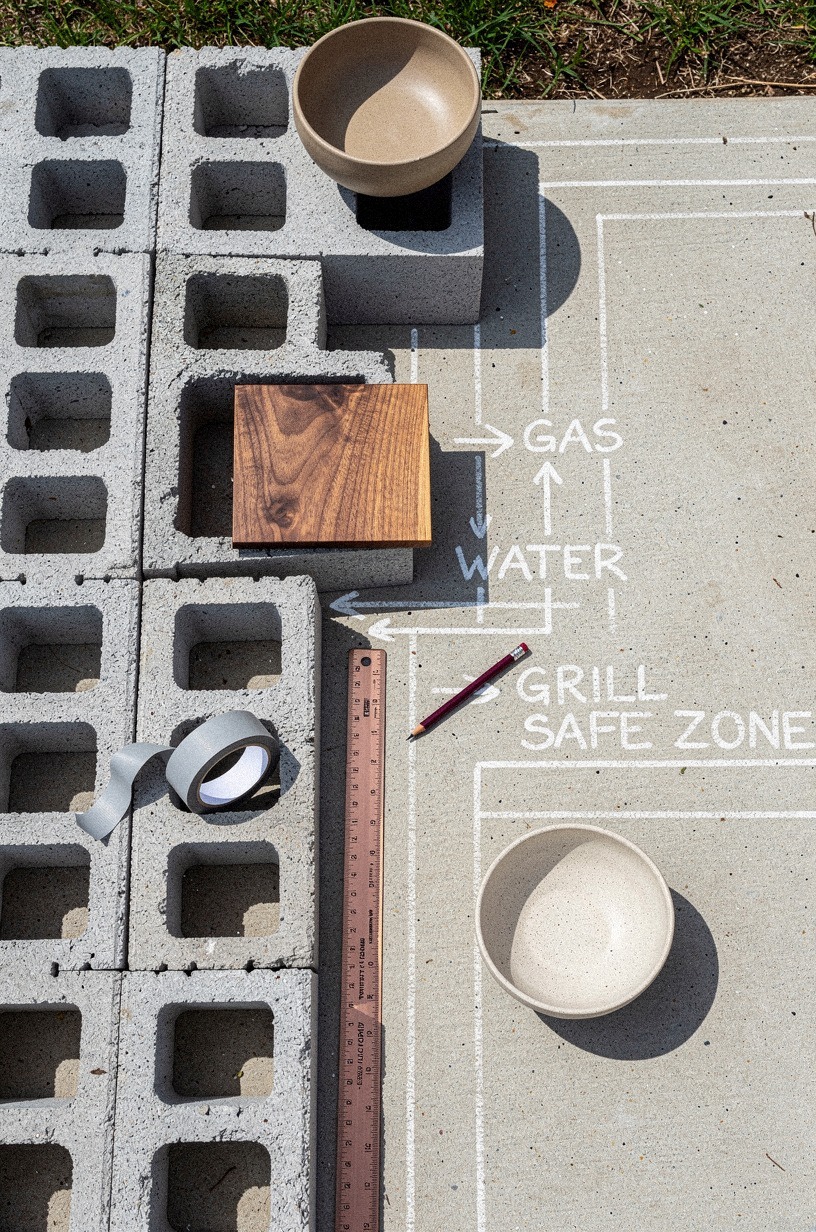
Mark every gas, water, and access path before the first course goes down. It feels fussy in the moment, but this is the step that keeps your back garden bbq ideas from turning into a demolition project two days later.
Chalk your hose route, your grill ventilation space, and the swing you need for any access panel. I also mark where my feet naturally stand, because a clearance that works on paper can still feel wrong when you cook.
Leave yourself room you can live with, not room that only passes a measurement. If you are using a sink fed by a hose, draw that line now and keep it away from the hot zone.
And if the kitchen backs onto a deck, study how to build an outdoor kitchen on a deck with ideas and tips before you commit to placement. A neat overhead plan saves your first course from becoming expensive rubble.
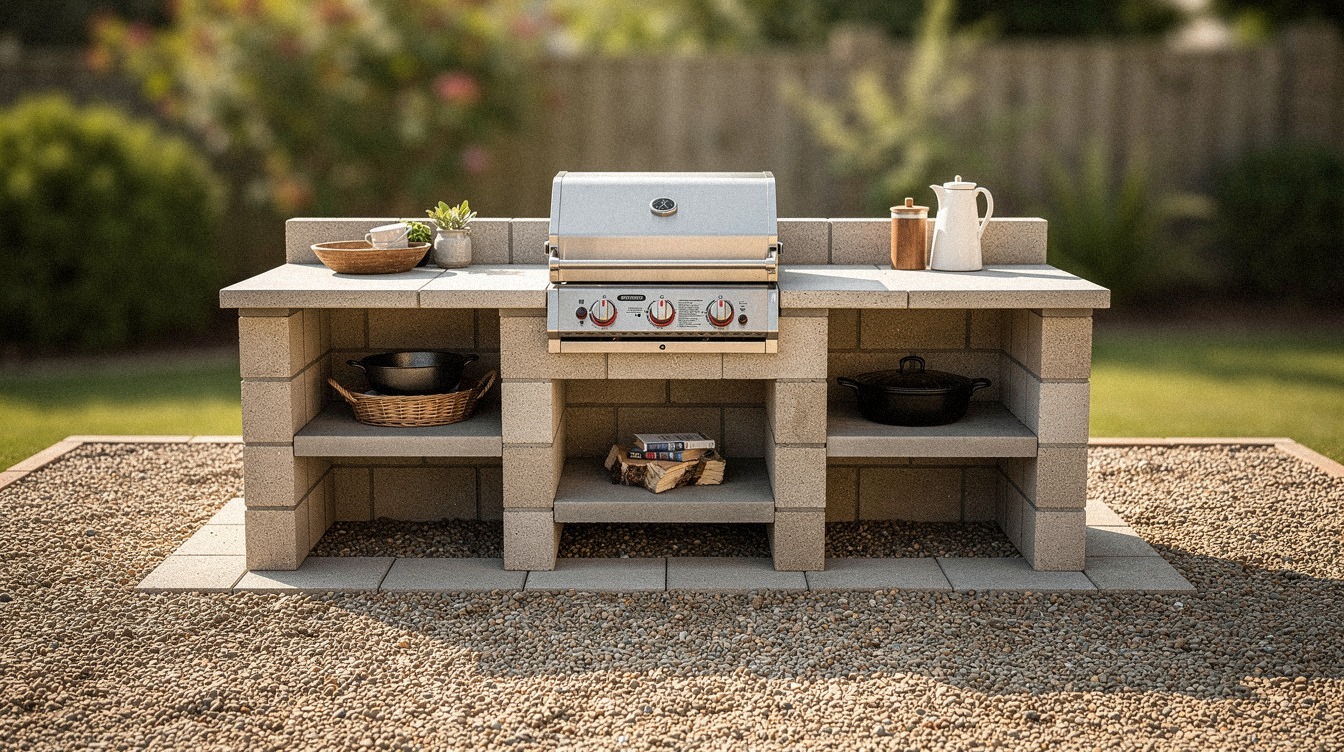
4Dry stack cinder blocks around the grill bay
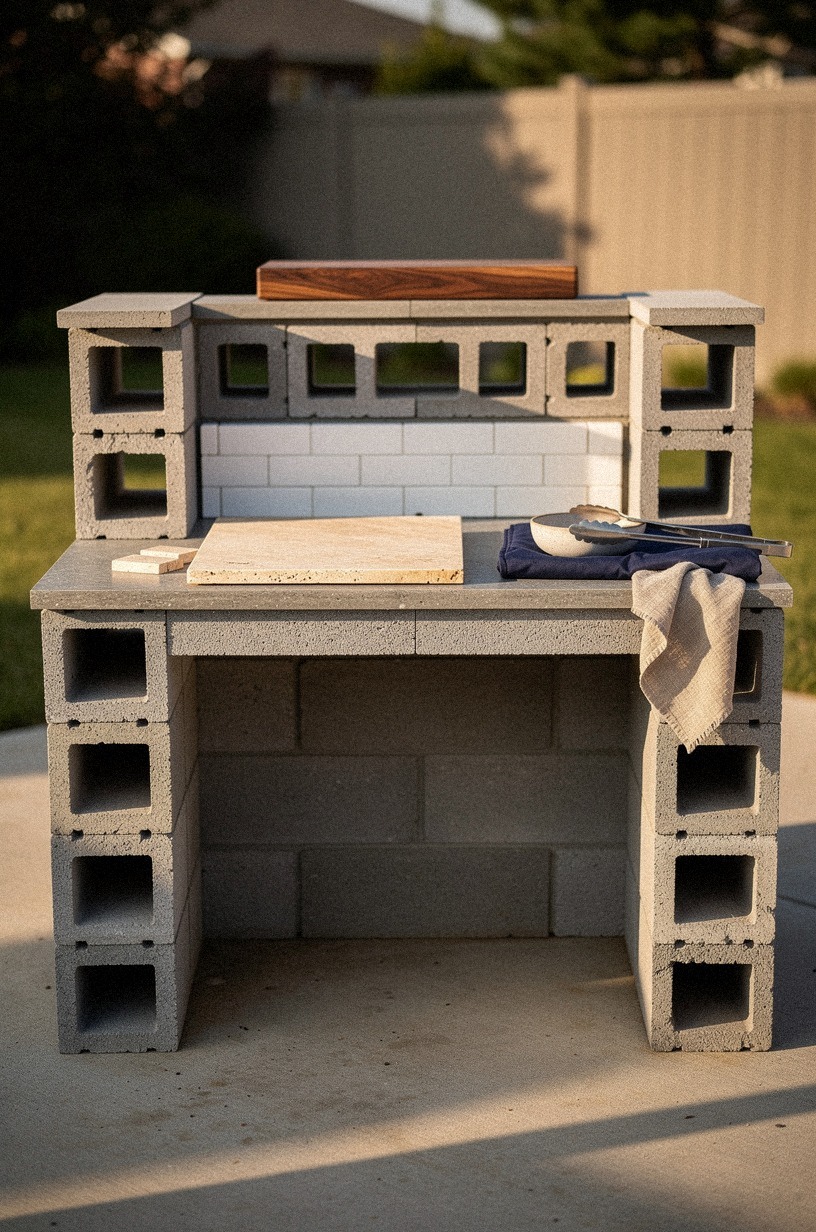
Dry stack first, always. You learn more from one test U-shape around the grill bay than from ten minutes staring at block counts in your notes.
The photo angle here should make you want to see the whole kitchen, not one cropped detail, so build with that same logic: full forms, readable runs, generous openings. I like standard concrete block with clean edges, then a couple of travertine samples on top so I can judge warmth against the raw gray.
As you stack, keep the grill insert centered and the side runs believable for prep, not just decoration. If a course starts drifting, pull it apart now.
It's cheap labor at this point. But once you fill cores, every bad decision gets heavier.
If you need more rugged inspiration for shapes that do not feel flimsy, stone outdoor kitchen ideas for a timeless rugged look is useful for proportion, even if you are staying with block.
5Anchor rebar through every corner block
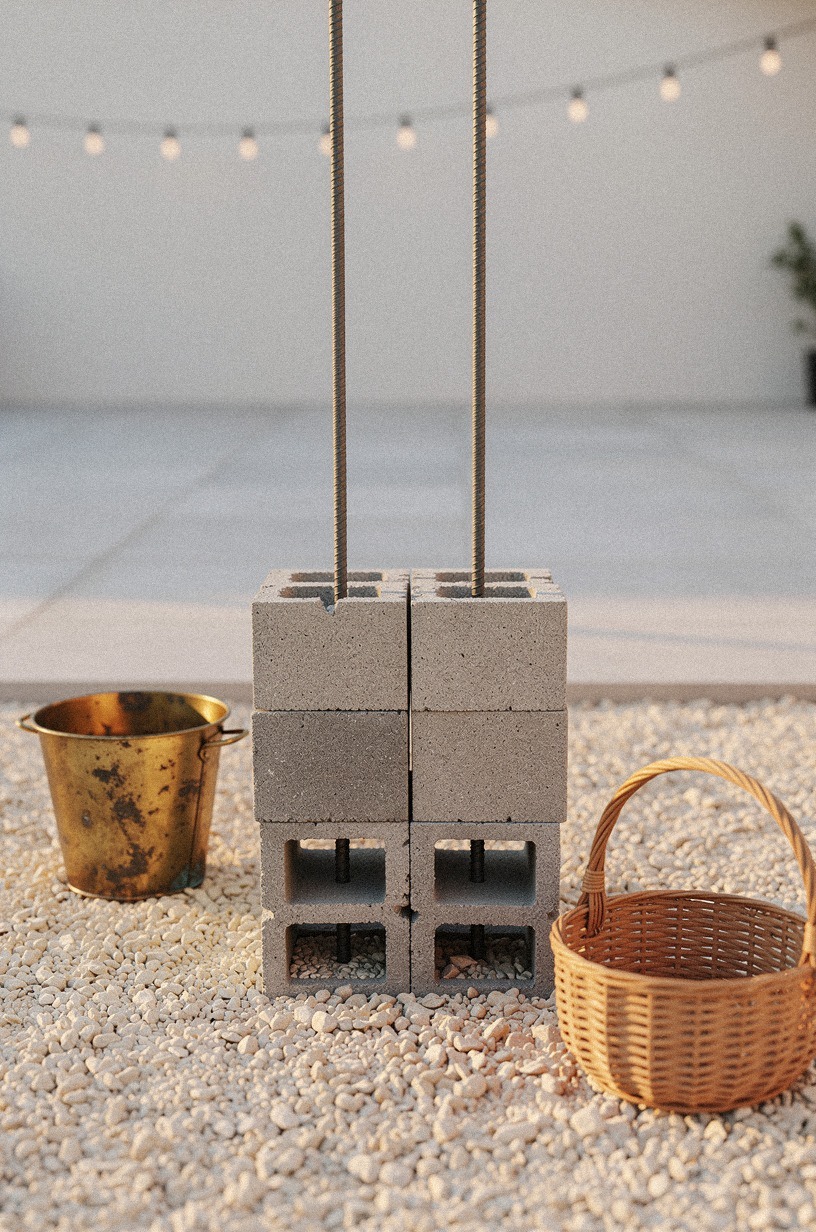
Anchor every corner block with rebar, because corners carry the story of whether this build feels sturdy or fake. I use vertical pieces dropped through the corner cores, then check plumb before moving on.
It isn't glamorous, but it's the step that turns stacked block into a small structure. You do not need heroics here. You need straight steel and enough patience to reset one block if the line goes soft.
Corners are where wobble starts, and wobble travels. That's why I wouldn't skip steel even on a tiny grill space. A cheap kitchen can look clean; it can't look apologetic.
And once the rebar is in, you can stop second-guessing every touch on the frame. Your future self will feel it when guests lean on the corner and nothing shifts.
That's the kind of cheap you want!
6Fill block cores with concrete for weight
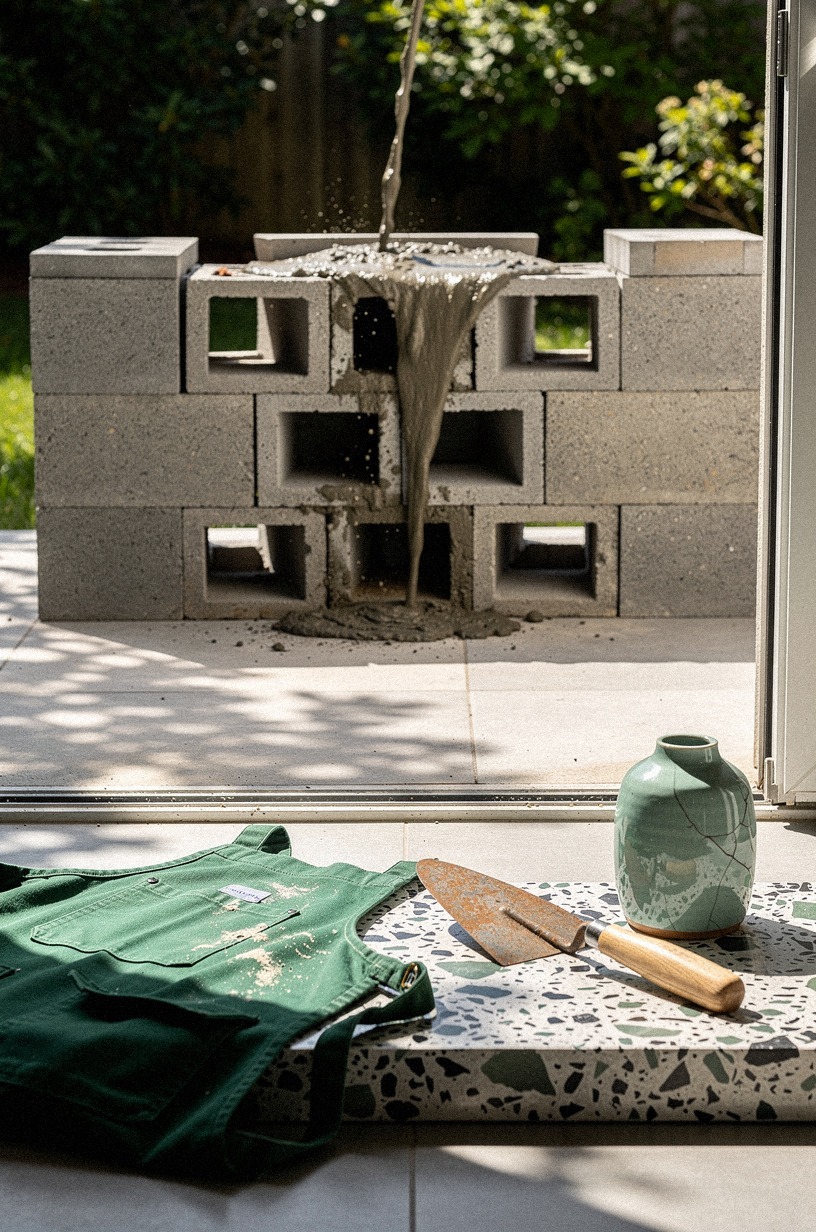
Fill the cores that matter with concrete for weight, especially around corners, grill supports, and any end block carrying a counter cap.
7Build a vented grill opening with fire brick
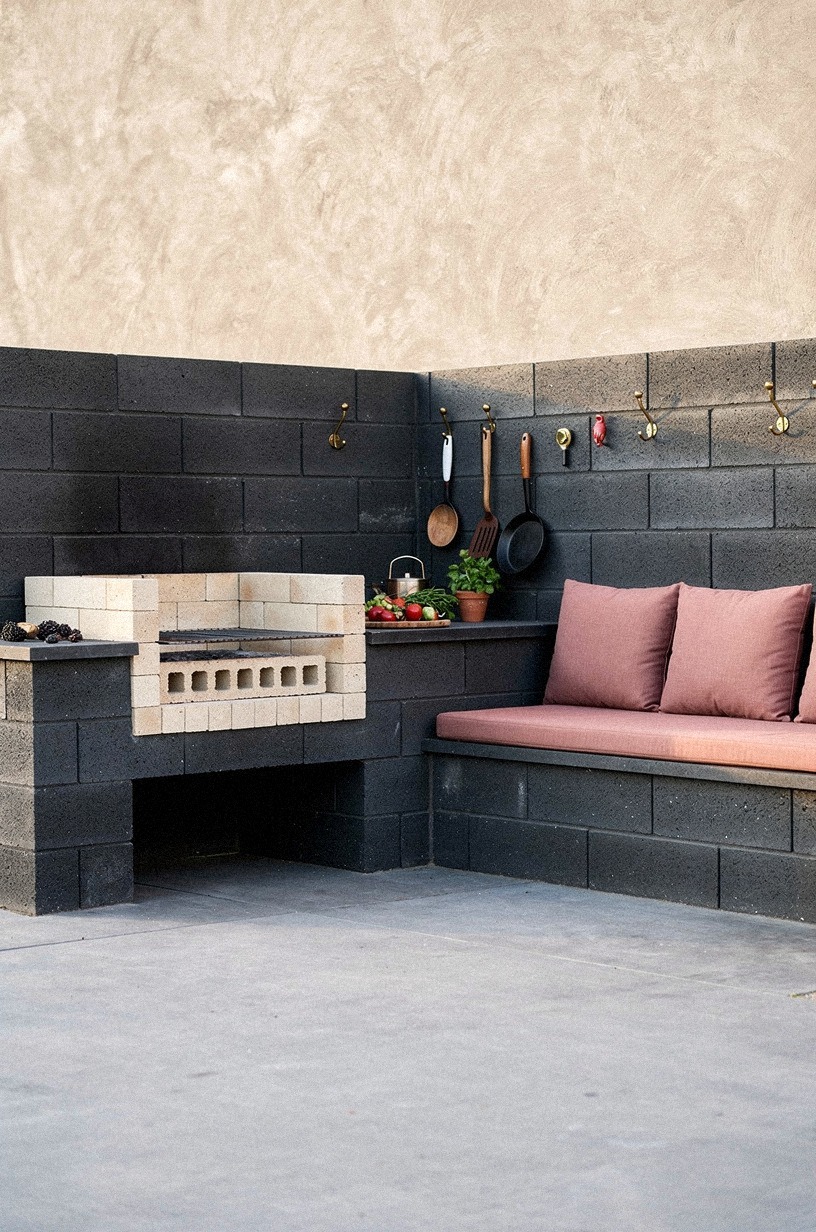
Build the grill opening like heat matters, because it does. You want a vented cavity, enough breathing space around the insert, and fire brick where the real punishment happens.
I wouldn't trust raw block alone right beside live heat if you are doing frequent charcoal cooking. The safer move is a lined opening that treats the hot zone as its own system instead of pretending the whole wall sees the same stress.
Keep the opening generous enough that you can slide the grill insert in without scraping every edge. If you are using charcoal, venting is not the place to get clever.
Why build a sturdy shell if the hottest part is the one corner you rushed? For more grill-wall inspiration with stronger visual mass, rustic outdoor kitchen ideas for a charming cookout space can help you judge openings, textures, and side runs.
8Set paver caps as cheap counter slabs
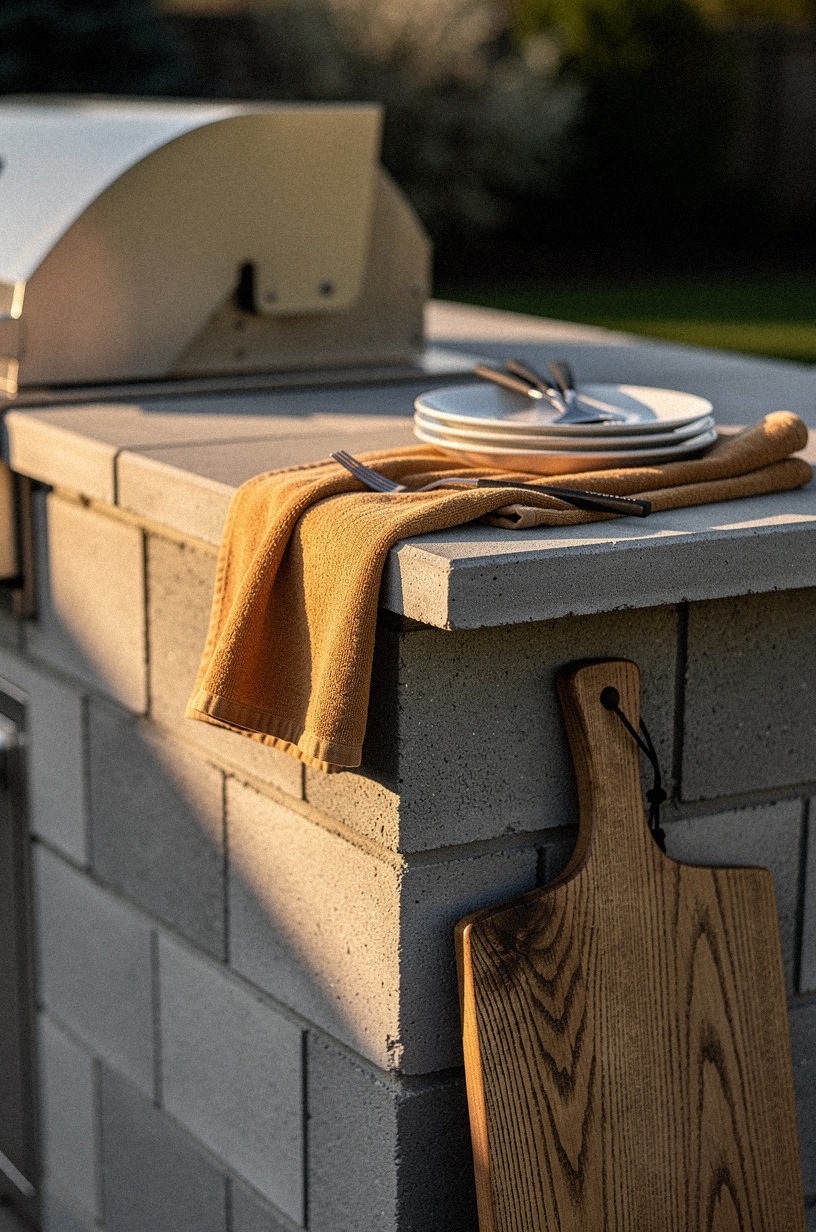
Set paver caps as your counter slabs if you want the project to stay cheap without looking flimsy. Thick concrete caps have the right attitude for block, and they do not force you into precious behavior the way a pricey quartz top would.
I like dry-fitting every cap first, then checking overhang with a tape instead of trusting my eye. Cheap counters still need deliberate edges.
And a modest overhang reads cleaner than a dramatic one, and it feels safer on a beginner build. If you want a warmer look, test your gray caps beside Benjamin Moore White Dove OC-17 on a sample board and see how much lighter the whole kitchen feels.
And if you are comparing layouts that use more finished tops, free DIY outdoor kitchen plans to build this weekend shows where a simple slab gives the biggest return. That little shift matters a lot!
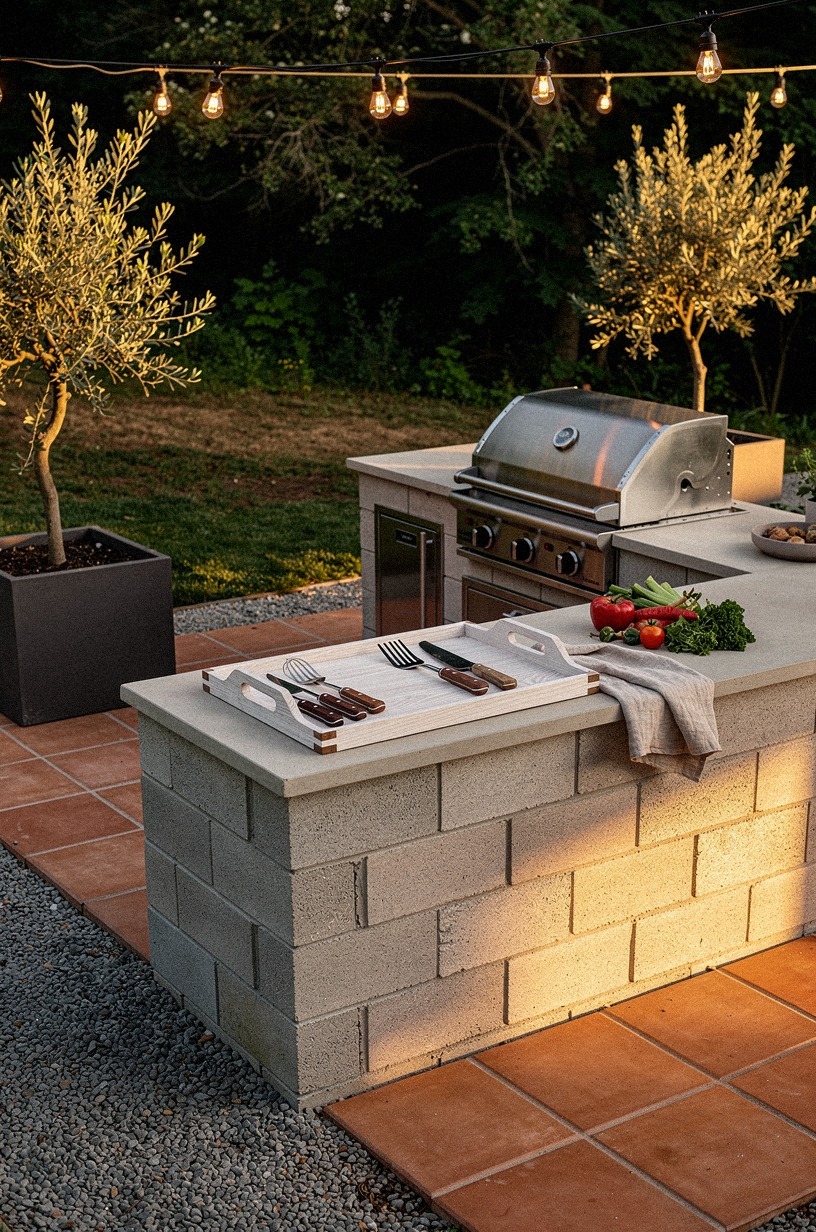
9Run a simple prep counter beside the grill
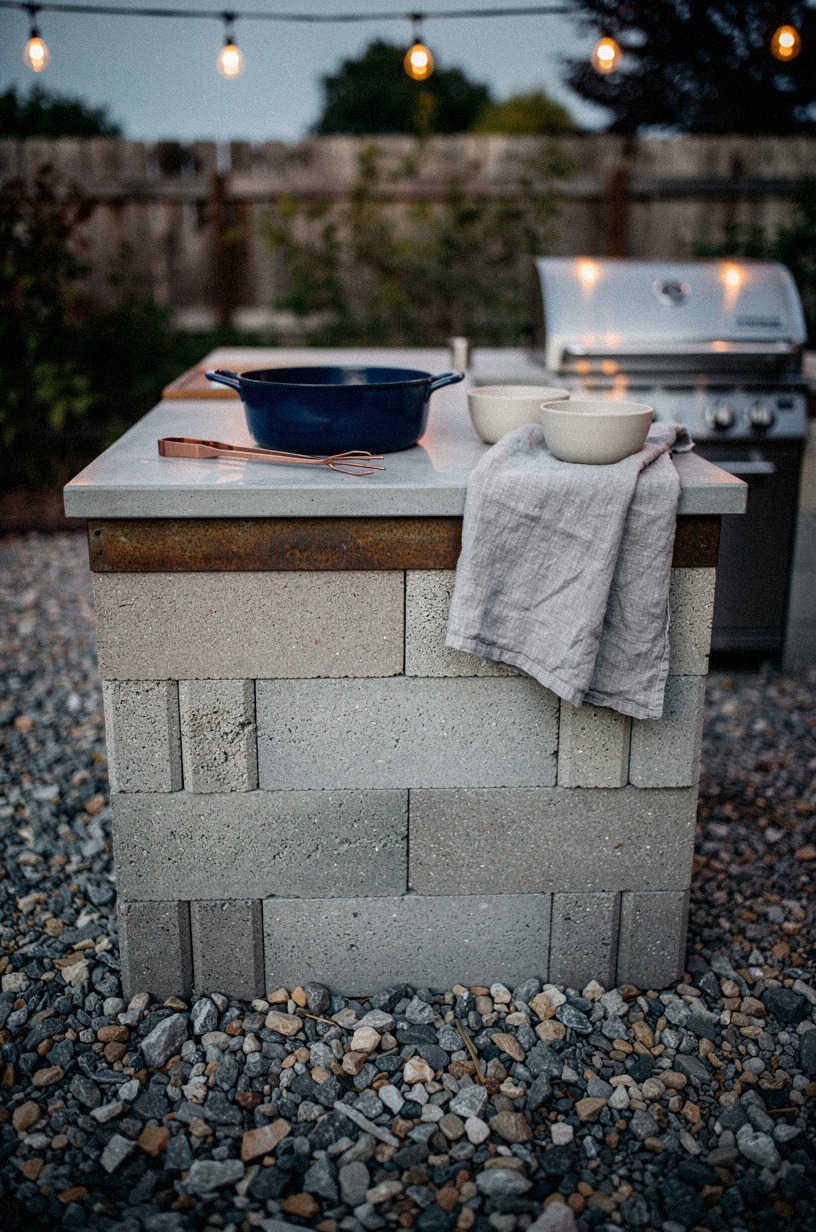
Run one honest prep counter beside the grill and call it enough. You do not need a sprawling island for a cinder block kitchen to work, but you do need a stretch of surface that holds a tray, a cutting board, and your tongs without making you shuffle like you are on a boat. I like a wood topper over the side run for warmth, especially a sealed cedar plank with a softened front edge.
Keep this section easy to wipe and easy to replace. A prep surface gets scarred, and that's fine. It's doing the job.
But do not make the counter so deep that you lose your walking path, especially in a narrow grill space. If you are working with awkward dimensions, small outdoor kitchen ideas that maximize every inch is where I'd borrow proportion before I borrow style.
10Add a hose sink with a bucket drain
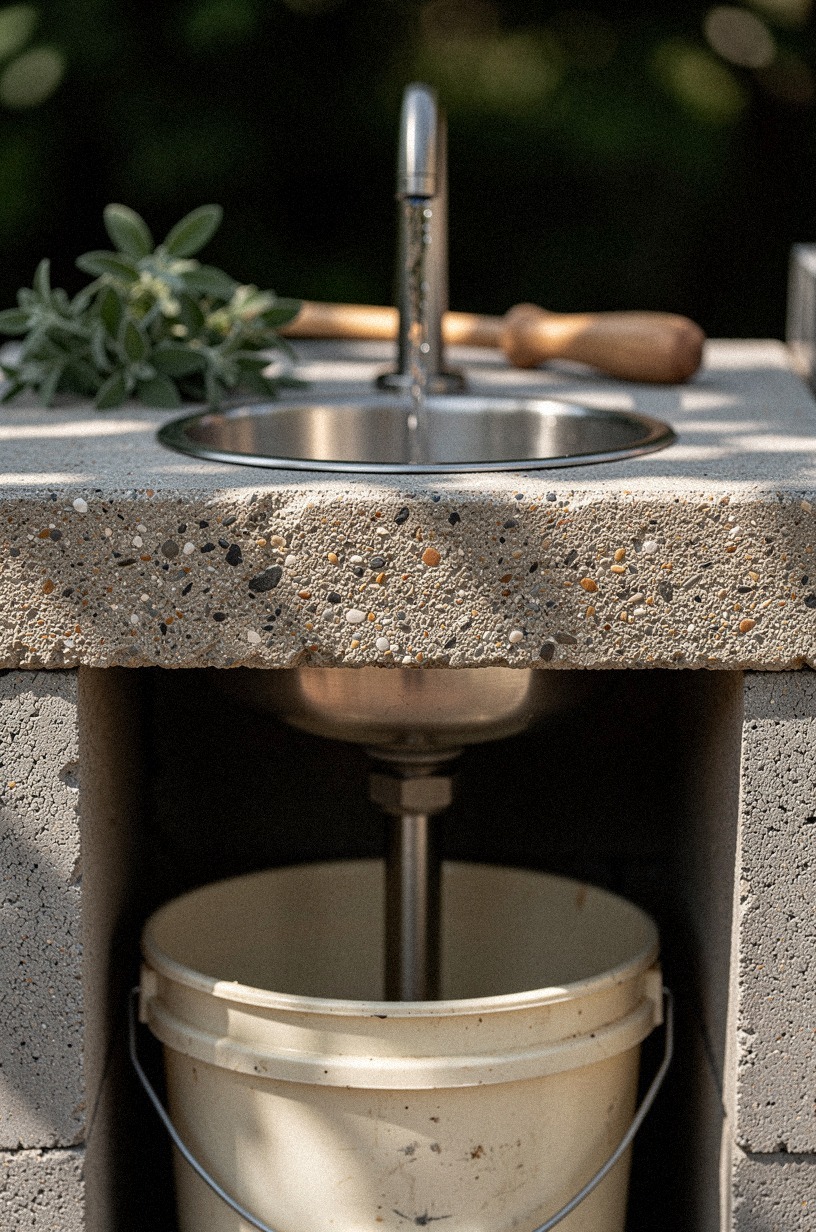
Add a hose-fed sink if you want hand-washing and quick rinses without pretending you are building a full plumbing package. A small metal basin, a simple faucet adapter, and a bucket drain can carry a surprising amount of usefulness in a cheap setup.
I love this step because it solves a real annoyance. You're outside, your hands are greasy, and suddenly a basic wash station feels downright luxurious.
Keep the basin close to the prep run, not crammed beside the hottest part of the grill. I use a cream bucket below because it looks calmer than a bright utility tote and still reminds me to empty it. But if you host often, size the drain bucket up before your first big weekend.
Nothing ruins momentum like a sink that works beautifully for fifteen minutes and then turns on you.
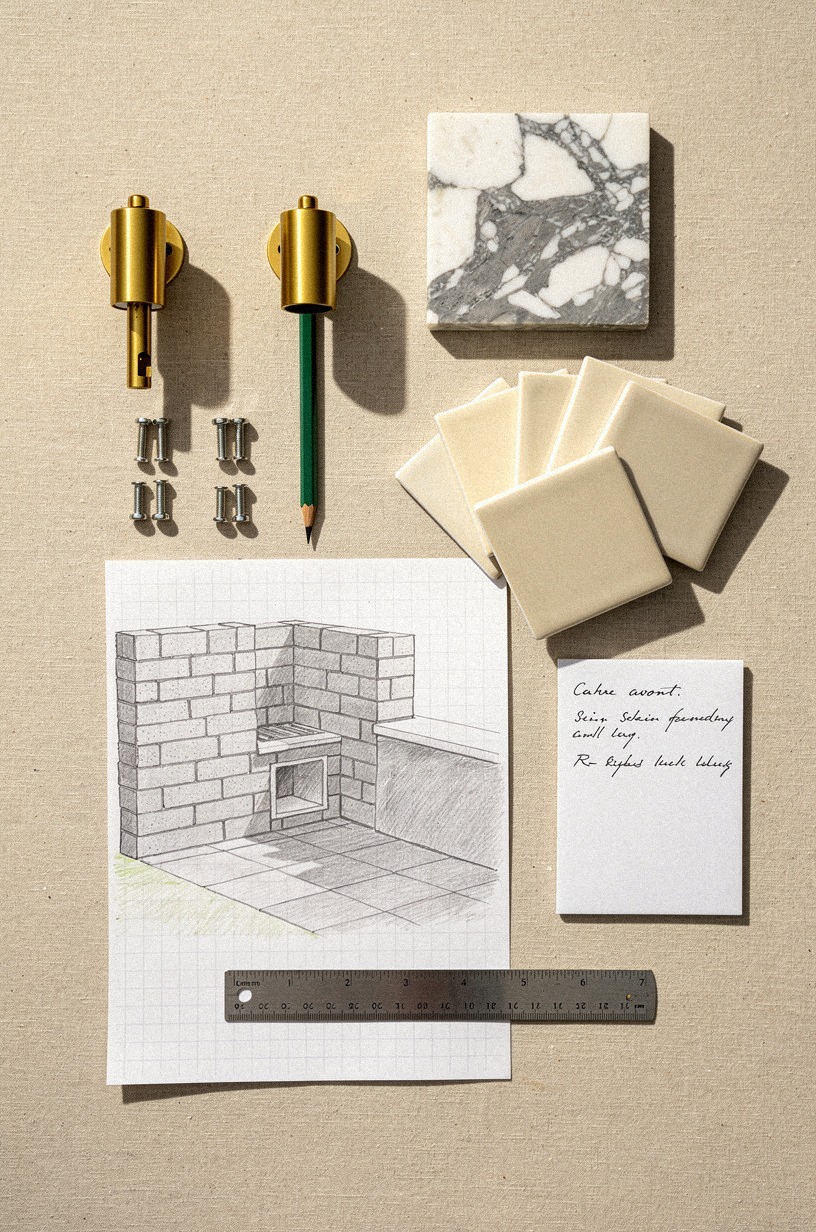
11Mount a cedar tool rail above the backsplash

Mount a cedar tool rail above the backsplash so your most-used tools live in reach, not in a damp drawer you forgot to build. A narrow rail with sturdy hooks gives the whole outdoor grill wall a finished line, and it works especially well over concrete surfaces that need a bit of warmth. I prefer cerused white oak indoors, but outside, sealed cedar wins because it forgives weather and still looks relaxed.
Hang the pieces you grab without thinking: spatula, tongs, grill brush, one towel. That's enough.
The rail should make the cook line faster, not busier. And if you want to compare this kind of layered function with other outdoor setups, RV outdoor kitchen ideas for cooking on the road has smart examples of keeping tools visible without making the space feel cluttered.
12Stack side blocks into open storage cubbies
Stack the side blocks into open cubbies instead of closing every void.
13Layer concrete board under the hot zone

Layer concrete board under the hot zone before you start congratulating yourself for saving money. Heat is where cheap projects expose their weak logic, and this layer is the part that keeps your grill bay from feeling like a shortcut.
I treat it as insurance you can see. Under the grill area, it gives you a cleaner, tougher transition and helps the whole cook zone look intentionally built.
Cut it neatly and keep the edges square to the block openings. If the board looks tossed in, the whole kitchen suddenly feels temporary, even when the structure is sound. But once it sits flat and true, the grill bay reads sharp.
I learned that one the hard way on an earlier build where the underlayer went in late and never looked fully integrated. Do it now.
Sleep better later.
14Tile the grill wall with budget porcelain
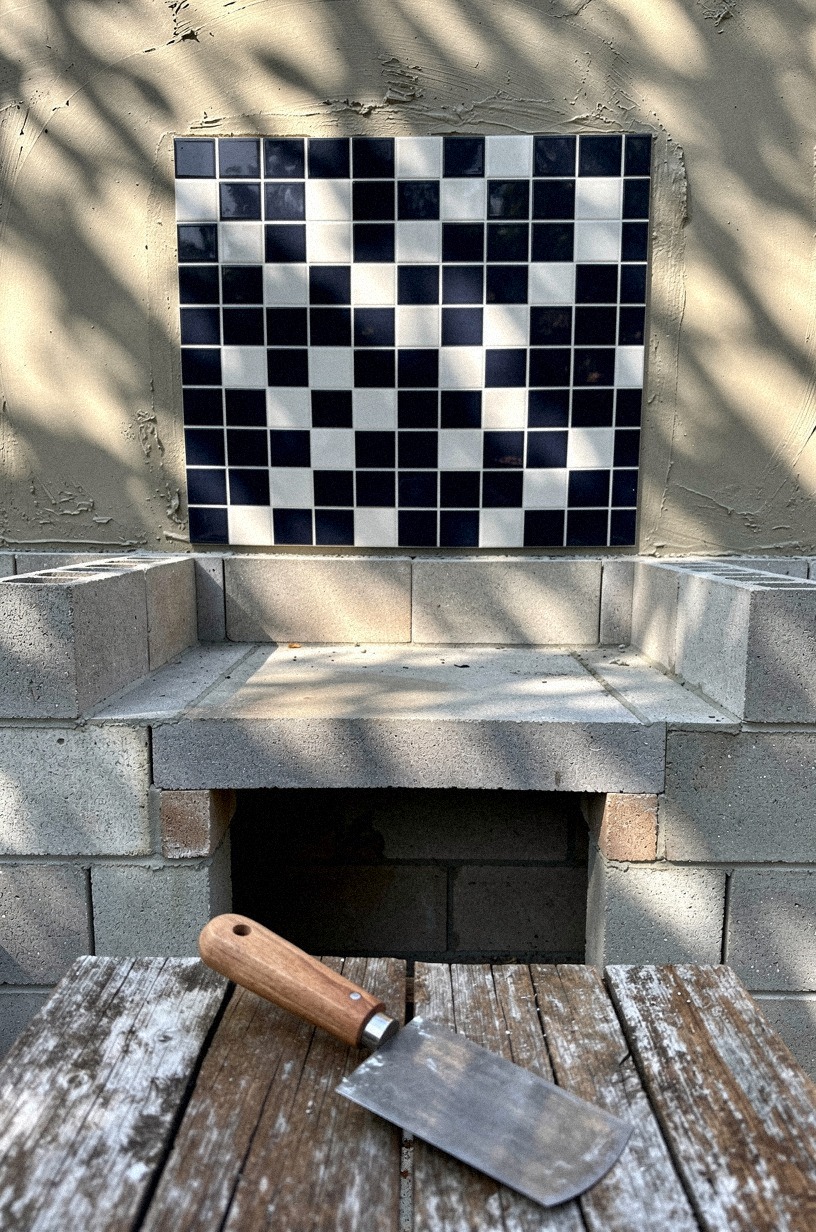
Tile the grill wall with budget porcelain if you want a backsplash that feels finished without dragging the budget into nonsense. I like porcelain here because it's forgiving, easy to wipe, and available in colors that still look grown-up.
A navy-and-white pattern can look crisp behind raw block, especially if the field stays simple and the counter remains quiet. The move is restraint, not more tile.
Keep your backsplash zone believable for the scale of the kitchen. An 18 in gap is the standard indoor reference between counters and uppers, and it gives you a good visual guide for how tall this feature should feel even without cabinets. If you are chasing a softer green version, sample Sherwin-Williams Evergreen Fog SW 9130 nearby and watch how the cool block warms up.
For more budget-minded backsplash thinking, how to build an outdoor kitchen: a beginner's guide pairs nicely with this step.
15Hang battery sconces over the cook line
Hang battery sconces over the cook line because overhead light alone makes every outdoor kitchen feel flatter than it should.
16Create a narrow serving ledge along the back
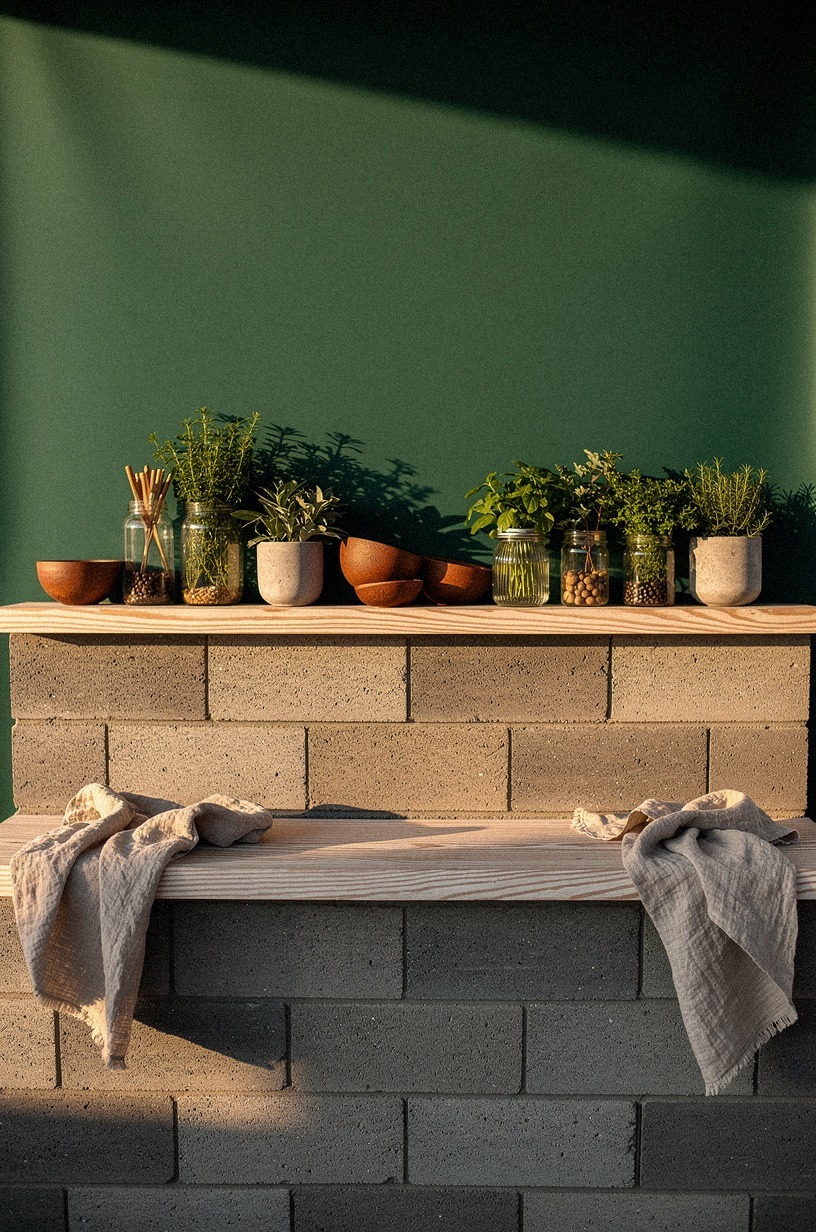
Create a narrow serving ledge along the back if you host even a little. A slim ledge gives drinks, condiments, and finished plates somewhere to land without stealing the prep counter.
I like a back ledge in white oak with a cerused finish because it lightens the mass of the block wall and makes the whole kitchen feel more intentional from an angle. Thin, useful, clean.
That's the mood.
Don't overbuild it. This ledge is for passing and staging, not for a stack of Dutch ovens. A narrow profile is the point.
But it should still line up cleanly across the back run so the wall looks centered in photos and in real life. For more tight-footprint solutions, small outdoor kitchen ideas that maximize every inch backs up this move beautifully.
17Plant herb crates beside the prep station
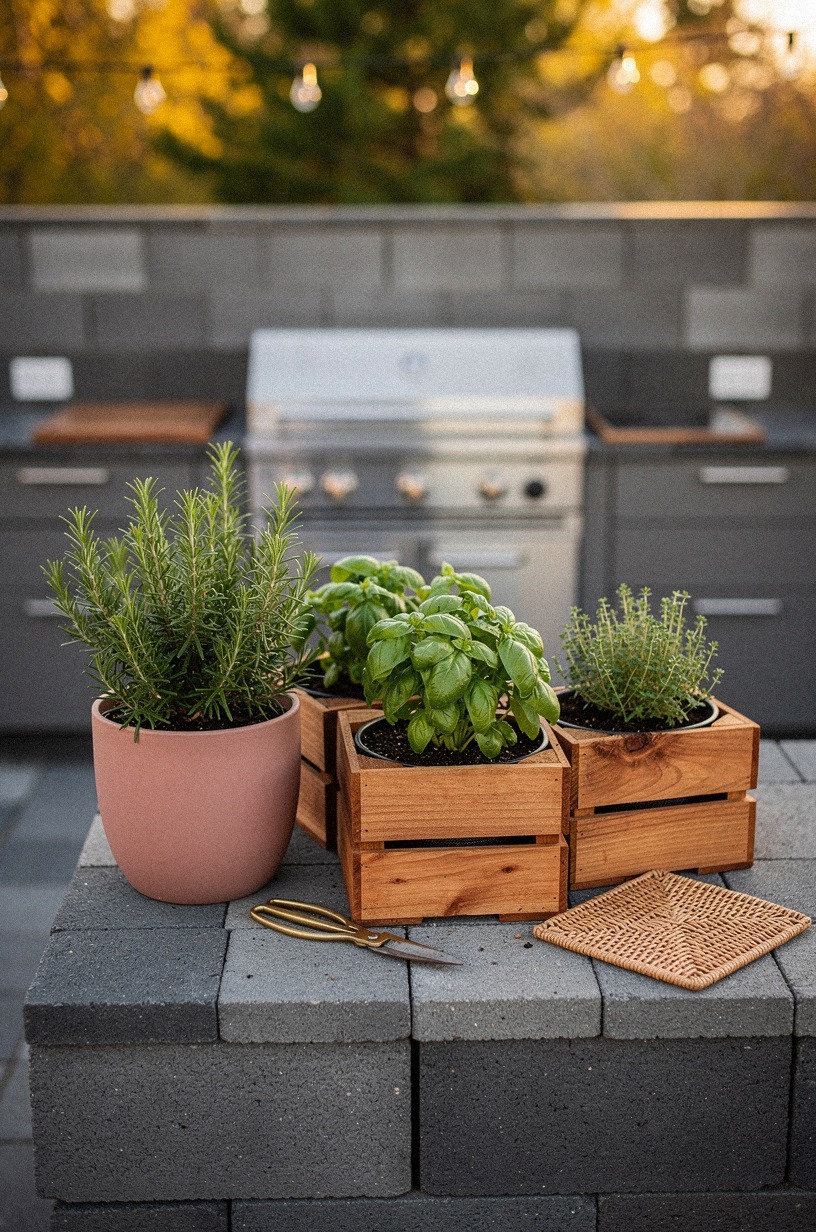
Plant herb crates beside the prep station so the kitchen feels lived in before you spend another dollar on finish upgrades.
18Seal the blocks with charcoal masonry paint
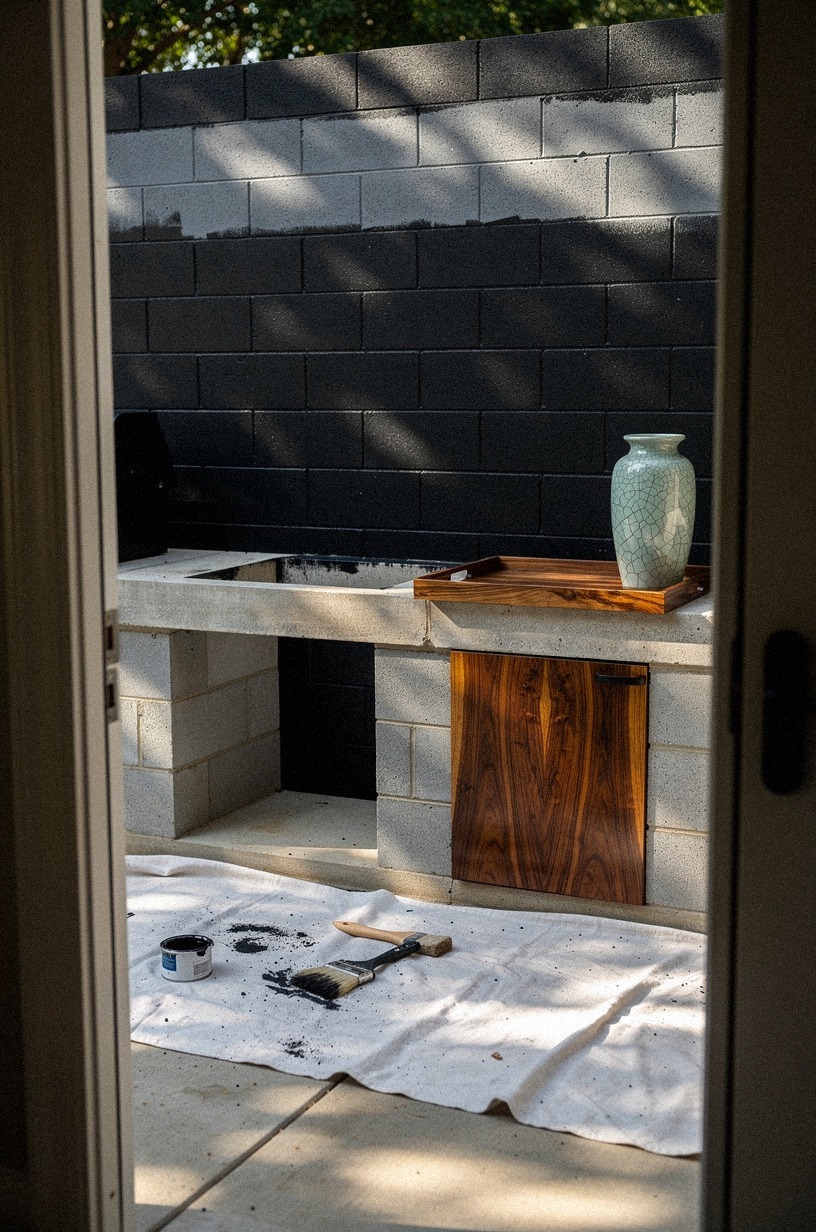
Seal the blocks with charcoal masonry paint if you want the cheapest big visual shift in the whole build. Deep charcoal gives the block a denser, calmer look, and it makes stainless, wood, and greenery stand out without trying too hard. I like this move more than leaving raw gray on every project, because raw block can read unfinished when the rest of the yard is tidy.
Paint gives it a point of view.
Test the color first near your counter sample and any tile. Farrow & Ball Studio Green No. 93 can be gorgeous in the yard too, but I would only use it if the planting around the kitchen is soft enough to support it.
Charcoal is the safer bet. And once you seal, you'll make cleanup easier after smoke and splash.
That's real value, not decorative theater.
19Finish with gravel paths around the kitchen
Finish with gravel paths around the kitchen so the project feels placed, not dropped into the yard. A few symmetrical runs of gravel do two jobs at once: they help drainage and they make the kitchen read as a destination.
I like this final step because it changes how you approach the space. Suddenly you are not walking up to stacked block.
You're arriving at a little outdoor room.
Keep the paths wide enough that two people can pass without the shoulder shuffle, and rake them back into shape after your first few uses. But do not outline the kitchen with tiny decorative strips.
That always looks stingy. Wider paths look calmer and wear better.
If you are still deciding how the whole zone should connect to the rest of the yard, how to build an outdoor kitchen on a deck with ideas and tips is helpful for circulation logic.
Why does this build feel sturdier than prefab carts?
Because weight solves more problems than hardware does. I've looked at plenty of ready-made outdoor carts that promise flexibility, and most of them feel terrific for six minutes.
Then you push one wheel over a joint in the patio, the top shivers, and the whole thing starts acting like temporary furniture. A cinder block kitchen gives you the opposite feeling.
It stays put. It asks you to plan the layout once, then rewards you every time you cook because nothing drifts, twists, or rattles under your hands.
I also think people underestimate how good honest mass can look when you edit the rest well. Block, gravel, porcelain, cedar, one metal sink, two warm sconces. That's not a compromise palette.
That's a disciplined one. The project works when you let the heavy structure do the visual work and stop trying to decorate your way out of it.
Cheap builds get ugly when they chase fake luxury. They get convincing when they choose one clear mood and keep it.
In this case, the mood is sturdy, clean, and a little rugged.
If I were guiding a friend through it, I'd tell them to spend their attention on alignment before finish. Not more accessories.
Not more add-ons. Alignment.
The reason so many outdoor kitchens feel off isn't that they lacked money. It's that the base, the grill opening, the ledge, and the lighting were all making different promises.
When your gravel pad is square, your modules are centered, your fire-brick opening is honest, and your prep run lands at a usable 36 in height, the kitchen suddenly feels expensive without performing expense.
And here's the part I learned by messing one up: do not treat each step like a separate craft project. Treat it like one line that gets refined. The rail relates to the backsplash.
The herb crates soften the painted block. The gravel paths echo the base. Even the cheap bucket drain makes more sense when the sink sits in a counter run that already looks settled.
That's why this style lasts. You aren't copying a showroom.
You're building a work zone that feels grounded, and your yard gets calmer because of it.
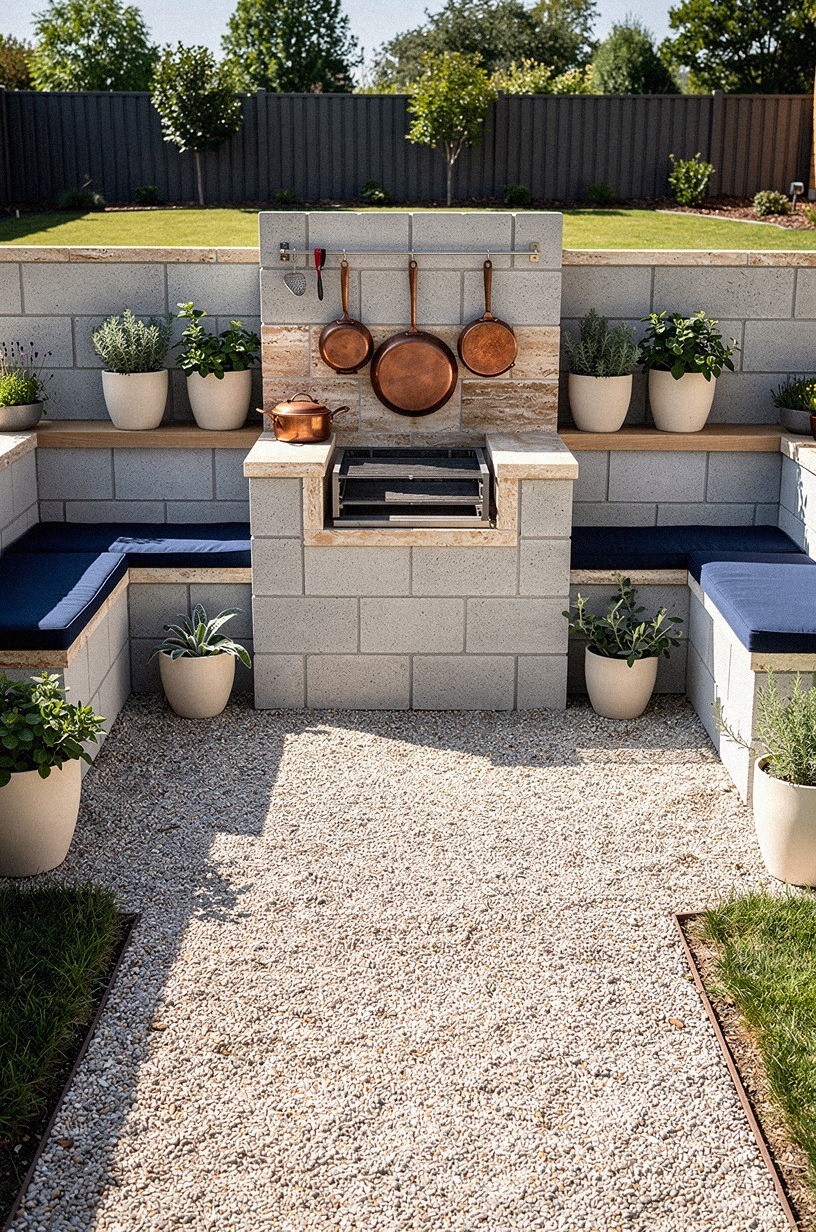
The Two-Zone Cook Line
Before you overcomplicate the layout, split the kitchen into two honest zones: hot and prep. That's it. Your grill, fire brick, concrete board, and venting belong to one side.
Your sink, tool rail, serving ledge, and herb crates belong to the other. If you keep that split clear, you won't keep crossing your own body while you cook. I didn't respect that enough on my first outdoor build, and every plate felt like a traffic drill.
The reason this rule matters is simple. A cheap build has no room for confused circulation.
You do not have extra square footage to waste, and you probably do not have custom storage solving mistakes for you. So give the hot zone the tougher materials, give the prep zone the softer touches, and let the path between them stay open. That's the version that looks best in photos and works best on a real Saturday night.
The Questions I Get Asked Most
What is the best How to Build a DIY Cinder Block Outdoor Kitchen (Cheap & Sturdy) for a small kitchen?
The best version for a small space is a straight grill wall with one side prep run because every inch stays usable. Think one grill bay, one counter, one lower cubby block, and a slim back ledge. If you need more tiny-footprint examples, small outdoor kitchen ideas that maximize every inch is the one I'd open first.
Where can I buy How to Build a DIY Cinder Block Outdoor Kitchen (Cheap & Sturdy) pieces on a budget?
Start with Home Depot, Lowe's, and Facebook Marketplace for the biggest savings. Blocks, gravel, paver caps, and utility sink parts are usually easiest new, while a grill insert or prep stool is often cheaper secondhand. I also check Target Threshold for outdoor trays and textiles when the hardscape is done.
How much does a How to Build a DIY Cinder Block Outdoor Kitchen (Cheap & Sturdy) makeover cost?
A basic makeover usually lands at about $300 to $1,500 if you are keeping the structure simple. Your cheapest wins are gravel, block, paint, and a modest cap surface.
The cost jumps when you add premium counters, full plumbing, or appliances that want a built-in surround. Outdoor kitchen ideas on a budget that stay DIY friendly can help you trim the extras.
Can I create a How to Build a DIY Cinder Block Outdoor Kitchen (Cheap & Sturdy) on a budget?
Yes, and the budget version can still look intentional. Keep the layout straight, use paver caps instead of stone slabs, add a hose sink instead of full plumbing, and paint the block instead of wrapping it. The part that worked best for me was spending on alignment, then saving on finishes.
Is a How to Build a DIY Cinder Block Outdoor Kitchen (Cheap & Sturdy) worth it in a small space?
Yes, it's worth it because a small space forces better decisions. You waste less material, your walking path gets planned earlier, and a compact cook line can feel more efficient than a scattered big yard setup. Keep your clearance around 42 to 48 in and let one side handle prep.
Is How to Build a DIY Cinder Block Outdoor Kitchen (Cheap & Sturdy) a good idea for a rental?
Yes, if you keep the build modular and reversible enough for your lease reality. Use freestanding accessories, a hose-fed sink, removable lighting, and loose herb crates instead of permanent landscaping. If you are working around a temporary setup, RV outdoor kitchen ideas for cooking on the road has the same no-fuss mindset.
Where I'd Start First
If I had to pick one step, I'd start with the gravel pad. A crooked base makes every block, cap, and path fight you later.
Get the level right first. The whole kitchen feels calmer, heavier, and more convincing from that moment on.