A usable outdoor bbq kitchen for serious grill masters runs from about $300 in weekend muscle to $25,000+ for a full masonry build, and most of us land somewhere in the middle. I've been cooking outside on every kind of grill from a $40 charcoal kettle to a built-in Blaze LTE, and the gear isn't what makes the space feel like a kitchen. It's the bones underneath: counter height you can work on without hunching, lighting that lets you read a steak crust at dusk, and storage that doesn't rust after one winter. These 17 ideas are the ones that move a backyard from "patio with a grill" to a true outdoor bbq kitchen for serious grill masters. None of them require a contractor if you've got a Saturday and a friend. Most cost less than a decent smoker.
- anchor the cook zone with a stone island
- pick a grill that earns the square footage
- layer two wood tones for depth (The Two-Wood Rule)
- skip the matching outdoor sofa set
- why does a covered patio change everything?
- pour a concrete counter at standard 36 in
- add a wood-fired pizza oven as a sidekick
- swap plastic storage for cedar cabinetry
- hang lights in three heights (The Three-Height Light Stack)
- paint the ceiling haint blue (The Haint Blue Ceiling)
- add a tv for game day, but weather-rated
- frame the bar overhang with proper 42 to 48 in clearance
- tile the backsplash with zellige, not subway
- plant herbs within arm's reach of the grill
- Traeger vs Weber: pick a charcoal sidekick for flavor
- run gas and electrical early, not later
- weather the off-season with a real cover
1anchor the cook zone with a stone island
Cold stone at the heart of an outdoor bbq kitchen reads as a showroom floor. The softer move is an upholstered island in organic bouclé, set on a low plinth so the working surface sits at 36 in. A warm white bouclé with camel and black accent cushions ties the cook zone to the seating area without competing with the grill for attention, and the soft texture invites people to lean on it between courses.
Pick bouclé with a tight weave so it doesn't fuzz after one summer. The plinth underneath can be stone or rendered concrete for weight and ballast, but the top and sides should stay soft and warm.
Run a piece of 1.5-inch conduit through the plinth before you close it up if you ever want electricity out there. Retrofitting it later means pulling the island apart.
I've made that mistake.
If you want the full breakdown on building the upholstered base, my stone outdoor kitchen ideas guide covers what holds up under the soft top. For a tighter build on a slimmer footprint, the outdoor kitchen ideas for small backyards guide walks through islands that earn their square footage.
2pick a grill that earns the square footage
The grill is the most expensive single line on the build, and most people oversize it. Flank it with a Nero Marquina black marble counter on one side, white veining running through the dark ground, and the whole cook zone settles into a midnight blue palette at dusk, with copper trim flashing against ivory walls and cabinetry. The marble does the heavy lifting visually, so you can spend less on the stainless hood and let the stone do the talking.
A 30-inch grill covers four to six people. Go to 36 inches only if you regularly cook for eight or more. Bigger than that and you're heating patio concrete while your guests queue for a burger.
3layer two wood tones for depth (The Two-Wood Rule)
One texture reads as builder-grade. Two textures reads as a designed space. The Two-Wood Rule, applied here to fabric: pair a primary ground of sage green with a deep-pile mohair velvet in a related tone, and let natural wood accents carry the warmth between them.
The mohair catches light against the flatter sage, and the whole zone settles into a designed palette without trying.
I default to sage on the seat cushions and mohair on the back pillows. Mohair has a slight sheen that catches afternoon light, while sage absorbs it.
The two textures together don't fight because they share an undertone. If sage feels too cool for your taste, a deep forest tone does the same job at higher contrast. For the bigger picture on building around that palette, the cozy rustic backyard ideas guide covers the rest of the zone.
Skip the matching set. A furniture store will sell you four identical seat pads in the same fabric and the whole zone looks like a catalog page. One or two accent cushions in a different texture is the move.
4skip the matching outdoor sofa set
Most patio sets arrive as a five-piece matching group, and that's exactly what makes an outdoor bbq kitchen look like a big-box showroom. The fix is a Carrara marble side table with subtle grey veining as the anchor piece, then loose seating in terracotta performance fabric with olive accent pillows. The marble carries the cool counterpoint, the terracotta warms the sun, and the olive ties it back to whatever's planted around the edge of the patio.
Two armchairs and a bench seat cover more guests than a five-piece set, and they don't force conversation into one rigid rectangle. The mismatched read is the whole point.
5why does a covered patio change everything?
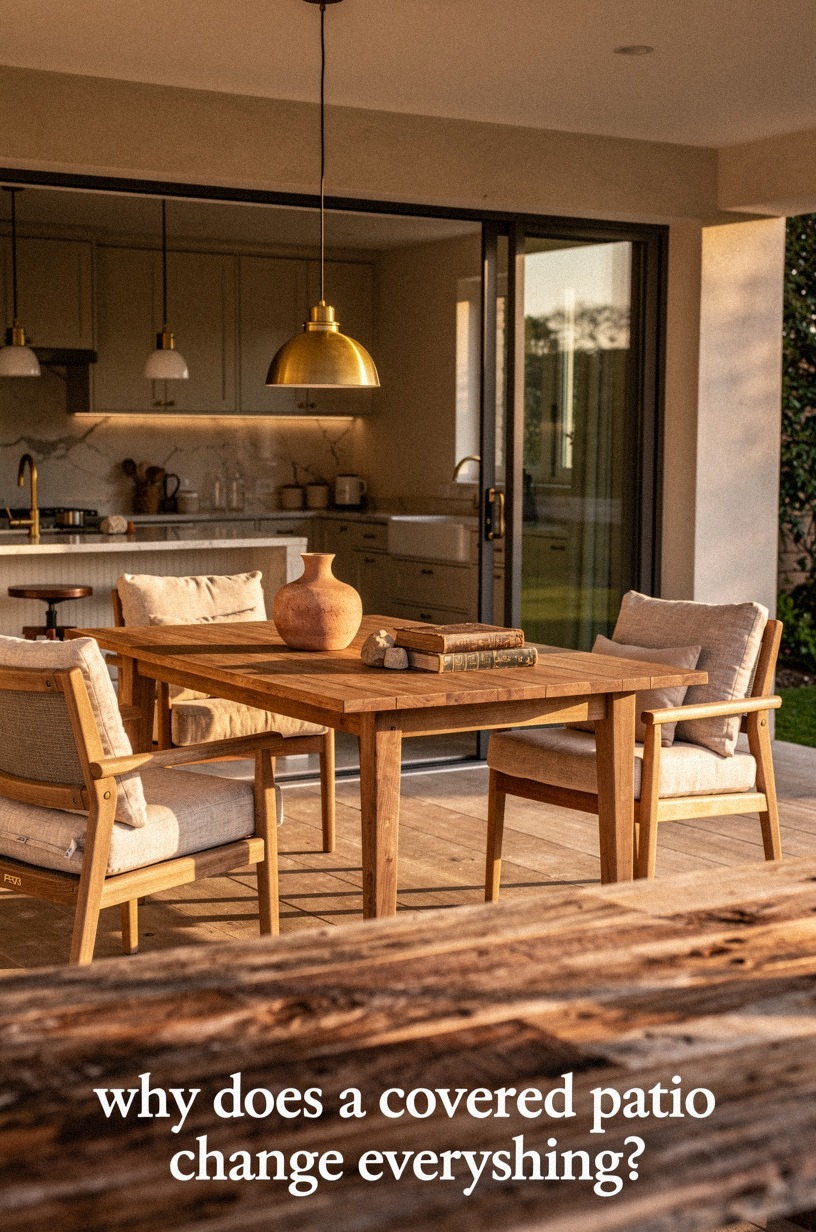
A pergola, a solid roof, even a retractable awning: any of them buys you an extra month of grilling season on each end. That's two more months of serious grill masters cooking outside in most climates. The roof also protects the bbq design outdoor investment from the worst UV and rain, which means your grill won't rust out and your cabinetry won't delaminate.
If a full pergola feels like too much, a retractable shade sail in clay canvas at $200 to $500 is the cheap move. They don't handle heavy snow, but they do handle sun and light rain, and they pack down for winter. I ran one for three seasons in linen before I upgraded, and honestly?
The shade sail did the same job for less.
Want a real grill master's setup? Go reclaimed weathered teak pergola with a polycarbonate roof panel in part of it, hung with aged brass hardware. The teak silvers naturally, the brass patinas darker over the same five years, and the contrast is the whole look.
Translucent panels let light through but block UV, so your zone stays dry without feeling like a cave. For more on year-round outdoor cooking, the summer outdoor kitchen ideas guide walks through seasonal setups that hold up past Labor Day. The whole roof question is covered in the cozy backyard pergola ideas guide if you want the full menu.
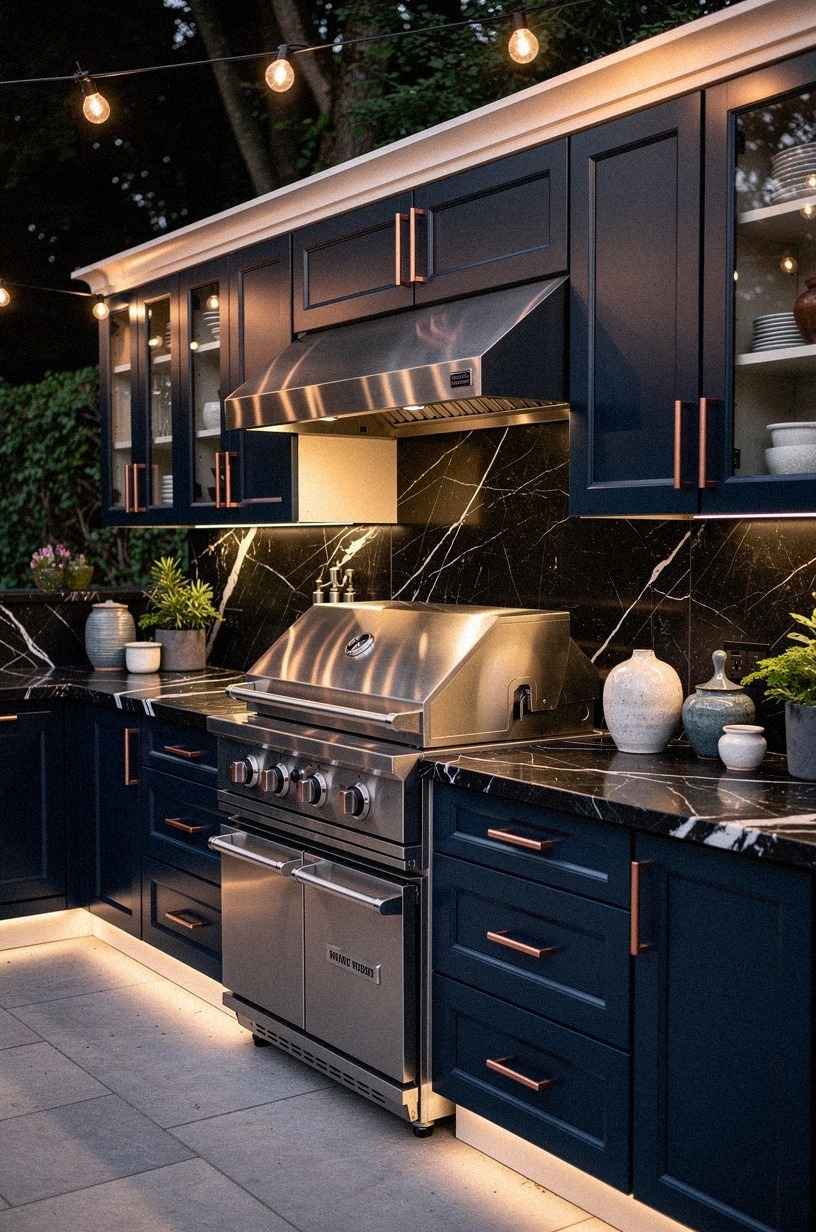
6pour a concrete counter at standard 36 in
The classic poured-concrete counter at 36 in works, but if you want something with more personality, swap to a Calacatta marble slab at the same height, with gold veining running through a soft white ground. It runs about $80 to $150 per square foot installed, more than concrete, but it doesn't try to look like an indoor surface the way gray slab does. It looks like the most expensive thing in any outdoor bbq kitchen because it is.
Pair it with plum seat cushions, grey shutters or cabinetry, and a few rose gold hardware pulls. The marble pulls all three together without competing. Calacatta needs a penetrating sealer every 12 to 18 months or it stains from grill drippings, more often than concrete because the veining is more open.
I learned this the hard way. I installed a counter for a client in Calacatta with a soft gold vein, they skipped the second-year seal, and a single bottle of Worcestershire left a permanent ghost mark.
Don't be the next one!
For a different pro finish, ask your stone yard about Calacatta Vagli or Calacatta Gold specifically. The vein pattern reads more dramatic at slab scale than the standard Calacatta, and the gold picks up late afternoon sun. If you're weighing marble against stone and tile, the best outdoor kitchen countertop materials guide compares them side by side so you can pick with eyes open.
7add a wood-fired pizza oven as a sidekick
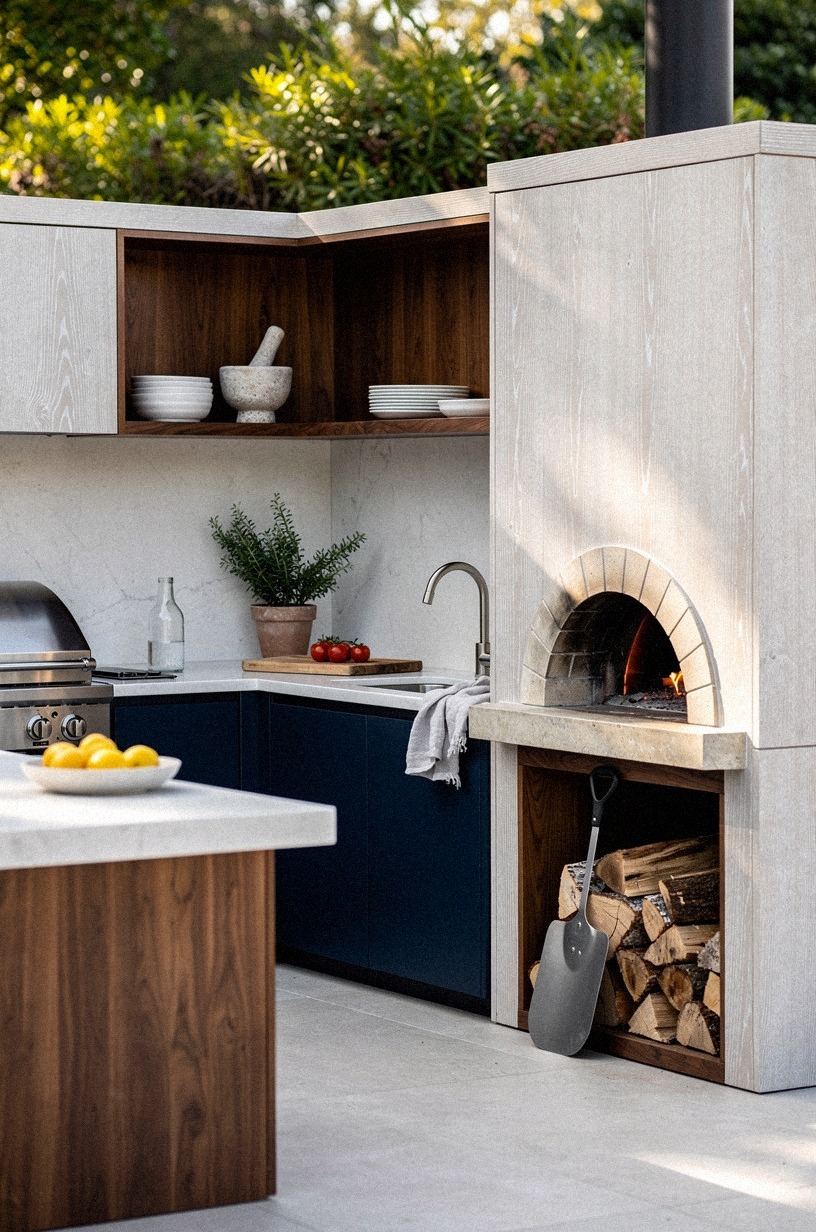
You don't need a full masonry oven. A countertop wood-fired pizza oven like the Ooni Karu 16 runs about $500 and hits 900°F in fifteen minutes.
Set it on a base clad in cerused white oak, where the grain pops white against the natural oak tone, with navy tile behind and a walnut shelf for the pizza peel. It sits on a section of your counter next to the grill and handles the one job your grill can't: pizza in 90 seconds.
Serious grill masters eventually end up with one of these because grilling is a 20-minute conversation and pizza is a 90-second spectacle. The wood-fired flavor is also a different animal from gas. If you're hosting a backyard cookout, you fire the pizza oven up first to feed kids while the grill handles the main protein.
Everybody wins.
If you want the built-in version, a traditional masonry pizza oven runs $3,000 to $8,000 installed, but it doubles as a backyard feature wall. It also weighs 1,500+ pounds, so you pour a foundation for it, not just set it on pavers. The full layout dance (L-shape, U-shape, single wall) is in the outdoor kitchen layout ideas guide if you're sketching the footprint.
8swap plastic storage for cedar cabinetry
The plastic outdoor cabinet everyone buys at the home center lasts about four years before the hinges snap and the doors warp. A bank of cabinets faced with backlit translucent onyx panels lasts decades and looks better as the LEDs age. The onyx glows emerald in the evening, with gold veins lit from inside and cream frames around each door.
Onyx is a real stone, not a panel, so it handles temperature swings without splitting. The cabinet boxes can be marine plywood with a thin onyx slab face glued and sealed on, then lit from the rear with a low-voltage LED strip.
If the install feels like too much, marine-grade polymer cabinets from brands like NewAge Products run $300 to $600 per cabinet and they don't rust. They're not as dramatic as onyx, but they survive a coastal winter without complaint.
The renter-friendly version is covered in the outdoor kitchen ideas on a budget guide along with other no-permanent-install moves.
9hang lights in three heights (The Three-Height Light Stack)
The Three-Height Light Stack is the lighting setup that makes a backyard look like an outdoor bbq kitchen. One height of fixtures reads as a cafe patio.
Three heights reads as a designed space. The fixtures themselves should be book-matched walnut housings, hung at 8 ft for ambient, 6 ft for mid-level, and a third low lantern line at 3 ft along the counter for task light. The walnut grain carries the eye through all three heights without the lights themselves competing.
Pair the walnut housings with forest green cords, rust cages on the lower string, and a few natural oak finials on the upper run. The palette stays warm in every direction, and the three woods read as cousins rather than clashes. The full breakdown on layout is in my outdoor kitchen lighting guide.
Skip solar string lights for serious cookouts. They dim after two hours and most don't survive a real rain. Plug-in LED string lights on a GFCI-protected outdoor circuit is the only move for serious grill masters.
10paint the ceiling haint blue (The Haint Blue Ceiling)
Haint blue is the soft blue-green paint Southern porch ceilings have carried for 200 years. The folklore was that the color was supposed to fool wandering spirits into thinking the ceiling was water, so they'd leave the porch alone. The real reason it stuck: the pale wash extends daylight visually, bouncing the sky's light back down so your covered patio feels like it's open-air even when it's not.
The modern move that does the same job in a different palette is warm travertine in a honed finish, with charcoal beams overhead and a few brass downlights between the beams. Travertine reads in dusty rose and warm cream rather than blue, but it lifts daylight the same way. If you want to keep the original haint-blue principle, Farrow & Ball's Dix Blue No.82 in an exterior finish is gorgeous and pricey.
You don't need a pergola ceiling to do this. A covered porch ceiling works, a soffit under a patio roof works, even a travertine-clad panel installed above the grill zone works.
The material is the magic, not the structure. And it pairs shockingly well with walnut structure underneath.
Warm stone, warm wood. Done.
11add a tv for game day, but weather-rated

A weather-rated outdoor TV is the single biggest entertainment upgrade you can make to a backyard, and most people do it wrong. Mount it on a back panel finished in warm white stucco, with camel leather straps as cable covers and black powder-coated brackets. Add an unlacquered brass arm that develops patina over the first season, and the whole install reads like it grew there rather than got bolted on last Saturday.
Run a dedicated GFCI-protected outlet behind the panel and a spare conduit for a soundbar. The brass arm is the only piece that needs wiping down every few months as the patina deepens; the rest is set-and-forget.
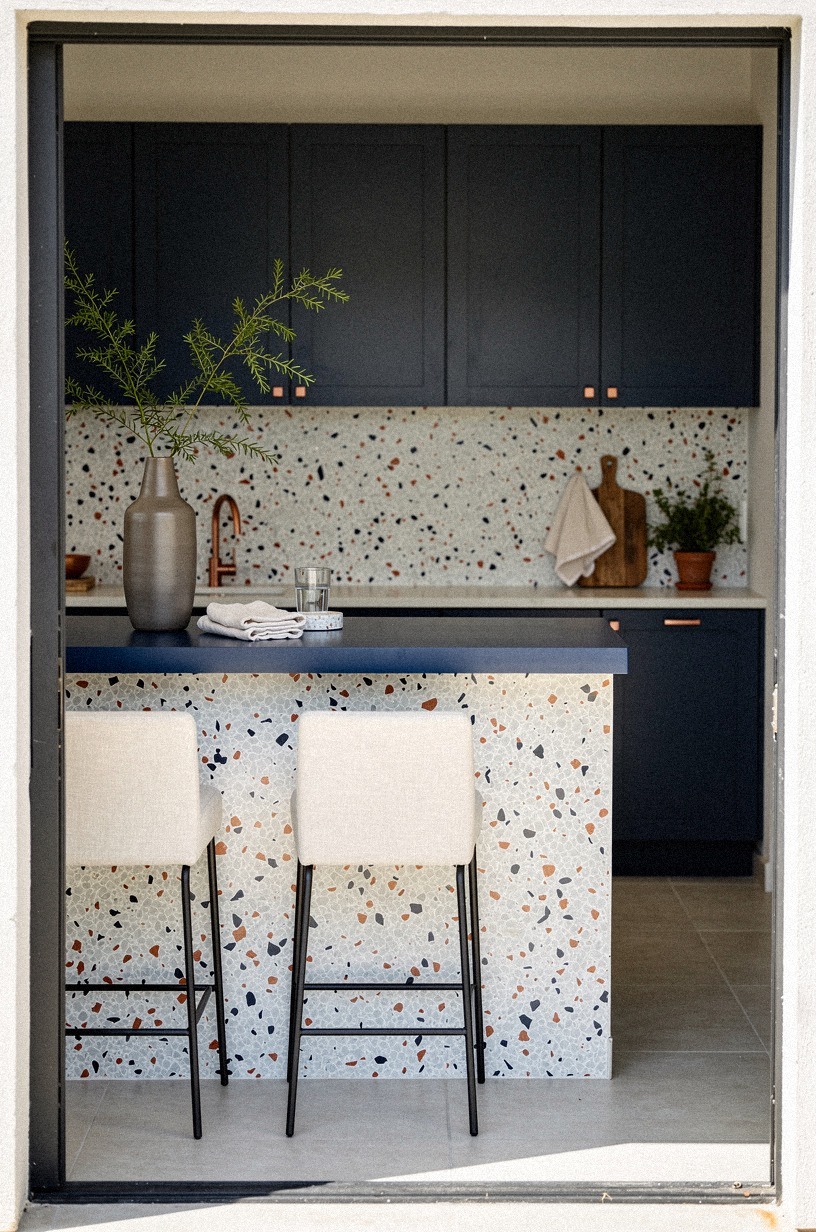
12frame the bar overhang with proper 42 to 48 in clearance
The bar overhang is the part of an outdoor bbq kitchen that makes it feel like an actual kitchen. Without it, you're just cooking behind a counter.
With it, you've got a place for people to sit, eat, and stay out of the cook's way. Standard counter height is 36 in, bar height is 42 in, and the clearance behind the bar stools needs to be 42 to 48 in so people can pass behind seated guests without cramming shoulders.
Top the bar with oversized-chip terrazzo in a dark ground with ivory chips and copper-colored aggregate. The whole surface reads midnight blue at night under low light, and the chips catch daylight without going sparkly.
The overhang itself should be 12 to 15 in past the support structure. Less and your guests have nowhere to put their knees.
More and the cantilever flexes when someone leans on it.
If you're tight on space, a 30 in counter (a hair under standard) with a single bar stool gives you the same hangout zone in less than half the footprint. It's not ergonomic for long prep sessions, but for entertaining it works fine.
I've got a longer breakdown in the outdoor kitchen + pool combo guide. If the bar overhang is the heart of your build, the outdoor kitchen bar ideas guide shows how designers pull it off on tight lots.
13tile the backsplash with zellige, not subway
Subway tile outside is a mistake. The grout absorbs water, the white shows every grease splatter, and after two winters it looks tired.
Zellige is one good move, but the upgrade for an outdoor bbq kitchen backsplash is hand-applied Venetian plaster in sage green, troweled in two coats so the subtle warm cream undertones show through the high points. It handles freeze-thaw cycles because the lime body is breathable, and it ages into a softer patina rather than cracking.
A natural wood floating shelf above the plaster line ties it back to the structure.
The cost is real: $25 to $45 per square foot installed, which is more than ceramic tile. But you're only covering 18 inches of vertical between counter and upper, so the total area is small.
The visual return is enormous. Color Atelier in sage or Marmorino in a custom tint are good starting points.
If plaster feels too much, limewash paint in a single sage tone works too. Stay away from anything shiny or smooth.
Matte or burnished only. Shiny surface outside shows every water spot.
For the breezier coastal version of the same look, the coastal outdoor kitchen ideas guide has lighter palettes that pair well with cedar structure.
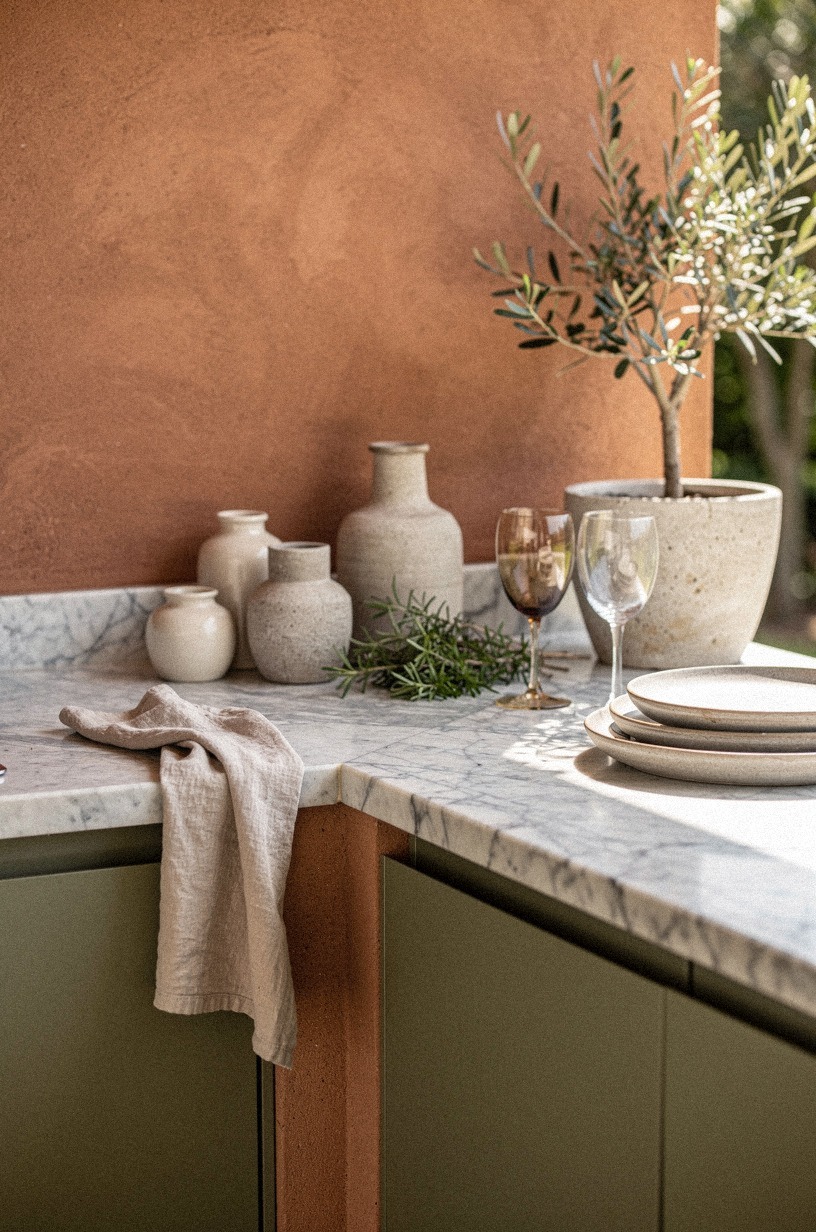
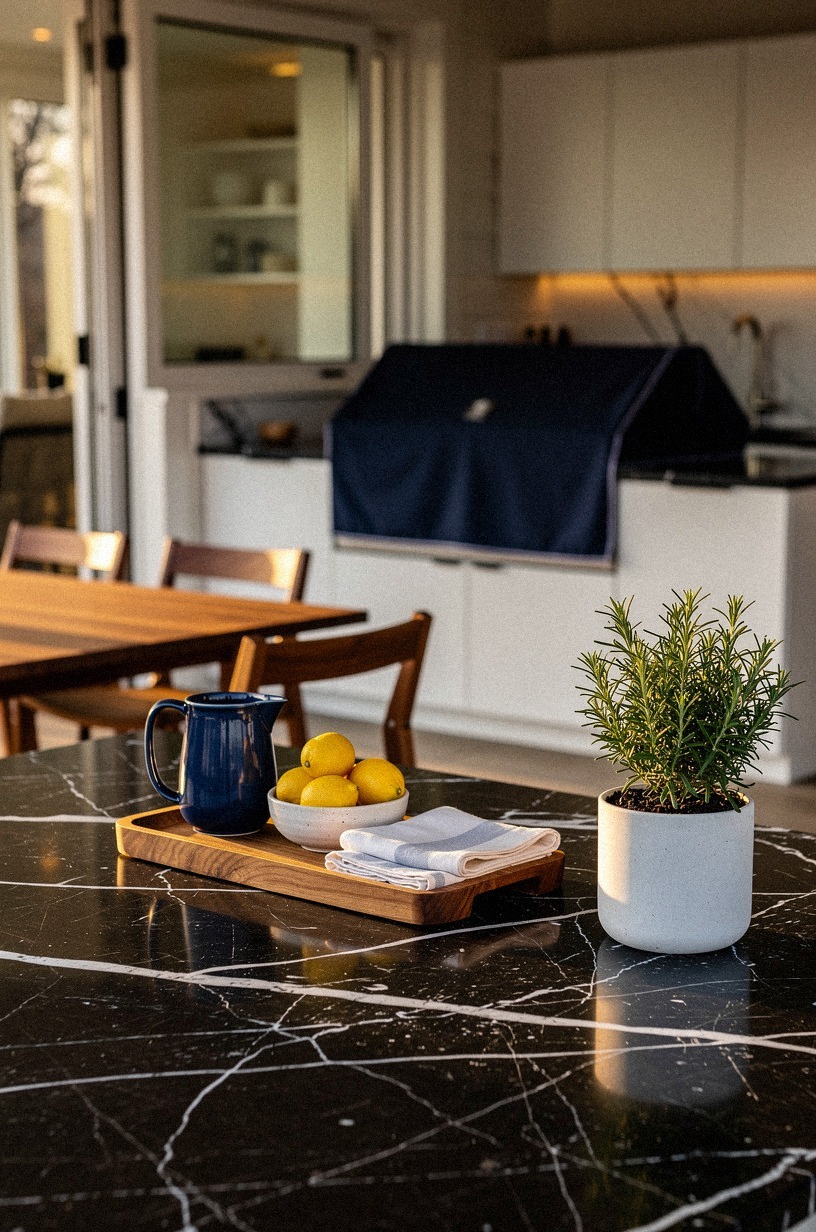
14plant herbs within arm's reach of the grill
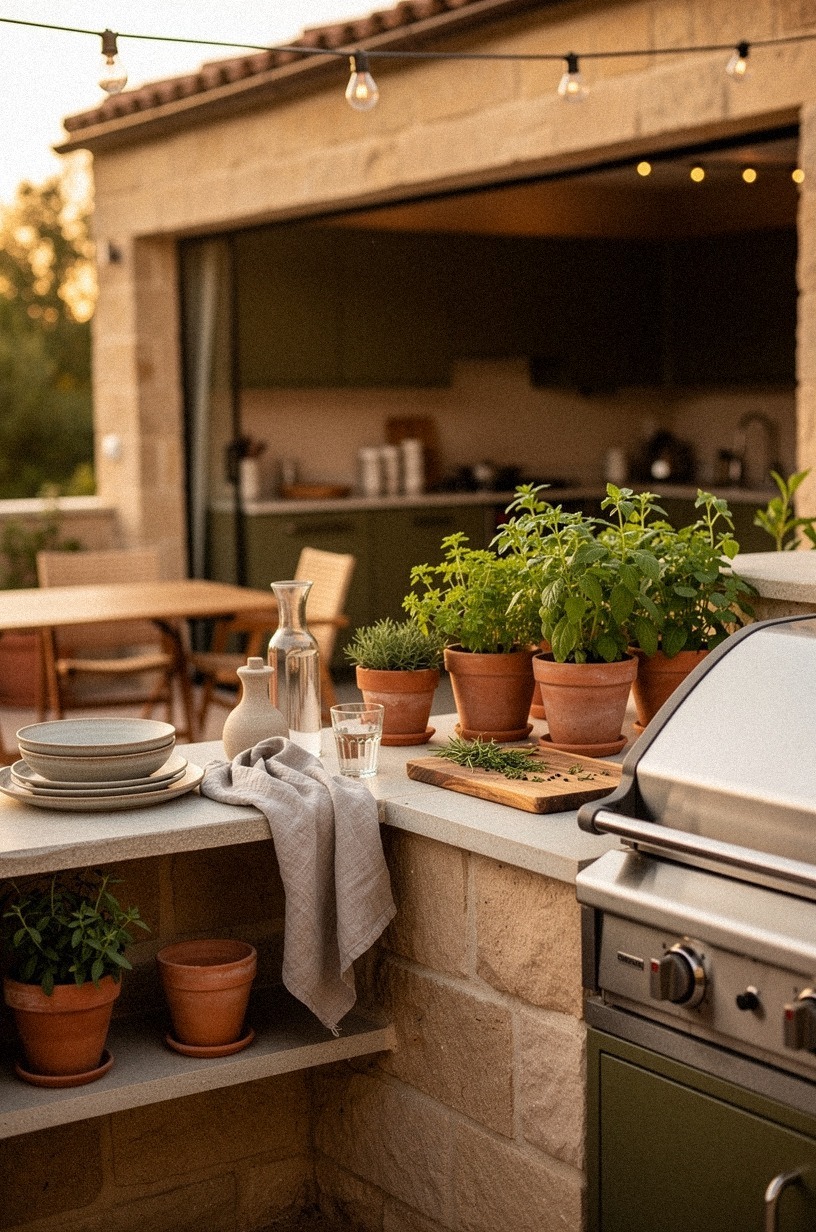
A row of planters along the back edge of the counter, each one growing a different herb, is the cheapest and most rewarding addition to any outdoor bbq kitchen. Basil, thyme, rosemary, oregano, sage. Five planters, five herbs, total cost under $100 if you start with small plants, not seeds.
The part that matters most is container size. Herbs need at least 8 in of soil depth to thrive, and most nursery pots are 6 in. Move them up one size the day you buy them.
Use terracotta pots with shagreen trays underneath, shagreen is a tough, textured leather that handles water splashes without marking. Set them against a stone wall in olive tones, and the whole herb row reads as a designed vignette rather than a windowsill afterthought.
Snip what you need mid-cook. There's no marketing line for "fresh rosemary off the deck" because the experience sells itself.
The first time you walk outside with scissors mid-grill and come back with a fist of herbs, you'll never buy the dried stuff again. Trust me on this one!
15Traeger vs Weber: pick a charcoal sidekick for flavor
A gas grill is the workhorse. A charcoal or wood-fired sidekick is the soul. Most serious grill masters run both, side by side, because they do different jobs.
Gas for weeknight chicken and vegetables. Charcoal or wood for the weekend cook when flavor matters.
The Weber Smokey Mountain at $400 is the bulletproof bullet smoker for beginners. The Traeger Ironwood at $1,300 handles low-and-slow without the babysitting.
The Ooni Karu (mentioned above) covers pizza. Pick one that fits your cooking style, not your neighbor's. Between Traeger and Weber specifically, the Weber wins for purist smoke flavor and the Traeger wins for set-and-forget convenience, so the real choice is how much you want to babysit the cook.
Dress the sidekick station in washed Belgian linen aprons hanging on aged brass hooks, with clay serving platters stacked on a side table. The linen softens with every wash and the brass picks up the same patina as the grill handles, so the whole corner reads as one working kitchen rather than two lonely appliances. If you're going to add a second cooker, give it at least 24 in of clearance from the main grill.
Less and the heat stresses the gas grill's hood over time. I see this mistake constantly in backyard setups.
Two cookers crammed together always ends with one of them dying early.
16run gas and electrical early, not later

The most expensive retrofit in any outdoor bbq kitchen is the gas line. Trenching, permit, pro install: it runs $1,200 to $3,000 if your gas meter is on the right side of the house.
If you think you might ever want gas out there, run the line during initial build even if you start on propane. The trench is the same price whether you run gas now or later.
Electric is cheaper to add but still $500 to $1,500 if you need a new circuit from the panel. Run at least one 20-amp GFCI-protected circuit out to the zone, with a spare conduit for a second one. Future-you will want to plug in a fridge, lights, or a TV, and you do not want to be trenching again.
Once the utilities are in, finish the seating with plum cushions on organic bouclé covers, with grey piping and a few rose gold snaps. The cushions stay outside through three seasons and the bouclé handles weather better than flat weaves, so the soft seating matches the marble and travertine you've already invested in.
Here's what the total picture looks like in 2026, depending on how far you go:
Most serious grill masters I know end up in the mid tier. You get 80% of the high-end experience for 30% of the cost.
The difference is masonry. You can fake stone with veneer, you can fake concrete with poured panels, but you can't fake a working pizza oven or a real stone hearth. Decide what matters to you, then spend there.
If you want the gas-and-go setup for cooking on the road (which taught me everything I know about lean outdoor kitchens), my RV outdoor kitchen ideas guide is a masterclass in how to build tight. For the bigger project-management view of running utilities first, the how to build an outdoor kitchen guide walks the order of operations from permit to pour.
17weather the off-season with a real cover
A real grill cover is the cheapest insurance in the outdoor bbq kitchen. A $40 to $80 cover extends grill life by five to ten years. The cover should be vinyl-lined, not just polyester, and it should fit the grill specifically, not a generic "large grill" cover that flaps in the wind.
For the rest of the zone: cabinet doors shut, umbrellas stored or covered, cushions brought inside. Countertops left bare so they don't trap moisture underneath. Anything that holds water against a surface is what kills outdoor kitchens over winter, not the cold itself.
If you want a serving surface that survives winter without drama, lay a Nero Marquina black marble slab with white veining over the side counter as a year-round prep block. The dark marble reads as navy at dusk against white walls and a walnut shelf above, and the stone shrugs off freeze-thaw because it's dense and non-porous when sealed.
If you're not grilling November through February, drain the gas line at the shutoff. Water in the line freezes and cracks fittings.
A $5 foam insulating cover on the gas meter goes a long way. I've been doing this for eight years and never had a freeze failure.
A rustic zone with a heavy timber feel will age more gracefully than a slick modern one, because rustic hides weathering. If that's your direction, my rustic outdoor kitchen ideas guide walks through materials that look better at year five than at year one.
An honest take on building one of these
I've built five outdoor kitchens at this point. Three for clients, two for myself.
And the thing nobody tells you, the part I learned the hard way, is that the outdoor kitchen lives or dies on infrastructure, not aesthetics. Pretty stone won't save you from a gas leak you should have run before the pour. A fancy grill won't cook anything if the counter is at 34 inches and your back is shot by the second burger.
The other thing: most people massively overbuild for entertaining they don't do. If you host eight people a year, you don't need a $25,000 setup. You need a good grill, a 36-inch counter, lights that work past dark, and somewhere to put a drink while you cook.
That's a $3,000 mid-tier build, and it does the job better than a half-finished dream kitchen you'd never use.
The flipside is also true. If you cook outside three nights a week from April through October, you'll wear through a cheap grill in three years. Spend on the grill.
Spend on the counter. Spend on the lighting.
Skip the pizza oven until you've decided you want one. The worst outdoor kitchens I've seen are the ones where somebody spent the budget on a wood-fired oven they use twice a year, then cooked weeknights on a $200 big-box special that fell apart.
One more thing worth saying out loud. An outdoor bbq kitchen doesn't have to be a separate "outdoor room" at all.
Some of the best setups I've seen are a six-foot counter extension off the back of the house, a single grill, a string of lights, and a couple of stools. That's it.
That's a kitchen. The rest is just dressing. If you want the indoor-meets-outdoor version of that same idea, my indoor outdoor kitchen ideas guide shows how to keep the cooking flow continuous.
If you're starting from scratch, the smart play is to plan your utilities first, then build the structure around them. Gas line, water line if you want a sink, electrical for lights and a fridge, drainage for the sink if you're going that far.
Get those four pieces in before you pour a single slab. Everything else is just styling.
The full sequence is in my free DIY outdoor kitchen plans guide if you want a printable checklist.
The Questions Worth Answering First
What is the best outdoor bbq kitchen setup for a small backyard?
A 6-foot linear run with a 30-inch grill, a 36-inch counter at standard height, and a single bar stool does the job in tight spaces. Focus your spend on the grill and lighting; skip the pizza oven and masonry until you've cooked on the setup for a season. The small outdoor kitchen ideas guide has full layout breakdowns for backyards under 200 square feet.
Where can I buy outdoor kitchen pieces on a budget?
IKEA, Target's Threshold line, and Wayfair carry outdoor cabinetry, lighting, and furniture in the $200 to $800 range. For real deals, hit Facebook Marketplace and Craigslist for used Weber and Big Green Egg setups.
Most secondhand grills just need a deep clean and a new grate. You'll save 50% to 70% off retail. The full budget playbook is in the outdoor kitchen ideas on a budget guide.
How much does a full outdoor bbq kitchen makeover cost?
Budget refreshes (paint, hardware, planters, peel-and-stick backsplash) run $300 to $1,500. Mid-range rebuilds (new grill, cedar cabinetry, lighting, concrete counter, gas line) land at $3,000 to $12,000.
Full masonry builds with stone island, pizza oven, and built-in appliances start at $25,000 and climb past $60,000 for premium work. Most serious grill masters I know end up in the mid tier.
Can I build an outdoor bbq kitchen on a tight budget?
Yes, and the cheapest moves are the most underrated. Paint the ceiling haint blue (one can, $40). Add planters with herbs ($100). Run string lights at three heights ($150).
Mount a $30 bar shelf for drink staging. That's $320 and a Saturday, and the zone reads like a real kitchen. Skip the masonry and the pizza oven until the budget catches up. You can always add the oven later, but you can't un-spend the masonry budget!
If you want to pour a real cinder-block base for next to nothing, the DIY cinder block outdoor kitchen guide is the cheapest serious build I've seen.
Is an outdoor bbq kitchen worth it for serious grill masters?
Worth it, full stop. If you're already grilling three to four nights a week, an outdoor kitchen reduces indoor cleanup, expands your cooking capacity, and adds genuine living space from April through October.
The dwell time and use rate justify the spend more than they do for most home upgrades. Start at the mid-tier and resist the urge to overbuild.
Is an outdoor bbq kitchen a good idea for a rental?
Yes, with three no-damage swaps. A propane grill instead of a gas line (roll it in, roll it out).
Planters on casters for any cabinetry or herb garden. Tension-rod string lights instead of hardwired fixtures.
None of those touch the property, and the landlord can't argue with a roll-away setup. IKEA and Target both have renter-friendly outdoor pieces that pack flat for move-out.
How do you build an outdoor bbq kitchen on a deck?
You go lighter on the build and skip the masonry. A wood deck can't take the weight of a stone island, so use modular cabinets on casters, a propane grill you can roll, and planters for the herb garden. The deck-specific build sequence is in my outdoor kitchen on a deck guide and it covers load limits, joist spacing, and how to keep the deck from rotting under the zone.
Where I'd Start First
If I had to pick one, I'd start with the gas line. Without it, every other upgrade fights a propane swap-out mid-summer. Get the utilities in, even if you build nothing else yet.